Page 2 - “IMPORTANTES CONSIGNES DE SECURITE”; “CONSERVER CES INSTRUCTIONS”
“IMPORTANTES CONSIGNES DE SECURITE” Lors de l’utilisation de la machine à coudre, il convient de toujours suivre les consignes de sécurité essentielles et de prendre notamment les précautions suivantes: “Lire toutes les instructions avant d’utiliser la machine.” DANGER - Pour réduire le risque de dé...
Page 3 - CONTENTS; Table des matiéres
○○○○○○○○○○○○○○○○○○○○○○○○○○○○○○○○○○○○○○○○○○○○○○○ ○○○○○○○○○○○○○○○○○○○○○○○○○○○○○○○○○○○○○○○○○○○○○○○○○○ CONTENTS Page PRINCIPAL PARTS ................................................................... 1 PRINCIPAL PARTS ................................................................... 2 ACCESSORIES ......
Page 6 - ACCESORIOS; ACESSÓRIOS
○○○○○○○○○○○○○○○○○○○○○○○○○○○○○○○○○○○○○○○○○○○○○○○ ○○○○○○○○○○○○○○○○○○○○○○○○○○○○○○○○○○○○○○○○○○○○○○○○○○ 3 ACCESSORIES 1 Buttonhole foot (1 pc.) 2 Zipper foot (1 pc.) 3 Button sewing Foot (1 pc.) 4 Needle set (regular single needle No. 14) (3 pcs.) 5 Twin needle (1 pc.) 6 Bobbins (3 pcs.) 7 Darning plate ...
Page 7 - Connecting Plugs; FONCTIONNEMENT DE LA; Raccordement; FUNCIONAMIENTO DE LA MÁ-; Conexión de los enchufes; FUNCIONAMENTO DA SUA MÁ-; Tomadas de ligação
○○○○○○○○○○○○○○○○○○○○○○○○○○○○○○○○○○○○○○○○○○○○○○○ ○○○○○○○○○○○○○○○○○○○○○○○○○○○○○○○○○○○○○○○○○○○○○○○○○○ 4 OPERATING YOUR SEWING MACHINE Connecting Plugs 1. Insert the foot controller plug, located between the foot con- troller and the power supply plug on the cord, into the jack onthe machine. 2. Insert ...
Page 8 - Interrupteur principal et de la lampe; Interruptor de força e de iluminação; Interruptor principal y de luz
○○○○○○○○○○○○○○○○○○○○○○○○○○○○○○○○○○○○○○○○○○○○○○○ ○○○○○○○○○○○○○○○○○○○○○○○○○○○○○○○○○○○○○○○○○○○○○○○○○○ 5 Main Power and Sewing Light Switches This switch turns the main power and sewing light on or off. (See fig. A .) 1 Turn on (toward the “I” mark) 2 Turn off (toward the “O” mark) Foot Controller When ...
Page 9 - Inserting the Needle; Pour mettre l’aiguille en place; Inserción de la aguja; Checking the Needle; Comprobación de la aguja; Colocação da agulha; Verificação da agulha
○○○○○○○○○○○○○○○○○○○○○○○○○○○○○○○○○○○○○○○○○○○○○○○ ○○○○○○○○○○○○○○○○○○○○○○○○○○○○○○○○○○○○○○○○○○○○○○○○○○ 6 Inserting the Needle Turn power switch to “O”.1. Remove the power supply plug from the electrical outlet.2. Raise the needle bar to its highest position.3. Lower the presser foot.4. If a needle is al...
Page 10 - Changing the Presser Foot; Cambio del prensatelas; Troca do pé calcador
○○○○○○○○○○○○○○○○○○○○○○○○○○○○○○○○○○○○○○○○○○○○○○○ ○○○○○○○○○○○○○○○○○○○○○○○○○○○○○○○○○○○○○○○○○○○○○○○○○○ 7 Changing the Presser Foot It may be necessary to change the presser foot according to yoursewing needs. SNAP-ON TYPE Turn power switch to “O”.1. Raise the needle to its highest position by turning th...
Page 11 - Converting to Free-Arm Style; Modèle bras libre; Conversión en modalidad de brazo libre; Uso do braço livre; Steadying the Machine; Para estabilizar la máquina; Para estabilizar a máquina
○○○○○○○○○○○○○○○○○○○○○○○○○○○○○○○○○○○○○○○○○○○○○○○ ○○○○○○○○○○○○○○○○○○○○○○○○○○○○○○○○○○○○○○○○○○○○○○○○○○ 8 Converting to Free-Arm Style Free-Arm sewing is convenient for sewing tubular and hard-to-reach areas on garments. To change your machine to the free-armstyle, lift up on the extension table and pull...
Page 12 - VARIOUS CONTROLS; Pattern Selection Dial; DESCRIPTIF DES DIFFERENTES; DISTINTOS MANDOS; Selector de puntadas; CONTROLES DIVERSOS; Botão seletor de pontos
○○○○○○○○○○○○○○○○○○○○○○○○○○○○○○○○○○○○○○○○○○○○○○○ ○○○○○○○○○○○○○○○○○○○○○○○○○○○○○○○○○○○○○○○○○○○○○○○○○○ 9 VARIOUS CONTROLS Pattern Selection Dial To select a stitch, simply turn the pattern selection dial in eitherdirection. Stitch widths and lengths are shown on the followingpage. 1 Pattern selection di...
Page 13 - THREADING THE MACHINE; Winding the Bobbin; ENFILAGE DE LA MACHINE; Remplissage de la canette; Palanca de retroceso; Alavanca de retrocesso
○○○○○○○○○○○○○○○○○○○○○○○○○○○○○○○○○○○○○○○○○○○○○○○ ○○○○○○○○○○○○○○○○○○○○○○○○○○○○○○○○○○○○○○○○○○○○○○○○○○ 12 Reverse Sewing Lever To sew in reverse, press down the reverse sewing lever as far aspossible and hold it in that position while lightly stepping on thefoot controller. To sew forward, release the r...
Page 17 - Para sacar el hilo de la canilla; Para puxar o fio da bobina
○○○○○○○○○○○○○○○○○○○○○○○○○○○○○○○○○○○○○○○○○○○○○○○ ○○○○○○○○○○○○○○○○○○○○○○○○○○○○○○○○○○○○○○○○○○○○○○○○○○ 17 3 1 D E A B C 1 2 3 4 5 6 8 1 2 7 7 Drawing Up Lower (bobbin) Thread 1. Raise the presser foot and the needle to their highest positions.2. With your left hand, hold the end of the upper thread. Wit...
Page 18 - Couture avec l’aiguille jumelée
○○○○○○○○○○○○○○○○○○○○○○○○○○○○○○○○○○○○○○○○○○○○○○○ ○○○○○○○○○○○○○○○○○○○○○○○○○○○○○○○○○○○○○○○○○○○○○○○○○○ 18 Twin-Needle Sewing Your sewing machine is designed for twin-needle sewing whichallows you to sew using two upper threads. You can use the samecolor or two different colors of thread for decorative s...
Page 19 - Thread Tension; Tension des fils; Tensión de los hilos; Tensão da linha
○○○○○○○○○○○○○○○○○○○○○○○○○○○○○○○○○○○○○○○○○○○○○○○ ○○○○○○○○○○○○○○○○○○○○○○○○○○○○○○○○○○○○○○○○○○○○○○○○○○ 20 Thread Tension Thread tension will affect the quality of your stitches. It may needto be adjusted when you change fabric or thread type. NOTE: It is recommended that a test sample be made on a fabri...
Page 21 - TABLEAU DES COMBINAISONS TISSU/AIGUILLE/FIL
○○○○○○○○○○○○○○○○○○○○○○○○○○○○○○○○○○○○○○○○○○○○○○○ ○○○○○○○○○○○○○○○○○○○○○○○○○○○○○○○○○○○○○○○○○○○○○○○○○○ 22 RELATIVE CHART OF SEWING FABRICS, NEEDLES AND THREADS COMBINATIONS SEWING FABRICS NEEDLE SIZES THREAD SIZES VERY THIN LIGHTWEIGHT MEDIUM WEIGHT HEAVYWEIGHT KNITS Fine tricot, Fine lace, Thin linen, ...
Page 22 - Straight Stitching; Point droit; Puntada recta; Costurar com ponto reto
○○○○○○○○○○○○○○○○○○○○○○○○○○○○○○○○○○○○○○○○○○○○○○○ ○○○○○○○○○○○○○○○○○○○○○○○○○○○○○○○○○○○○○○○○○○○○○○○○○○ 24 Straight Stitching Pattern 6-10 (Center needle position) 11 (Left needle position) The Straight Stitch (6-10 or 11) is used for top stitching and sewinglightweight fabrics. Starting Sewing (fig. A) ...
Page 23 - Zigzag Stitching; Points zigzag; Puntadas zigzag; Ponto ziguezague
○○○○○○○○○○○○○○○○○○○○○○○○○○○○○○○○○○○○○○○○○○○○○○○ ○○○○○○○○○○○○○○○○○○○○○○○○○○○○○○○○○○○○○○○○○○○○○○○○○○ 26 Zigzag Stitching Pattern 2 (Zigzag Stitch) 3 (Zigzag Stitch) 4 (Zigzag Stitch) ZIGZAG STITCH Set the pattern selection dial to the appropriate Zigzag Stitch (2, 3or 4) with the desired width.It is r...
Page 24 - Blind Hem Stitching; Point élastique invisible; Puntadas invisibles; Embainhar com ponto invisível elástico
○○○○○○○○○○○○○○○○○○○○○○○○○○○○○○○○○○○○○○○○○○○○○○○ ○○○○○○○○○○○○○○○○○○○○○○○○○○○○○○○○○○○○○○○○○○○○○○○○○○ 27 Blind Hem Stitching Pattern 12 (Stretch Blind Stitch) The Stretch Blind Stitch is used to finish the edge of projects madewith stretch fabrics without the stitch showing.1. Set the pattern selection...
Page 25 - Elastic Stitching; Point élastique; Puntada elástica; Costura elástica
○○○○○○○○○○○○○○○○○○○○○○○○○○○○○○○○○○○○○○○○○○○○○○○ ○○○○○○○○○○○○○○○○○○○○○○○○○○○○○○○○○○○○○○○○○○○○○○○○○○ 28 Elastic Stitching Pattern 14 (Elastic Stitch) The Elastic Stitch can be used in 3 ways: mending, sewing elasticor joining fabric. Each is explained below.Set the pattern selection dial to 14. MENDIN...
Page 26 - Shell Tuck Stitching; Point picot; Puntada ondas; Ponto concha
○○○○○○○○○○○○○○○○○○○○○○○○○○○○○○○○○○○○○○○○○○○○○○○ ○○○○○○○○○○○○○○○○○○○○○○○○○○○○○○○○○○○○○○○○○○○○○○○○○○ 29 Shell Tuck Stitching Pattern 13 (Shell Tuck Stitch) The Shell Tuck Stitch can be used to sew a picot (lace-like) edgeon a lightweight fabric.1. Set the pattern selection dial to 13.2. Use a tighter ...
Page 27 - Making a Buttonhole; Création d’une boutonnière; Para coser ojales; Casear
○○○○○○○○○○○○○○○○○○○○○○○○○○○○○○○○○○○○○○○○○○○○○○○ ○○○○○○○○○○○○○○○○○○○○○○○○○○○○○○○○○○○○○○○○○○○○○○○○○○ 30 Making a Buttonhole Pattern Foot 1(b ac d) Buttonhole foot NOTE: 1. It is recommended to practice making a buttonhole on a scrap piece of fabric before attempting it on the actual garment. 2. When m...
Page 30 - Buttonhole Fine Adjustment; Equilibrage des boutonnières; Ajuste fino de los ojales; Ajuste do caseado
○○○○○○○○○○○○○○○○○○○○○○○○○○○○○○○○○○○○○○○○○○○○○○○ ○○○○○○○○○○○○○○○○○○○○○○○○○○○○○○○○○○○○○○○○○○○○○○○○○○ 34 Buttonhole Fine Adjustment If the stitching on the two sides of the buttonhole do not appearuniform, the following adjustments can be made.1. After sewing the left side of the buttonhole, stitch the...
Page 31 - Button Sewing; Pour coudre un bouton; Coser botones; Pregar botões
○○○○○○○○○○○○○○○○○○○○○○○○○○○○○○○○○○○○○○○○○○○○○○○ ○○○○○○○○○○○○○○○○○○○○○○○○○○○○○○○○○○○○○○○○○○○○○○○○○○ 35 Button Sewing Pattern Foot Other 2, 3 or 4 Button Sewing Foot Darning Plate 1. Measure the distance between the buttonholes and set the pat- tern selection dial to the Zigzag Stitch (2, 3 or 4) with...
Page 32 - Poner de cremalleras; Pregar zípers
○○○○○○○○○○○○○○○○○○○○○○○○○○○○○○○○○○○○○○○○○○○○○○○ ○○○○○○○○○○○○○○○○○○○○○○○○○○○○○○○○○○○○○○○○○○○○○○○○○○ 36 Zipper Insertion Pattern 6-10 (Straight Stitch) The zipper foot is used to sew on various types of zippers and caneasily be positioned to the right or left side of the needle.When sewing the right s...
Page 33 - Gathering; Pour froncer un tissu; Fruncido; Franzir
○○○○○○○○○○○○○○○○○○○○○○○○○○○○○○○○○○○○○○○○○○○○○○○ ○○○○○○○○○○○○○○○○○○○○○○○○○○○○○○○○○○○○○○○○○○○○○○○○○○ 37 4 A 1 2 3 B 4 Gathering Pattern 6-10 (Straight Stitch) 1. Set the pattern selection dial to the Straight Stitch (6-10) with the desired length. 2. Loosen the tension of the upper thread (to about 2)...
Page 34 - Zurcido
○○○○○○○○○○○○○○○○○○○○○○○○○○○○○○○○○○○○○○○○○○○○○○○ ○○○○○○○○○○○○○○○○○○○○○○○○○○○○○○○○○○○○○○○○○○○○○○○○○○ 38 Darning Pattern Foot Other 6-10 (Straight Stitch) None Darning Plate 1. Place the darning plate on the needle plate as shown in fig. A . 2. Set the pattern selection dial to the Straight Stitch (6-1...
Page 35 - Appliques; Aplicaciones; Aplicações decorativas
○○○○○○○○○○○○○○○○○○○○○○○○○○○○○○○○○○○○○○○○○○○○○○○ ○○○○○○○○○○○○○○○○○○○○○○○○○○○○○○○○○○○○○○○○○○○○○○○○○○ 39 Appliques Pattern 2, 3, 4, 5 (Zigzag Stitch) An applique is created by cutting a contrasting piece of fabric intoa shape to be used as a decoration on a garment or project.1. Baste the cut design to...
Page 36 - Monogramming and Embroidering; Monogrammes et broderies; Monogramas y bordados; Execução de monogramas e de bordados
○○○○○○○○○○○○○○○○○○○○○○○○○○○○○○○○○○○○○○○○○○○○○○○ ○○○○○○○○○○○○○○○○○○○○○○○○○○○○○○○○○○○○○○○○○○○○○○○○○○ 40 Monogramming and Embroidering Pattern Foot Other 2, 3, 4, 5 (Zigzag Stitch) None Darning Plate PREPARING FOR MONOGRAMMING AND EMBROIDERING 1. Place the darning plate on the needle plate.2. Set the p...
Page 38 - Changing the Bulb; Remplacement de l’ampoule; Cambio de la bombilla; Substituição da lâmpada
○○○○○○○○○○○○○○○○○○○○○○○○○○○○○○○○○○○○○○○○○○○○○○○ ○○○○○○○○○○○○○○○○○○○○○○○○○○○○○○○○○○○○○○○○○○○○○○○○○○ 42 Changing the Bulb 1. Remove the power supply plug from the electrical outlet.2. Loosen the face plate screw as shown in fig. A . 3. Remove the face plate from the machine as illustrated in fig. B . ...
Page 39 - Engrasado; Lubrificação; Nettoyage; Cleaning
○○○○○○○○○○○○○○○○○○○○○○○○○○○○○○○○○○○○○○○○○○○○○○○ ○○○○○○○○○○○○○○○○○○○○○○○○○○○○○○○○○○○○○○○○○○○○○○○○○○ 43 Oiling 1. Remove the power supply plug from the outlet.2. Put 2 to 3 drops of oil at each of the points indicated in fig. A . 3. After oiling, run the machine at a fast speed without thread installe...
Page 40 - Limpieza; Limpeza
○○○○○○○○○○○○○○○○○○○○○○○○○○○○○○○○○○○○○○○○○○○○○○○ ○○○○○○○○○○○○○○○○○○○○○○○○○○○○○○○○○○○○○○○○○○○○○○○○○○ 44 NOTE: When the needle is lowered, the shuttle hook cannot be removed. Cleaning the Shuttle Race 1. Remove any accumulated lint and thread with a brush from the retaining ring, hook, driver and race ...
Page 41 - Performance Checklist; Listado de posibles incidencias; Eventuais problemas e sua solução
○○○○○○○○○○○○○○○○○○○○○○○○○○○○○○○○○○○○○○○○○○○○○○○ ○○○○○○○○○○○○○○○○○○○○○○○○○○○○○○○○○○○○○○○○○○○○○○○○○○ 45 Cleaning the Feed Dogs 1. Remove the presser foot holder and the needle.2. Remove the needle plate using a coin or screwdriver to take out the screws. 3. Clean the lint from the upper part of the fe...
Page 44 - Embalaje de la máquina; Reembalagem da máquina; IMPORTANTE
○○○○○○○○○○○○○○○○○○○○○○○○○○○○○○○○○○○○○○○○○○○○○○○ ○○○○○○○○○○○○○○○○○○○○○○○○○○○○○○○○○○○○○○○○○○○○○○○○○○ 54 Repacking the Machine Keep the carton and packing materials for future use. It may be-come necessary to reship the sewing machine. Improper packingor improper packing material could result in damage...


 Notice Brother 1
 Notice Brother 750E
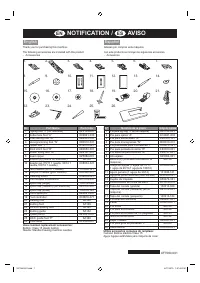 Mode d'emploi Brother DZ2400
 Mode d'emploi Brother FAX-T102
 Notice Brother HE-240
 Mode d'emploi Brother HL-5240
 Mode d'emploi Brother J14
 Mode d'emploi Brother JS23
 Mode d'emploi Brother LS-1217
 Mode d'emploi Brother LS-2125i
 Notice Brother PED-BASIC
 Mode d'emploi Brother PQ 1300
 Notice Brother PQ1500S