Electrolux XXLBOX14 - Manuel d'utilisation - Page 8
 2
2
 3
3
 4
4
 5
5
 6
6
 7
7
 8
8
 9
9
 10
10
 11
11
 12
12
 13
13
 14
14
 15
15
 16
16
 17
17
 18
18
 19
19
 20
20
 21
21
 22
22
 23
23
 24
24
 25
25
 26
26
 27
27
 28
28
 29
29
 30
30
 31
31
 32
32
 33
33
 34
34
 35
35
 36
36
 37
37
 38
38
 39
39
 40
40
 41
41
 42
42
 43
43
 44
44
 45
45
 46
46
 47
47
 48
48
 49
49
 50
50
 51
51
 52
52
 53
53
 54
54
 55
55
 56
56
 57
57
 58
58
 59
59
 60
60
 61
61
 62
62
 63
63
 64
64
 65
65
 66
66
 67
67
 68
68
 69
69
 70
70
 71
71
 72
72
 73
73
 74
74
 75
75
 76
76
 77
77
 78
78
 79
79
 80
80
 81
81
 82
82
 83
83
 84
84
 85
85
 86
86
 87
87
 88
88
 89
89
 90
90
 91
91
 92
92
 93
93
 94
94
 95
95
 96
96
 97
97
 98
98
 99
99
 100
100
 101
101
 102
102
 103
103
Table des matières:
- Page 7 – Español; Nunca pase la aspiradora:; Français; Precauções com cabos eléctricos:
- Page 9 – Introducción; Avant de commencer; Português; Antes de começar
- Page 11 – Logro de los mejores resultados; Comment obtenir les meilleurs résultats; Como obter os melhores resultados.
- Page 19 – Remplacement des filtres; Cambio de filtros; Cambio del filtro de salida de aire*; A substituição do filtro de exautão de saida
- Page 23 – Gestion des pannes; Solución de problemas; Resolução de problemas
8
* Certain models only. ** Execution depending on technology
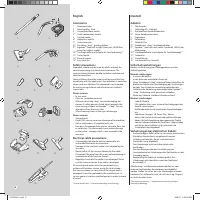
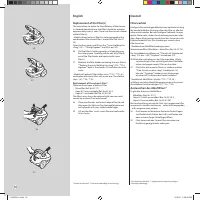
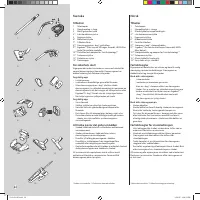
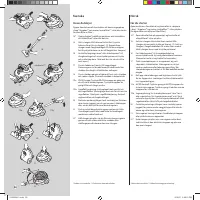
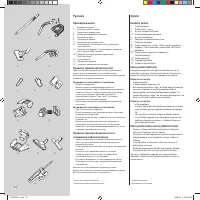
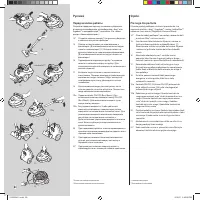
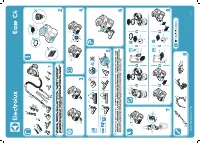
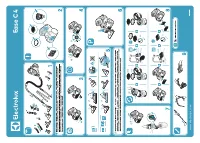
English
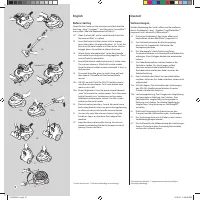
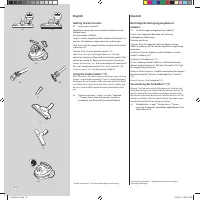
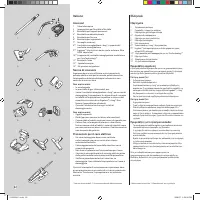
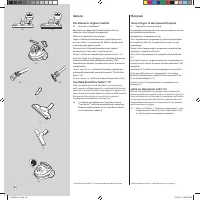
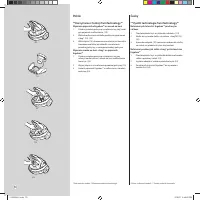
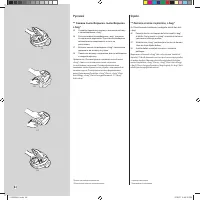
Before starting
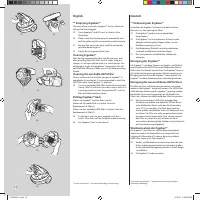
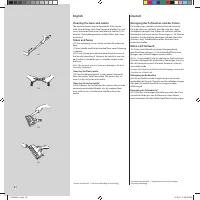
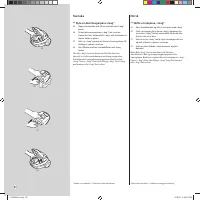
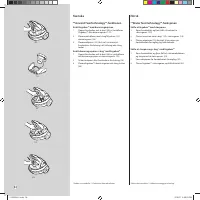
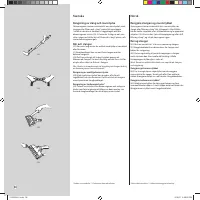
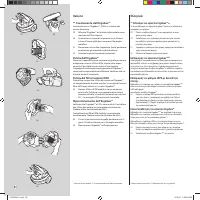
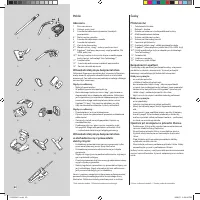
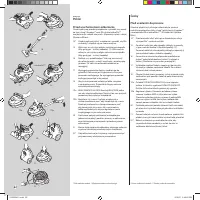
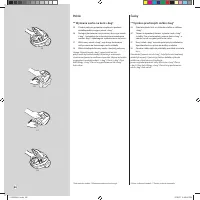
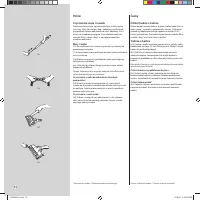
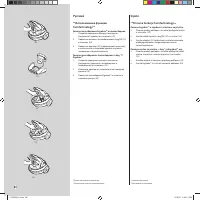
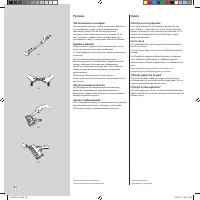
Open the front cover on the machine and check that the
dust bag, s-bag® / Ergobox™ , and the motor-/microfilter**
are in place. (See also Replacement of filter(s))
14* Open the back lid* on the machine and check that
the exhaust filter* is in place.
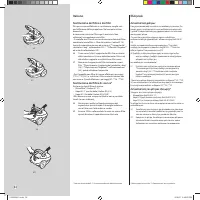
15 Insert the hose until the catches click to engage
(press the catches to release the hose). (2). Insert the
hose into the hose handle until the catches click to
engage (press the catches to release the hose).
16 Attach the or telescopic tube* to the hose handle
and nozzle by pushing and twisting together. (Twist
and pull apart to dismantle.)
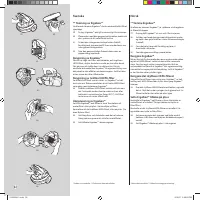
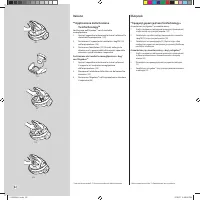
17 Extend the electric cable and connect it to the mains.
The vacuum cleaner is fitted with a cable winder.
Once the electric cable has been extended, it stays in
that position.
18 To rewind the cable, give it a slight sharp pull and
then release. The cable will then automatically
rewind.
19a ON/OFF control: Push the ON-OFF button once to
start the vacuum cleaner. Push same button once
more to turn it off.
19b Power Regulation: Twist the power control towards
„max” to increase the suction power. Twist the power
control towards „min” to decrease suction power.
Additional suction power control: Use the suction
control on the hose handle.
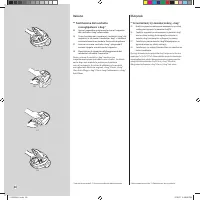
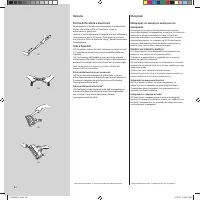
20 Practical parking positions (and at the same time a
backsaving feature) when you pause during cleaning
or when you carry and store the vacuum cleaner.
21 You can also carry the vacuum cleaner using the
handle on top or on the lower front edge of the
machine.
22* Keep the hose in place while storing the vacuum
cleaner by extending the elastic bumper cord and
placing it across the hose
cordmatic™
14.
15.
16.
17.
18.
19a.
19b.
21.
22.
20.
Deutsch
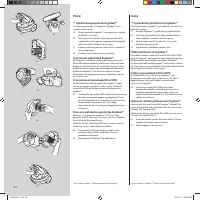
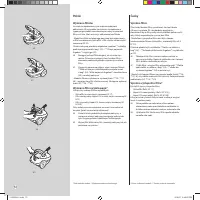
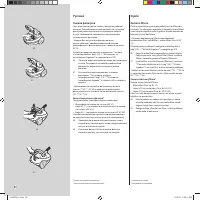
Vorbereitungen
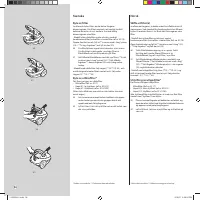
Vordere Abdeckung des Geräts öffnen und kontrollieren,
ob ein Staubbeutel, s-bag® / Ergobox™ und Motorfilter**
eingesetzt sind (siehe auch „Filterwechsel“.)
14
Die hintere Abdeckung* des Geräts öffnen und
kontrollieren, ob der Abluftfilter* eingesetzt ist.
15
Den Schlauch einsetzen, bis die Verriegelung
einrastet. Zur Freigabe des Schlauches die
Verriegelung drücken.
16
Das Teleskoprohr* durch Drehen und festes
Zusammenschieben an Schlauchgriff und Bodendüse
anbringen. (Zum Zerlegen drehen und auseinander
ziehen.)
17
Das Kabel herausziehen und den Stecker in die
Steckdose stecken. Der Staubsauger verfügt
über eine automatische Kabelaufwicklung.
Nach dem Herausziehen des Kabels arretiert die
Kabelaufwicklung.
18
Zum Aufwickeln des Kabels kurz am Kabel ziehen
und dann loslassen. Das Kabel wird dann automatisch
aufgewickelt.
19a EIN/AUS-Regler: Zum Einschalten des Staubsaugers
den EIN/AUS-Schalter einmal drücken. Erneutes
Drücken schaltet das Gerät aus.
19b Leistungsregulierung: Zum Steigern der Saugleistung
Leistungsregler in Richtung „max“ drehen. Zum
Reduzieren der Saugleistung Leistungsregler in
Richtung „min“ drehen. Zusätzliche Regelung der
Saugleistung: Saugsteuerung am Schlauchgriff*
einstellen.
20
Praktische Parkposition für Arbeitspausen, den
Transport und die Aufbewahrung des Staubsaugers.
21
Der Staubsauger kann am Griff oder an der unteren
Vorderkante getragen werden.
22* Den Schlauch für die Aufbewahrung des Staubsaugers
fixieren. Dazu elastischen Gummizug herausziehen
und um den Schlauch ziehen.
* Nur bestimmte Modelle. ** Vorgehensweise von der jeweiligen
Technologie abhängig
2192924-01.indd 8
2/13/07 4:39:46 PM
„Téléchargement du manuel“ signifie que vous devez attendre que le fichier soit complètement chargé avant de pouvoir le lire en ligne. Certains manuels sont très volumineux, et le temps de chargement dépend de la vitesse de votre connexion Internet.
Résumé
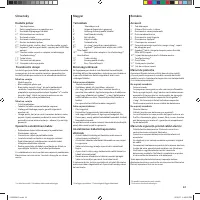
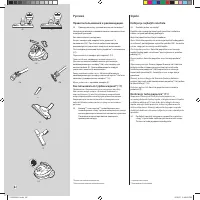
7 Español Accesorios 1 Tubo telescópico 2 Mango del tubo flexible y tubo flexible 3 Boquilla para alfombras y superficies duras 4 * Boquilla pequeña combinada 5 Boquilla para espacio estrechos 6* Boquilla para tapicerías 7* Pinza para accesorios 8** Bolsa s-bag® para polvo y soporte de la b...
9 Español Introducción Abra la tapa delantera del aparato y compruebe que la bolsa s-bag® o el Ergobox™ y el microfiltro del motor** están colocados correctamente (consulte también el apartado sobre el cambio de filtros).14* Abra la tapa posterior* del aparato y compruebe que el filtro de salida d...
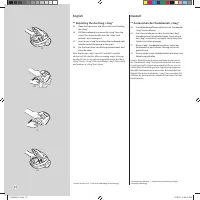
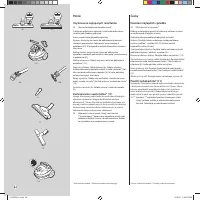
11 Español Logro de los mejores resultados 23 Accesorios incluidos*Boquilla para tapicería y boquilla para espacios estrechos, situadas debajo de una tapa plegable.Utilice las boquillas tal y como se describe a continuación: Alfombras: utilice la boquilla para alfombras/superficies duras con la pal...
Autres modèles de aspirateurs Electrolux
-
 Electrolux Clario
-
 Electrolux Clario 2001MN
-
 Electrolux EC41-2SW
-
 Electrolux EC41-4T
-
 Electrolux EC41-ANIM
-
 Electrolux EC41-H2SW
-
 Electrolux EER73DB
-
 Electrolux EER73IGM
-
 Electrolux EHVS2510AW
-
 Electrolux EHVS3510AR