GE GFD55ESPRRS - Mode d'emploi
Séchoir GE GFD55ESPRRS - Mode d'emploi, à lire gratuitement en ligne au format PDF. Nous espérons que cela vous aidera à résoudre toutes les questions que vous pourriez avoir. Si vous avez encore des questions, contactez-nous via le formulaire de contact.


32
49-3000206 Rev 5
Installation Instructions
REVERSING THE DOOR SWING (Optional)
IMPORTANT NOTES
• Handle parts carefully to avoid scratching paint.
• Provide a non-scratching work surface for the door.
• Set screws down by their related parts to avoid using
them in the wrong places.
•
Once you begin, do not move the cabinet until
door-swing reversal is completed.
•
These instructions are for changing the hinges from the
right side to the left side—if you ever want to switch them
back to the right side, follow these same instructions and
reverse all references to the left and right.
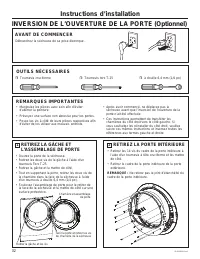
REMOVE THE STRIKE PLATE
AND DOOR ASSEMBLY
•
Open the dryer door.
•
Remove the two screws from the strike plate using
a T-25 torx driver.
•
Remove the strike plate and set it aside.
•
While supporting the door, remove the two screws
from the hinge in the dryer face using a 1/4” (6.4 mm)
nut driver.
•
Lift the door assembly to remove it from the dryer
face and set it aside on a protective surface.
1
Phillips-head screwdriver
T-25 torx driver
1/4” (6.4 mm) nut driver
TOOLS YOU WILL NEED
BEFORE YOU START
Unplug the dryer from its electrical outlet.
REMOVE THE INNER DOOR
•
Remove the 14 screws from the inner door frame
using a Phillips-head screwdriver and set them aside.
•
Remove the inner door frame from the outer door.
NOTE:
Do not remove the gasket from the inner door
frame.
2
Hold the Door and
Remove Hinge Screws
from the Dryer
Remove Strike
Plate and Screws
Hinge and Door
Assembly
« Chargement du manuel » signifie que vous devez attendre que le fichier soit complètement chargé avant de pouvoir le lire en ligne. Certains manuels sont très volumineux, et le temps de chargement dépend de la vitesse de votre connexion Internet.
Ce manuel vous a-t-il été utile ?
À propos de ce manuel
- Marque
- GE
- Modèle
- GFD55ESPRRS
- Type de document
- Mode d'emploi
- Catégorie
- Séchoir
- Langue(s)
- Anglais, Espagnol, Français
- Pages
- 47
- Taille du fichier
- 13,5 MB
- Format
Poser une question
Manuels associés
Plus de modèles séchoirs GE
 Mode d'emploi GE GFD14ESSNWW
 Mode d'emploi GE GFD55ESSNWW
 Mode d'emploi GE GFD55GSSNWW
 Mode d'emploi GE GFD65ESPVDS
 Mode d'emploi GE GFD65ESSVWW
 Mode d'emploi GE GFD65GSPVDS
 Mode d'emploi GE GFD65GSSVWW
 Mode d'emploi GE GFD85ESPNRS
 Mode d'emploi GE GFD85ESSNWW
- Mode d'emploi GE GFD85GSPNRS
 Mode d'emploi GE GFT14ESSMWW
- Mode d'emploi GE GFV55ESSNWW
 Mode d'emploi GE PFD95ESPTDS