GE GTS18HYNRFS - Manuel d'utilisation - Page 5


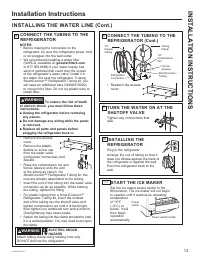
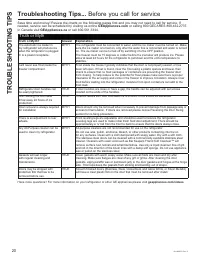


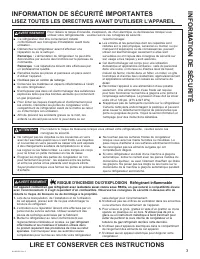

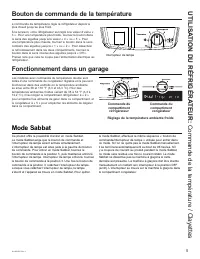


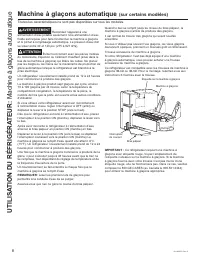

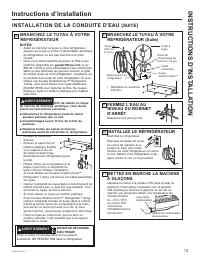


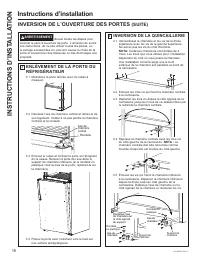


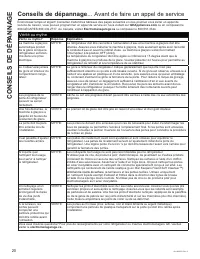

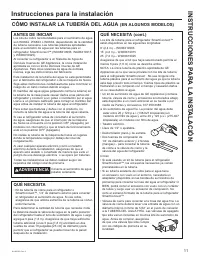

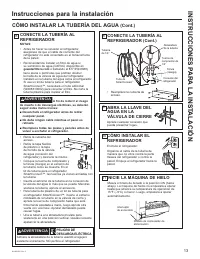
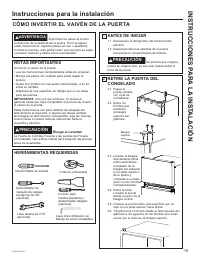
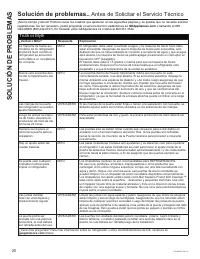
Table des matières:
- Page 7 – RÉFRIGÉRATEUR; Congélateur au sommet
- Page 8 – NOUS VOUS REMERCIONS D’ACCUEILLIR GE APPLIANCES CHEZ VOUS; sommes heureux de vous accueillir dans notre famille.
- Page 10 – BRANCHEMENTS ÉLECTRIQUES; RISQUE DE CHOC ÉLECTRIQUE; INFORMA; MISE AU REBUT APPROPRIÉE DE VOTRE ANCIEN RÉFRIGÉRATEUR; RISQUE DE SUFFOQUER OU D’Y ÊTRE EMPRISONNÉ; Mise au rebut des produits réfrigérants et en mousse; RISQUE D’INCENDIE OU D’EXPLOSION
- Page 12 – Clayettes pleine largeur
- Page 13 – Tiroir et du couvercle; Enlèvement du bac de rangement; Pour remettre les bacs:; Bacs de rangement
- Page 20 – INSTALLATION DE LA POIGNÉE; ÉCUSSON ET LE BOUCHON; POIGNÉE EN PLASTIQUE
- Page 21 – INVERSION DE L’OUVERTURE DES PORTES; ENLÈVEMENT DE LA PORTE DU; OUTILS REQUIS; Portes pesantes
- Page 23 – INVERSION DES POIGNÉES DE PORTE
- Page 24 – REMISE EN PLACE DES PORTES
- Page 25 – CRAQUEMENTS et; CONSEILS DE DÉP; Bruits normaux de fonctionnement
- Page 28 – Soutien au consommateur; SOUTIEN AU
49-1000478 Rev. 2
13
INST
ALLA
TION INSTRUCTIONS
Installation Instructions
INSTALLING THE WATER LINE (Cont.)
8
CONNECT THE TUBING TO THE
REFRIGERATOR
NOTES:
•
Before making the connection to the
refrigerator, be sure the refrigerator power cord
is not plugged into the wall outlet.
•
We recommend installing a water filter
*;5/4DYDLODEOHRQ
gewaterfilters.com
or 877.959.8688) if your water supply has
sand or particles that could clog the screen
RIWKHUHIULJHUDWRU¶VZDWHUYDOYH,QVWDOOLWLQ
WKHZDWHUOLQHQHDUWKHUHIULJHUDWRU,IXVLQJ
6PDUW&RQQHFW5HIULJHUDWRU7XELQJNLW\RX
ZLOOQHHGDQDGGLWLRQDOWXEH:;;
WRFRQQHFWWKHILOWHU'RQRWFXWSODVWLFWXEHWR
install filter.
WARNING
To reduce the risk of death
or electric shock, you must follow these
instructions:
Ŷ
Unplug the refrigerator before removing
any panels.
Ŷ
Do not damage any wiring while the panel
is removed.
Ŷ
Replace all parts and panels before
plugging the refrigerator back in.
•
Remove the access
cover.
•
Remove the plastic
flexible or screw cap
from the water valve
(refrigerator connection) and
discard.
•
Place the compression nut and
ferrule (sleeve) onto the end
of the tubing as shown. On
6PDUW&RQQHFW5HIULJHUDWRU7XELQJNLWWKH
nuts are already assembled to the tubing.
,QVHUWWKHHQGRIWKHWXELQJLQWRWKHZDWHUYDOYH
connection as far as possible. While holding
the tubing, tighten the fitting.
)RUSODVWLFWXELQJIURPD6PDUW&RQQHFW
Refrigerator Tubing kit, insert the molded
end of the tubing into the shutoff valve and
tighten compression nut until it is hand tight,
then tighten one additional turn with a wrench.
Overtightening may cause leaks.
•
Fasten the tubing into the clamp provided to hold
it in a vertical position. You may need to pry open
the clamp.
9
TURN THE WATER ON AT THE
SHUTOFF VALVE
Tighten any connections that
leak.
8
CONNECT THE TUBING TO THE
REFRIGERATOR (Cont.)
•
Reattach the access
cover.
Tubing
Clamp
´
Compression
Nut
Ferrule
(sleeve)
SmartConnect
Tubing
Refrigerator
Connection
´
Copper
Tubing
10
INSTALLING THE
REFRIGERATOR
Plug in the refrigerator.
Arrange the coil of tubing so that it
does not vibrate against the back of
the refrigerator or against the wall.
Push the refrigerator back to the
wall.
11
START THE ICE MAKER
Set the ice maker power switch to the
0N position. The ice maker will not begin
to operate until it reaches its operating
temperature
of 15°F
(–9°C) or
EHORZ,WZLOO
then begin
operation
automatically.
ON OFF
Power
switch
Power switch model
WARNING
ELECTRIC SHOCK
HAZARD
Attach tubing clamp using existing hole only.
'2127GULOOLQWRWKHUHIULJHUDWRU
„Téléchargement du manuel“ signifie que vous devez attendre que le fichier soit complètement chargé avant de pouvoir le lire en ligne. Certains manuels sont très volumineux, et le temps de chargement dépend de la vitesse de votre connexion Internet.
Résumé
MESURES DE SÉCURITÉ . . . . . . . . . 3 Instructions de fonctionnement Bouton de commande de la température . 5 Fonctionnement dans un garage . . . . . . . . . 5 Mode Sabbat . . . . . . . . . . . . . . . . . . . . . . . . . . 5 Clayettes du compartiment réfrigérateur . .6 Clayettes du compartimen...
2 49-1000478 Rev. 2 NOUS VOUS REMERCIONS D’ACCUEILLIR GE APPLIANCES CHEZ VOUS Que vous ayez grandi avec GE Appliances ou qu’il s’agisse de votre première acquisition, nous sommes heureux de vous accueillir dans notre famille. Nous sommes fiers du savoir-faire, de l’innovation et de l’esthétique qui...
4 49-1000478 Rev. 2 Ne coupez pas ou n’enlevez pas, sous aucun prétexte, la troisième broche de mise à la terre du cordon d’alimentation. Pour des raisons de sécurité, cet appareil doit être correctement mis à la terre. Le cordon d’alimentation de cet appareil est équipé d’une fiche à trois broches ...
Autres modèles de réfrigérateurs GE
-
 GE GFD28GELDS
-
 GE GFD28GYNFS
-
 GE GFE28GELDS
-
 GE GFE28GYNFS
-
 GE GIE17GSNRSS
-
 GE GIE18DTNRBB
-
GE GIE18DTNRWW
-
 GE GIE18GCNRSA
-
GE GIE18GSNRSS
-
GE GIE18GTNRBB