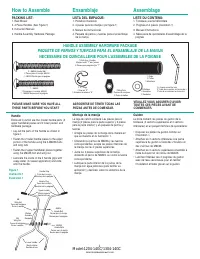
Page 2 - de la manija; Assemblage; poignée; HANDLE ASSEMBLY HARDWARE PACKAGE; PAQUETE DE PERNOS Y TUERCAS PARA EL ENSAMBLAJE DE LA MANIJA; NECESSAIRE DE QUINCAILLERIE POUR L’ASSEMBLEE DE LA POIGNEE; Handle; Figure 1; Ilustración 1; Illustration 1
How to Assemble PACKING LIST: 1. Reel Mower2. 4 Piece Handles (See Figure 1)3. Instruction Manual4. Handle Assembly Hardware Package Ensamblaje LISTA DEL EMPAQUE: 1. Podadora mecánica2. 4 piezas para las manijas (ver figura 1)3. Manual de instrucciones4. Paquete de pernos y tuercas para el ensamblaj...
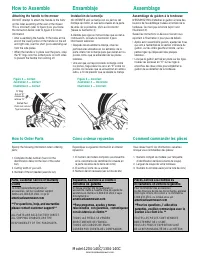
Page 3 - How to Assemble; Attaching the handle to the mower; Ensamblaje; Instalación de la manija; Assemblage du guidon à la tondeuse; How to Order Parts; notre ligne directe du soutien à la clientèle au; Figure 2 — Correct; Ilustración 2 — Correct; Illustration 2 — Correct; Figure 3 — Incorrect; Ilustración 3 — Incorrecto; Illustration 3 — Incorrect; Comment commander les piè ces
How to Assemble Attaching the handle to the mower DO NOT attempt to attach the handle to the boltson the roller assembly at the rear of the mower.This is incorrect! (refer to figure 3) As you followthe instruction below, refer to figure 2 for moreinformation. • After assembling the handle, fit the h...
Page 4 - Kits List Lista de Kits Liste des kits; Description; descripción; description; Ilustración; Illustration; Nécessaire de quincaillerie d’assemblage de
4 Americanlawnmower.com 1 RM14-HK-1 3 RM-WK8.5-1 5 RM-GPK-1 6 RM14-RAK-1 Kit # Kit# # Kit# Kits List Lista de Kits Liste des kits 8.5" Light gray Wheel Kit Kit de rueda gris claro de 8.5” Trousse de roue gris clair de 21,59 cm (8.5 po) Gear and Pawl Kit Kit de engranaje y trinquete Trousse d’eng...
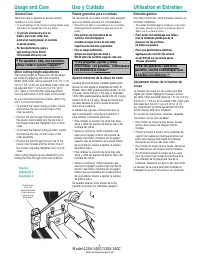
Page 5 - Figure 4; Ilustración 4; Illustration 4; Usage and Care; General Care; Pautas generales para el cuidado; Entretien général; To prevent unnecessary wear on
Minor cutting height adjustments The cutting height on these units can be adjust-ed simply by adjusting the roller assembly.Model 1204-14GC can be adjusted from 1/2" (1.27cm) to 1 3/4" (4.45 cm) and Model 1304-14GC canbe adjusted from 1" (2.54 cm) to 2 1/4" (5.72cm). Keep in mind tha...
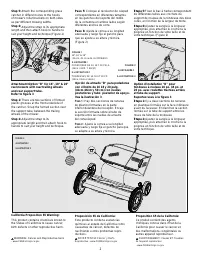
Page 6 - Figure 5; Ilustración5; Illustration 5; Do not adjust unless absolutely needed.
6 Americanlawnmower.com Figure 5 Ilustración5 Illustration 5 Front Anterior Avant Rear Posterior Arrière Adjusting Screws Tornillos de ajuste Ecrous d'ajustement Usage and Care Mower blade adjustment The blades have been preadjusted before leavingthe factory. Misalignment can occur resulting in blad...
Page 7 - Sharpening the cutting blades; Pour aiguiser les lames; Ilustración 6
Usage and Care Uso y Cuidado Utilisation et Entretien Sharpening the cutting blades When the mower is properly lubricated andadjusted, sharpening should not be necessaryfor several years. However, the following stepswill allow you to do the procedure yourself atrelatively little expense. • Remove th...
Page 8 - California Proposition 65 Warning:; ANY; ççç; propulsion non manuelle utilisée dans
8 Americanlawnmower.com WARNING: Some dust and debris created by the use of this tool could contain chemicals known to the State of California to cause cancer and birth defects or other reproductive harm. Some examples of these chemicals are:• chemicals in fertilizers• compounds in insecticides, her...
Page 10 - Refer to figure 3; Proposición 65 de California:
ñ Attachment Option "B" for 16", 18" & 20"reel mowers with rear trailing wheels and rear support tube. Refer to figure 3 There are two sections of formed plastic grooves at the front underside ofthe catcher. Snap the formed section over the support tube, between the trailing ...