Page 4 - Schlitzschraubendreher.; Benodigd gereedschap
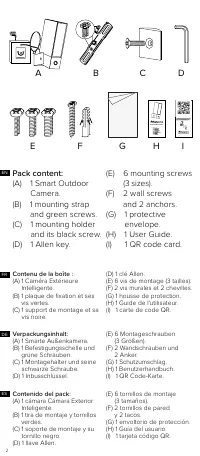
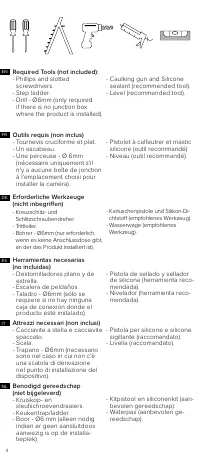
4 NL IT ES DE FR EN Required Tools (not included): - Phillips and slotted screwdrivers. - Step ladder. - Drill - Ø6mm (only required if there is no junction box where the product is installed). - Caulking gun and Silicone sealant (recommended tool). - Level (recommended tool). Herramientas necesaria...
Page 8 - OK; Pick a spot on the wall to install; Check with your smartphone that you have; Wählen Sie eine Stelle , um die Smarte Außenkamera an der
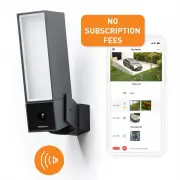
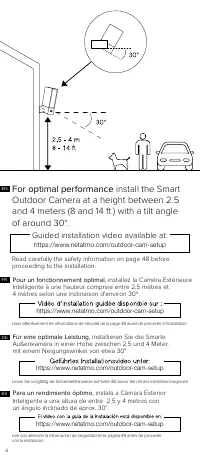
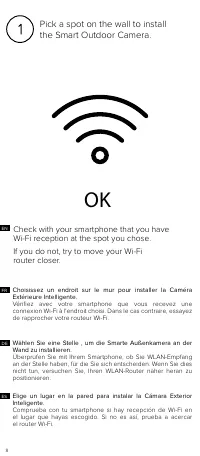
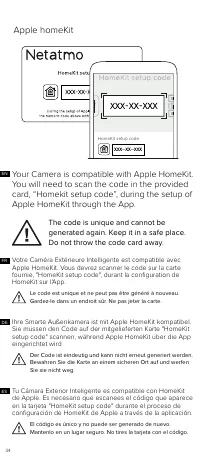
8 OK Pick a spot on the wall to install the Smart Outdoor Camera. Check with your smartphone that you have Wi-Fi reception at the spot you chose.If you do not, try to move your Wi-Fi router closer. Wählen Sie eine Stelle , um die Smarte Außenkamera an der Wand zu installieren. Überprüfen Sie mit Ihr...
Page 12 - Prepare the installation.; Bereiten Sie die Installation vor.
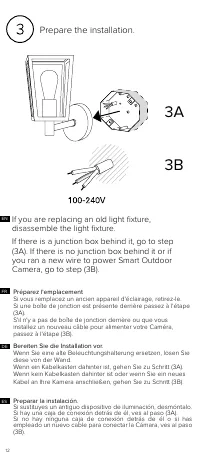
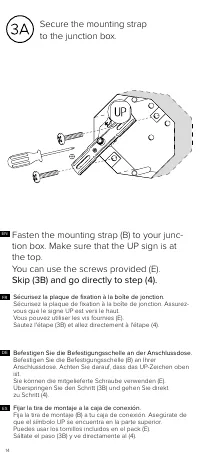
12 If you are replacing an old light fixture, disassemble the light fixture. If there is a junction box behind it, go to step (3A). If there is no junction box behind it or if you ran a new wire to power Smart Outdoor Camera, go to step (3B). FR DE ES Prepare the installation. Bereiten Sie die Insta...
Page 16 - Drill two holes above and to the left of the; Fijar la tira de montaje a la pared.
16 Secure the mounting strap to the wall. ES DE FR Drill two holes above and to the left of the power cable and secure the mounting strap as shown in the picture.You can use the screws and anchors provided (F) or others that are better suited for your wall.Make sure that the UP sign is at the top. F...
Page 20 - Conectar los cables.
20 Connect the wires. Use the wire terminal behind the plate. Blue/White (NEUTRAL) supply wire to Blue wire Brown/Black (HOT) supply wire to Brown wire Yellow and Green (GROUND) supply wire to Yellow and Green wire Make sure the ground (GND) wire from the wire terminal is also screwed to the mountin...
Page 22 - Align the central holes of the wall plate with those; Sécurisez le boîtier mural sur la plaque de fixation.
22 Secure the plate on the mounting strap. ES DE FR Align the central holes of the wall plate with those of the mounting strap and pass the green screw through one of the holes of the “U” shaped guide. Then turn the plate horizontal (use a level if needed) and fasten the green screw tight. Sécurisez...
Page 24 - Secure the camera; Use the provided mounting holder and black; Fijar la cámara a la placa.
24 Secure the camera to the plate. ES DE Use the provided mounting holder and black screw (C) to secure the camera to the mounting strap and plate.You can now cut and remove the wire tie and the protective envelope. Fijar la cámara a la placa. Utiliza el soporte de montaje y el tornillo negro sumini...
Page 26 - Neigen Sie die Kamera, um das Video aus dem richtigen; Inclina la cámara para grabar vídeos desde el ángulo correcto.; Inclinez correctement la caméra pour filmer la zone à; Use the Allen key (D) to untighten the screws
26 Tilt the camera to record video from the correct angle. DE Neigen Sie die Kamera, um das Video aus dem richtigen Winkel aufzunehmen. Verwenden Sie den Inbusschlüssel (D), um die Schrauben an der Seite oder Rückseite zu lösen, um die Kamera zu kippen. Stellen Sie sicher, dass Sie sie danach richti...
Page 28 - The Smart Outdoor Camera will start for the first
28 Reconnect the power. ES DE Schließen Sie sie wieder ans Netz an. Die Smarte Außenkamera startet zum ersten Mal und das Licht geht an. Dies kann eine Minute dauern. Wenn das Licht nicht angeht, gehen Sie zu Seite 35 für Ratschläge zur Fehlerbehebung. Rétablissez le courant. La Caméra Extérieure In...
Page 30 - Schützen Sie die Verdrahtung.
30 Protect the wiring. ES DE FR We recommend that you caulk the mounting surface on the top and sides of the plate with silicone weather sealant.Leave bottom unsealed so moisture can drain out. Schützen Sie die Verdrahtung. Wir empfehlen Ihnen, dass Sie die Montagefläche auf der Oberseite und an den...
Page 32 - To set up your Camera from your smartphone or; netatmo security
32 Téléchargez l'application. Pour configurer votre Caméra de votre smartphone ou tablette, rendez-vous sur netatmo.com/outdoor-cam-setup. La Caméra Extérieure Intelligente ne peut pas être configurée depuis un ordinateur. FR To set up your Camera from your smartphone or tablet, go to netatmo.com/ou...
Page 34 - Apple homeKit; Your Camera is compatible with Apple HomeKit.
34 Apple homeKit EN Your Camera is compatible with Apple HomeKit. You will need to scan the code in the provided card, “Homekit setup code”, during the setup of Apple HomeKit through the App. The code is unique and cannot be generated again. Keep it in a safe place. Do not throw the code card away. ...
Page 50 - Legal notice
52 FCC Statement This equipment has been tested and found to comply with the limits for a Class B digital device, pursuant to part 15 of the FCC rules. These limits are designed to provide reasonable protection against harmful interference in a residential installation. This equipment generates, use...
Page 52 - 无线连接; ワイヤレス接続
54 Canadian Compliance Statement This device complies with Industry Canada license-exempt RSS standard(s). Operation is subject to the following two conditions: (1) this device may not cause interference, and (2) this device must accept any interference, including interference that may cause undesir...