Philips AJ3600/37 - Guide rapide

Philips AJ3600/37 - Guide rapide, à lire gratuitement en ligne au format PDF. Nous espérons que cela vous aidera à résoudre toutes les questions que vous pourriez avoir. Si vous avez encore des questions, contactez-nous via le formulaire de contact.
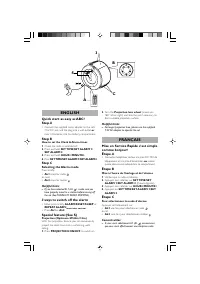
SET
TIME
H
O
U
R
+
S
ET
AL
AR
M
1
SET
AL
AR
M
2
M
IN
U
T
E
+
PRESET 1- 5
1
2
3
4
5
4XAA/R6/UM3 1.5V
S
C
B
3
A
DC 7.5V
ENGLISH
Quick start as easy as ABC!
Step
A
•
Connect the supplied mains adapter to the set’s
7.5V DC jack and the plug into a wall outlet
or
inser t 4 batteries into the batter y compar tment.
Step
B
How to set the Clock & Alarm times
1
.
Check the radio is switched off.
2
.
Press and hold
SET TIME
/
SET ALARM 1
/
SET ALARM 2
.
3
.
Press and hold
HOUR+
/
MINUTE+
.
4
.
Press
SET TIME
/
SET ALARM 1
/
SET ALARM 2
.
Step
C
Selecting the Alarm mode
Press briefly:
• AL1
once for radio
or /and
• AL2
once for buzzer
Helpful hints:
–
If you have selected AL1 (AL ) , make sure you
have properly tuned to a station before turning off
the set (See TUNING TO RADIO STATIONS)
.
3
ways to switch off the alarm
•
Either press briefly:
ALARM RESET/SLEEP
or
REPEAT ALARM
/
BRIGHTNESS CONTROL
.
•
Press
AL1
or
AL2
.
Special feature:(See S)
Projection (Optimum: Within 2.5m)
With this projection feature, you can conveniently
project the clock time onto a surface e.g. walls,
ceiling.
1
.
Press
PROJECTION ON/OFF
to switch on.
2
.
Turn the
Projection lens wheel
(maximum
180º left or right) and also the set, if necessar y, to
find a suitable projection surface.
Helpful hints:
–
For longer projection time, please use the supplied
7.5V AC adapter to operate the set.
FRANÇAIS
Mise en Service Rapide c’est simple
comme bonjour!
Étape
A
•
Connectez l’adaptateur secteur à la prise DC 7.5V de
l’équipement et à la prise d’alimentation
ou
insérez
quatre piles comme indiqué dans ce compartiment.
Étape
B
Mise à l’heure de l’horloge et de l’alarme
1
.
Vérifiez que la radio est éteinte.
2
.
Appuyez sans relâcher sur
SET TIME
/
SET
ALARM 1
/
SET ALARM 2
. (l’heure clignote)
3
.
Appuyez sans relâcher sur
HOUR+
/
MINUTE+
.
4
.
Appuyez sur
SET TIME
/
SET ALARM 1
/
SET
ALARM 2
.
Étape
C
Pour sélectionner le mode d’alarme
Appuyez soit brièvement sur :
• AL1
une fois pour sélectionner radio .
ou /et
• AL2
une fois pour sélectionner ronfleur .
Conseils utiles:
–
Si vous avez sélectionné AL1 (AL ), assurez-vous
que vous avez effectivement une réception radio
„Téléchargement du manuel“ signifie que vous devez attendre que le fichier soit complètement chargé avant de pouvoir le lire en ligne. Certains manuels sont très volumineux, et le temps de chargement dépend de la vitesse de votre connexion Internet.