Philips HD4952/40 - Manuel d'utilisation

Philips HD4952/40 - Manuel d'utilisation, à lire gratuitement en ligne au format PDF. Nous espérons que cela vous aidera à résoudre toutes les questions que vous pourriez avoir. Si vous avez encore des questions, contactez-nous via le formulaire de contact.
www.philips.com/w
elcome
User manual
HD4911
www.philips.com/w
elcome
Safety leaflet
HD4911
www.philips.com/w
elcome
Warranty
HD4911
10cm
10cm
c
a
b
d
e
f
g
h
i
j
k
l
m
n
o
On/Off
On/Off
On/Off
On/Off
3 Sec
3 Sec
1
2 3 4 5 6 7 8 9
10
1
2 3 4 5 6 7 8 9
10
EN User manual
DE Benutzerhandbuch
ES Manual del usuario
FR Mode d’emploi
IT Manuale utente
RU
Руководство пользователя
Specifications are subject to change without notice.
© 2013 Koninklijke Philips Electronics N.V.
All rights reserved.
HD4952_UM_V2.0_130428
Register your product and get support at
www.philips.com/welcome
HD4952
English
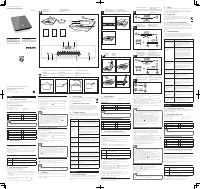
1 Your induction cooker
Congratulations on your purchase and welcome to Philips! To fully
benefit from the suppor t that Philips offers, register your product at
www.philips.com/welcome.
2 What’s in the box
Induction cooker main unit
Pot (depending on countries)
Safety leaflet
User manual
Warranty card
Overview
a
Cooking plate
d
Control panel
b
Cooking zone
e
Air outlets
c
Air inlet
f
Power cord
Note
•
It is normal for the color of the cooking plate to differ slightly from
one unit to another.
Controls overview
g
Preset indicator
l
Power levels
h
Screen
m
Control slide
i
Timer indicator
n
Preset/Timer
j
Cooking temperatures
o
Child Lock
k
On/Off
3 Before first use
Remove all packaging materials from the induction cooker.
Preparing for use
1
Place the appliance on a dr y, stable and level surface.
2
Make sure there is at least 10cm free space around the appliance
to prevent overheating.
3
Always place the cookware on the cooking zone during cooking.
4
Make sure you use cookware of the correct types and sizes (see
the table below).
Recommended types and sizes of cookware
Material
Cookware with a bottom made of iron or magnetic
stainless steel
Shape
Cookware with a flat bottom
Size
Cookware with a bottom diameter of 10-23cm,
depending on the cooking mode
4 Use the induction cooker
1
Follow the steps in “Preparing for use”.
2
Put the plug into the power socket.
3
Touch the On/Off icon (
), and the On/Off indicator lights up.
4
Move your finger on the control slide to the left or right to select
a power level.
»
The induction cooker star ts working after the power level is
selected.
5
When the cooking is finished, touch the On/Off icon (
) to
switch off the appliance.
6
Unplug the induction cooker after the fan stops working.
What’s in the box
Contenu de l’emballage
Lieferumfang
Contenuto della confezione
Contenido de la caja
Комплектация
Set up child lock
Configuration du verrouillage
enfant
Einstellen der Kindersicherung Impostazione del blocco bambini
Configuración del bloqueo
infantil
Установка блокировки от
детей
Cleaning
Nettoyage
Pflege
Pulizia
Limpieza
Очистка
Preset time for delayed
cooking
Programmation pour une
cuisson ultérieure
Einstellen der Zeit für
zeitverzögertes Kochen
Orario preimpostato per la
cottura ritardata
Tiempo programado para la
cocción retardada
Функция отсрочки старта для
включения в заданное время
Use the timer
Utilisation du minuteur
Verwendung des Timers
Utilizzo del timer
Uso del temporizador
Использование таймера
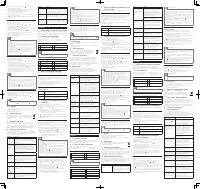
Use the induction cooker
Utilisation de la plaque de
cuisson à induction
Verwenden des Induktionsherds Utilizzo del fornello a induzione
Uso de la cocina de inducción
Использование индукционной
варочной панели
Recommended types and sizes of
cookware
Tipos y tamaños de recipientes
recomendados
Tipi e misure consigliate per le
pentole
Empfohlene Typen und Größen von
Kochtöpfen
Tailles et types d’ustensile de cuisine
recommandés
Рекомендуемые формы и размеры
емкостей
Preparing for use
Avant utilisation
Für den Gebrauch vorbereiten Preparazione per l’uso
Preparación para su uso
Подготовка прибора к работе
Use the timer
You can use the timer function to decide how much time you want
the appliance to work.
1
Touch the On/Off icon (
), the On/Off (
) indicator lights up.
2
Move your finger on the control slide to the left or right to select
a power level.
3
Touch the Preset/Timer icon ( ) repeatedly until the timer
indicator lights up.
4
Touch the power level 1 to set the hour a©nd power level 10 to
set the minute.
5
When the time has elapsed, the induction cooker stops working
automatically.
Note
•
You can also move your finger on the control slide to the left to set
the hour and to the right to set the minute.
•
Long touch power level 1 or 10 to fast forward in adjusting the time.
•
After you have selected the working time, wait for a few seconds
before the induction cooker automatically confirms it.
•
After the timer is set, you can touch the Preset/Timer icon (
)
repeatedly until the timer indicator is off to deactivate the timer.
•
The timer is available from 1 minute to 2 hours.
•
If the timer function is deactivated, the induction cooker can work
for as long as 12 hours.
Preset time for delayed cooking
You can use the preset function to set the time at which you want the
appliance to star t working.
1
Touch the On/Off icon (
), the On/Off indicator lights up.
2
Move your finger on the control slide to the left or right to select
a power level.
3
Touch the Preset/Timer icon ( ) repeatedly until the preset
indicator lights up.
4
Touch the power level 1 to set the hour and power level 10 to set
the minute.
5
When the preset time has elapsed, the induction cooker star ts
working automatically.
Note
•
You can also move your finger on the control slide to the left to set
the hour and to the right to set the minute.
•
Long touch power level 1 or 10 to fast forward in adjusting the time.
•
After the time is selected, the induction cooker automatically
confirms the working time after a few seconds.
•
After the preset time is set, you can touch the Preset/Timer icon
( ) repeatedly until the preset indicator is off to deactivate the
preset timer.
•
The preset timer is available up to 24 hours.
Set up child lock
When the induction cooker is working, touch the child lock icon
( ) for 3 seconds to enter child lock mode.
To unlock, touch the child lock icon (
) for 3 seconds again.
Note
•
At child lock mode, only On/Off (
) and child lock ( ) are
responsive.
5 Cleaning
1
Unplug the appliance after the fan stops working and let it cool
down.
2
Clean the appliance with a damp cloth and, if necessar y, with some
mild cleaning agent.
6 Environment
Do not throw away the appliance with the normal household
waste at the end of its life, but hand it in at an official
collection point for recycling. By doing this, you help to
preser ve the environment.
7 Guarantee and service
If you need ser vice or information or if you have a problem, please
visit the Philips website at www.philips.com or contact the Philips
Consumer Care Centre in your countr y (you will find its phone
number in the worldwide guarantee leaflet). If there is no Consumer
Care Centre in your countr y, go to your local Philips dealer.
8 Troubleshooting
If your induction cooker does not function properly or if the cooking
quality is insufficient, consult the table below. If you are unable to solve
the problem, contact a Philips ser vice centre or the Consumer Care
Centre in your countr y.
Problem
Solution
The On/Off
button ( )
does not
respond.
There is a connection problem. Check if the
induction cooker is connected to the mains and
if the plug is inser ted firmly into the wall socket
The appliance
beeps
continuously
and then stops
working.
You may have put unsuitable cookware on the
cooking plate or you may have removed the
cookware from the cooking plate during cooking.
Make sure the cookware is made of steel, iron or
aluminum with stainless steel cladding base and
has a base diameter larger than 10cm.
You may have placed the cookware outside of
the cooking zone.
The cookware
does not heat up
to the required
temperature.
The bottom of the cookware may not be flat.
Use cookware with a flat bottom. If the problem
still exists, take the appliance to your Philips
dealer or a ser vice center authorised by Philips.
The appliance
stops working
suddenly.
The temperature of the cookware is too high.
Let the cookware cool down for a while.
The fan works
but the appliance
has not star ted
working.
You need to select a power level by moving your
finger on the control slide to the left or right.
Error code E1 or
E2 is displayed on
the screen.
The main sensor is in open circuit or shor t circuit
state. Take the appliance to your Philips dealer or
a ser vice center authorised by Philips.
Error code E3 or
E4 is displayed on
the screen.
The heat sink sensor is in open circuit or shor t
circuit state. Take the appliance to your Philips
dealer or a ser vice center authorised by Philips.
Error code E5 or
E6 is displayed on
the screen.
The voltage is either too high or too low. Check
if the voltage in your home is suitable for the
induction cooker.
Error code E7, E8
or E9 is displayed
on the screen.
The induction cooker has malfunction. Take the
appliance to your Philips dealer or a ser vice
center authorised by Philips.
Deutsch
1 Ihr Induktionsherd
Herzlichen Glückwunsch zu Ihrem Kauf und willkommen bei Philips.
Um das Kundendienstangebot von Philips vollständig nutzen zu
können, sollten Sie Ihr Produkt unter www.philips.com/welcome
registrieren.
2 Lieferumfang
Induktionsherd – Hauptgerät
Topf (länderabhängig)
Sicherheitsbroschüre
Betriebsanleitung
Garantiekar te
Überblick
a
Kochplatte
d
Bedienfeld
b
Kochzone
e
Luftauslässe
c
Lufteinlass
f
Netzkabel
Hinweis
•
Es ist normal, dass die Farbe der Kochplatte von einem Gerät zum
anderen leicht variier t.
Übersicht über die Bedienelemente
g
Voreinstellungsanzeige
l
Leistungsstufen
h
Bildschirm
m
Schiebeschalter
i
Timer-Anzeige
n
Voreinstellung/Timer
j
Kochtemperaturen
o
Kindersicherung
k
On/Off
3 Vor dem ersten Gebrauch
Entfernen Sie alle Verpackungsmaterialien vom Induktionsherd.
Für den Gebrauch vorbereiten
1
Stellen Sie das Gerät auf eine trockene, stabile und ebene
Oberfläche.
2
Halten Sie um das Gerät herum mindestens 10 cm Platz frei, um
eine Überhitzung zu vermeiden.
3
Stellen Sie die Kochtöpfe während des Kochens immer auf die
Kochzone.
4
Vergewissern Sie sich, dass Sie Kochtöpfe des richtigen Typs und
der richtigen Größe verwenden (siehe Tabelle unten).
Empfohlene Typen und Größen von Kochtöpfen
Material
Kochtöpfe mit einem Boden aus Eisen oder
magnetischem Edelstahl
Form
Kochtöpfe mit einem flachen Boden
Größe
Kochtöpfe mit einem unteren Durchmesser von 10 bis
23 cm, abhängig vom Kochmodus
4 Verwenden des Induktionsherds
1
Folgen Sie den Schritten im Kapitel „Für den Gebrauch
vorbereiten“.
2
Stecken Sie den Stecker in die Steckdose.
3
Berühren Sie das Symbol „Ein/Aus“ (
), und die Anzeige leuchtet.
4
Bewegen Sie Ihren Finger auf dem Schiebeschalter nach links oder
rechts, um eine Leistungsstufe auszuwählen.
»
Der Induktionsherd ist betriebsbereit, wenn die Leistung
ausgewählt wurde.
5
Wenn Sie das Kochen beendet haben, berühren Sie das Symbol
„Ein/Aus“ (
), um das Gerät auszuschalten.
6
Ziehen Sie den Stecker des Induktionsherds aus der Steckdose,
sobald der Lüfter nicht mehr in Betrieb ist.
Verwendung des Timers
Sie können die Timer-Funktion verwenden, um einzustellen, wie lange
Sie das Gerät verwenden möchten.
1
Berühren Sie das Symbol „Ein/Aus“ (
), und die Anzeige „Ein/
Aus“ ( ) leuchtet.
2
Bewegen Sie Ihren Finger auf dem Schiebeschalter nach links oder
rechts, um eine Leistungsstufe auszuwählen.
3
Berühren Sie wiederholt das Symbol „Voreinstellung/Timer“ (
),
bis die Timer-Anzeige aufleuchtet.
4
Berühren Sie die Leistungsstufe 1, um die Stunden einzustellen, und
die Leistungsstufe 10, um die Minuten einzustellen.
5
Wenn die Zeit vergangen ist, hör t der Induktionsherd automatisch
auf zu kochen.
Hinweis
•
Sie können Ihren Finger auch auf dem Schiebeschalter nach links
bewegen, um die Stunden einzustellen, und nach rechts, um die
Minuten einzustellen.
•
Berühren Sie lange die Leistungsstufe 1 oder 10, um bei der
Zeiteinstellung in den Schnellvorlauf zu wechseln.
•
Nachdem Sie die Betriebszeit ausgewählt haben, war ten Sie ein paar
Sekunden, bis der Induktionsherd diese automatisch bestätigt.
•
Nachdem der Timer eingestellt wurde, können Sie das Symbol
"Voreinstellung/Timer" (
) wiederholt berühren, bis die Timer-
Anzeige nicht mehr leuchtet, um den Timer zu deaktivieren.
•
Der Timer kann zwischen 1 Minute bis zu 2 Stunden eingestellt
werden.
•
Wenn die Timer-Funktion deaktivier t ist, ist der Induktionsherd
12 Stunden lang betriebsbereit.
Einstellen der Zeit für zeitverzögertes Kochen
Sie können die Voreinstellungsfunktion verwenden, um die Zeit
festzulegen, zu der das Gerät mit dem Betrieb beginnen soll.
1
Berühren Sie das Symbol „Ein/Aus“ (
), und die Anzeige
leuchtet.
2
Bewegen Sie Ihren Finger auf dem Schiebeschalter nach links oder
rechts, um eine Leistungsstufe auszuwählen.
3
Berühren Sie wiederholt das Symbol „Voreinstellung/Timer“ (
),
bis die Voreinstellungsanzeige aufleuchtet.
4
Berühren Sie die Leistungsstufe 1, um die Stunden einzustellen, und
die Leistungsstufe 10, um die Minuten einzustellen.
5
Wenn die voreingestellte Zeit abgelaufen ist, hör t der
Induktionsherd automatisch auf zu kochen.
Hinweis
•
Sie können Ihren Finger auch auf dem Schiebeschalter nach links
bewegen, um die Stunden einzustellen, und nach rechts, um die
Minuten einzustellen.
•
Berühren Sie lange die Leistungsstufe 1 oder 10, um bei der
Zeiteinstellung in den Schnellvorlauf zu wechseln.
•
Nachdem die Zeit ausgewählt wurde, bestätigt der Induktionsherd
automatisch die Betriebszeit nach ein paar Sekunden.
•
Nachdem die voreingestellt Zeit festgelegt wurde, können Sie das
Symbol "Voreinstellung/Timer" (
) wiederholt berühren, bis die
Voreinstellungsanzeige nicht mehr leuchtet, um den Timer für die
Voreinstellung zu deaktivieren.
•
Der Timer für die Voreinstellung kann bis auf 24 Stunden eingestellt
werden.
Einstellen der Kindersicherung
Berühren Sie bei Betrieb des Induktionsherds das Symbol
„Kindersicherung“ (
) 3 Sekunden lang, um in den
Kindersicherungsmodus zu gelangen.
Drücken Sie zum Aufheben der Kindersicherung das entsprechende
Symbol ( ) 3 Sekunden lang.
Hinweis
•
Im Kindersicherungsmodus lassen sich nur der Ein-/Ausschalter
( ) und die Kindersicherung ( ) bedienen.
5 Pflege
1
Ziehen Sie den Stecker des Geräts aus der Steckdose, wenn der
Lüfter nicht mehr in Betrieb ist, und lassen Sie es abkühlen.
2
Reinigen Sie das Gerät mit einem feuchten Tuch und bei Bedarf
etwas mildem Reinigungsmittel.
6 Umgebung
Werfen Sie das Gerät am Ende der Lebensdauer nicht in
den normalen Hausmüll. Bringen Sie es zum Recycling zu
einer offiziellen Sammelstelle. Auf diese Weise helfen Sie, die
Umwelt zu schonen.
7 Garantie und Kundendienst
Benötigen Sie weitere Informationen oder treten Probleme auf,
besuchen Sie die Philips Website (www.philips.com), oder setzen Sie
sich mit einem Philips Ser vice-Center in Ihrem Land in Verbindung
(Telefonnummer siehe Garantieschrift). Sollte es in Ihrem Land kein
Ser vice-Center geben, wenden Sie sich bitte an Ihren lokalen Philips
Händler.
8 Fehlerbehebung
Wenn Ihr Induktionsherd nicht ordnungsgemäß funktionier t oder
die Kochqualität unzureichend ist, konsultieren Sie die Tabelle unten.
Wenn Sie das Problem nicht lösen können, kontaktieren Sie ein Philips
Ser vice-Center oder das Ser vice-Center in Ihrem Land.
Problem
Lösung
Der Ein-/Ausschalter
( ) reagier t nicht.
Es gibt ein Problem mit der
Stromversorgung. Überprüfen Sie, ob
der Induktionsherd an das Stromnetz
angeschlossen ist und der Stecker fest in der
Steckdose steckt.
Das Gerät piepst
ununterbrochen und
hör t dann auf, zu
arbeiten.
Sie haben möglicherweise unpassende
Kochtöpfe auf die Kochplatte gestellt, oder
Sie haben möglicherweise die Kochtöpfe
während des Kochens von der Kochplatte
entfernt. Vergewissern Sie sich, dass die
Kochtöpfe aus Stahl, Eisen oder Aluminium
sind, über eine Edelstahl-Verkleidung
verfügen und einen Grunddurchmesser von
mehr als 10 cm haben.
Sie haben die Kochtöpfe möglicherweise
außerhalb der Kochzone platzier t.
Die Kochtöpfe
erhitzen nicht bis
zur erforderlichen
Temperatur.
Der Boden der Kochtöpfe darf nicht flach
sein. Verwenden Sie Kochtöpfe mit einem
flachen Boden. Wenn das Problem weiterhin
besteht, bringen Sie das Gerät zu Ihrem
Philips Händler oder einem von Philips
autorisier ten Ser vice-Center.
Das Gerät
funktionier t plötzlich
nicht mehr.
Die Temperatur der Kochtöpfe ist zu
hoch. Lassen Sie die Kochtöpfe eine Weile
abkühlen.
Der Lüfter
funktionier t, aber das
Gerät arbeitet nicht.
Sie müssen eine Leistungsstufe durch
Bewegen Ihres Fingers auf dem
Schiebeschalter nach links oder rechts
auswählen.
Der Fehlercode
E1 oder E2 wird
auf dem Bildschirm
angezeigt.
Der Hauptsensor befindet sich im
Ruhespannungs- oder Kurzschlussmodus.
Bringen Sie das Gerät zu Ihrem Philips
Händler oder einem von Philips autorisier ten
Ser vice-Center.
Der Fehlercode
E3 oder E4 wird
auf dem Bildschirm
angezeigt.
Der Kühlkörper befindet sich im
Ruhespannungs- oder Kurzschlussmodus.
Bringen Sie das Gerät zu Ihrem Philips
Händler oder einem von Philips autorisier ten
Ser vice-Center.
Der Fehlercode
E5 oder E6 wird
auf dem Bildschirm
angezeigt.
Die Spannung ist entweder zu hoch oder
zu niedrig. Prüfen Sie, ob sich die Spannung
in Ihrem Zuhause für den Induktionsherd
eignet.
Die Fehlercodes E7,
E8 oder E9 werden
auf dem Bildschirm
angezeigt.
Der Induktionsherd hat eine technische
Störung. Bringen Sie das Gerät zu Ihrem
Philips Händler oder einem von Philips
autorisier ten Ser vice-Center.
Español
1 La cocina de inducción
Enhorabuena por su compra y bienvenido a Philips. Para aprovechar al
máximo la asistencia que ofrece Philips, registre el producto en
www.Philips.com/welcome.
2 Contenido de la caja
Unidad principal de la cocina de inducción
Recipiente (según el país)
Folleto sobre seguridad
Manual de usuario
Tarjeta de garantía
Descripción general
a
Placa
d
Panel de control
b
Zona de cocinado
e
Salidas de aire
c
Entrada de aire
f
Cable de alimentación
Nota
•
Es normal que el color de la placa difiera ligeramente entre una
unidad y otra.
Descripción de los controles
g
Indicador de preajuste
l
Niveles de potencia
h
Pantalla
m
Botón de control
i
Indicador del temporizador
n
Preajuste/temporizador
j
Temperaturas de cocinado
o
Bloqueo infantil
k
Encendido/Apagado
3 Antes de utilizarla por primera vez
Retire todos los materiales del embalaje de la cocina de inducción.
Preparación para su uso
1
Coloque el aparato sobre una superficie seca, estable y plana.
2
Asegúrese de que hay al menos 10 cm de espacio libre alrededor
del aparato para evitar un sobrecalentamiento.
3
Coloque siempre el recipiente sobre la zona de cocinado para
cocinar.
4
Asegúrese de utilizar un recipiente del tipo y tamaño correcto
(consulte la tabla siguiente).
Tipos y tamaños de recipientes recomendados
Material
Recipiente con una base de hierro o de acero
inoxidable magnético
Forma
Recipiente con una base plana
Tamaño
Recipiente con una base de 10-23 cm de diámetro, en
función del modo de cocinado
4 Uso de la cocina de inducción
1
Siga los pasos de la sección “Preparación para su uso”.
2
Introduzca la clavija en una toma de corriente.
„Téléchargement du manuel“ signifie que vous devez attendre que le fichier soit complètement chargé avant de pouvoir le lire en ligne. Certains manuels sont très volumineux, et le temps de chargement dépend de la vitesse de votre connexion Internet.