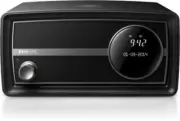
Philips ORT2300B/10 - Guide rapide
Philips ORT2300B/10 - Guide rapide, à lire gratuitement en ligne au format PDF. Nous espérons que cela vous aidera à résoudre toutes les questions que vous pourriez avoir. Si vous avez encore des questions, contactez-nous via le formulaire de contact.
English
DCongratulations on your purchase, and welcome to Philips! To fully
benefit from the suppor t that Philips offers, register your product at
www.philips.com/welcome.
1 Safety
Read and understand all instructions before you use this product. If
damage is caused by failure to follow the instructions, the warranty
does not apply.
Risk of electric shock or fire!
•
Never remove the casing of the product.
•
Never expose the product and accessories to rain or water.
Never place liquid containers, such as vases, near the product.
If liquids are spilt on or into the product, disconnect it from the
power outlet immediately. Contact Philips Consumer Care to
have the product checked before use.
•
Never place the product and accessories near naked flames or
other heat sources, including direct sunlight.
•
Never inser t objects into the ventilation slots or other
openings on the product.
•
Where the mains plug or an appliance coupler is used as the
disconnect device, the disconnect device shall remain readily
operable.
•
Disconnect the product from the power outlet before lightning
storms.
•
When you disconnect the power cord, hold the plug securely,
never the cable.
Risk of short circuit or fire!
•
Use only power supplies listed in the user manual
•
Before you connect the product to the power outlet, make
sure that the power voltage matches the value printed on the
back of the product. Never connect the product to the power
outlet if the voltage is different.
•
Never expose the product to rain, water, sunshine, or excessive
heat.
•
Avoid force coming onto power plugs. Loose power plugs can
cause arcing or fire.
Risk of injury or damage to the product!
•
This product shall not be exposed to dripping or splashing!
•
Do not place any sources of danger on this product (e.g. liquid
filled objects, lighted candles).
•
Never place the product or any objects on power cords or on
other electrical equipment.
•
If the product is transpor ted in temperatures below 5°C,
unpack the product and wait until its temperature matches
room temperature before connecting it to the power outlet.
Risk of overheating!
•
Never install this product in a confined space. Always leave a
space of at least four inches around the product for ventilation.
•
Make sure that cur tains or other objects never cover the
ventilation slots on the product.
Note
•
The rated power voltage is printed on the back of the product. The model number and
serial number are printed on the bottom.
2
What’s in the box (Fig. 1)
Check and identify the contents of the package.
3
Connect power (Fig. 2)
1
Select a proper plug and fix it to the power adaptor securely.
2
Connect the power adaptor between the power outlet and
the product.
3
Press the power and volume knob to power on the product.
•
To switch the product to standby mode, press the power
and volume knob again.
4
Set the time and date (Fig. 3)
Note
•
To manually set the clock, switch the product to standby mode first.
1
In standby mode, press and hold
until
[Set time]
is displayed.
»
The hour digits blink.
2
Press
/
to set the hour, and then press
to confirm.
»
The minute digits blink.
3
Press
/
to set the minute, and then press
to confirm.
»
The date is displayed with the day digits blink.
4
Press
/
to set the day, and then press
to confirm.
»
The month digits blink.
5
Press
/
to set the month, and then press
to confirm.
»
The year digits blink.
6
Press
/
to set the year, and then press
to confirm.
»
[Time saved]
flashes, and then the set clock and date are
displayed.
Tip
•
When a DAB radio station that transmits time signals is broadcast, the product
synchronizes its clock with the DAB radio station automatically.
5
Use the alarm timer
Note
•
Make sure that you have set the time and date correctly.
Set an alarm (Fig. 4)
You can set
two
alarms.
1
Press and hold
AL1
(or
AL2
) for two seconds.
»
[Alarm 1]
(or
[Alarm 2]
) is displayed with
AL1
(or
AL2
)
blinking.
»
The current alarm time is displayed with hour digits blinking.
2
Press
/
to set the hour, and then press
to confirm.
»
The minute digits begin to blink.
3
Press
/
to set the minute, and then press
to confirm.
»
The alarm source name begins to blink:
[DAB]
,
[FM]
, or
[Buzzer]
.
All registered and unregistered trademarks are
proper ty of their respective owners.
© 2013 Koninklijke Philips Electronics N.V.
All rights reser ved.
ORT2300_10_UM_V1.0
User manual
Brugervejledning
Benutzerhandbuch
Mode d’emploi
ORT2300
Register your product and get support at
4
Press
/
to select an alarm source, and then press
to confirm.
•
If
[DAB]
or
[FM]
is selected as the alarm source, press
to select a preset radio station or the last
listened station.
»
The alarm frequency blinks:
[Daily]
(daily),
[Weekdays]
(weekdays),
[Weekends]
(weekends), or
[Once]
(once).
5
Press
/
to select a frequency, and then press
to confirm.
»
The alarm volume level blinks.
6
Press
/
to set the volume level, and then press
to confirm.
»
[Alarm Saved]
flashes.
Snooze the alarm
When an alarm sounds, press
SNOOZE
.
»
The alarm repeats after 9 minutes.
Stop the alarm
When the first (or second) alarm sounds, press
AL1
(or
AL2
).
»
The alarm stops and then repeats at the set time.
6
Listen to FM radio stations
(Fig. 5)
Note
•
For optimal reception, fully extend the antenna and adjust its
position.
•
You can store a maximum of 20 FM radio stations.
1
Press
SOURCE
repeatedly until
[FM Mode]
is displayed.
»
FM
is highlighted and the current radio frequency is displayed.
2
Press and hold
until
[Auto]
is displayed.
»
After the search is complete, the first stored radio station is
broadcast.
3
Press
PRESET
to access the list of stored radio stations.
4
Press
/
repeatedly to tune to a stored radio station.
Search for a radio station manually
Press
/
repeatedly until the frequency of target radio station
is displayed.
Search for a radio station automatically
Press and hold
/
until
[Scanning...]
is displayed.
»
After a strong radio station is detected, the search stops and
the radio station is broadcast.
Program radio stations manually
1
Tune to a radio station.
2
Press and hold
PRESET
until
[Preset store]
is displayed.
3
Press
/
repeatedly to select a preset sequence number.
4
Press
PRESET
to confirm.
»
The radio station is stored with the selected sequence
number.
5
Repeat steps 1-4 to program more radio stations.
•
To tune to a stored radio station, press
PRESET
to access the
list of stored radio stations, and then press
/
repeatedly.
Note
•
If you store a radio station with the sequence number of another one, the earlier one
is overwritten.
Display RDS information
Radio Data System (RDS) is a ser vice that allows FM stations to
transmit additional information. When you tune to an FM radio
station that transmits RDS signals, the station name is displayed.
1
Tune to an RDS station.
2
Press
repeatedly to scroll through the following
information (if available):
•
Station name
•
Radio text
•
Program type such as
[NEWS]
(news),
[SPORT]
(spor t),
[POP M]
(pop music)...
•
Stereo/Mono
Adjust FM settings
1
Press and hold
to access the FM menu.
2
Press
/
to display the
[Scan setting]
menu.
3
Press
to access sub-menus.
4
Press
/
to select an option.
•
[Strong stations]
: Search for strong stations only.
•
[All stations]
: Search for all stations no matter whether
the signal strength of a station is strong or weak.
5
Press
to confirm the option.
7
Listen to DAB radio stations
(Fig. 6)
Note
•
For optimal reception, fully extend the antenna and adjust its
position.
•
You can program a maximum of 20 DAB radio stations.
•
Check with local retailer or go to www.WorldDAB.org for
applicable DAB radio frequencies in your area.
1
Press
SOURCE
repeatedly until
[DAB Mode]
is displayed.
»
DAB
is highlighted.
2
Press and hold
to access the DAB menus.
»
The
[Full scan]
menu is displayed. If not, press
/
repeatedly to select the
[Full scan]
menu.
3
Press
to activate the automatic search.
»
This product automatically stores radio stations with sufficient
signal strength.
»
After the search is complete, the first stored radio station is
broadcast automatically.
4
Press
/
repeatedly to select a station, and then press
PRESET
to star t listening.
Tip
•
You can re-scan to update the list of stored stations and tune to a station manually.
Program radio stations
1
Tune to a DAB radio station.
2
Press and hold
PRESET
to activate the programming.
3
Press
/
repeatedly to select a preset sequence number.
4
Press
PRESET
to confirm.
»
The radio station is stored with the selected sequence
number.
5
Repeat steps 1-4 to program more radio stations.
•
To tune to a stored radio station, press
PRESET
to access the
list of stored radio stations, and then press
/
repeatedly.
Note
•
If you store a radio station with the sequence number of another one, the earlier one
is overwritten.
Display DAB information
The name of current DAB station is displayed. You can also view the
other information.
To cycle through available information, press
repeatedly.
•
Dynamic label segment (DLS)
•
Signal strength
•
Program type (PTY)
•
Ensemble name
•
Frequency
•
Signal error rate
•
Bitrate codec
Use DAB menus
1
Press and hold
to access the DAB menus.
2
Press
/
repeatedly to toggle through the menus.
Re-scan for stations
Full scan is used to perform a wide range search for DAB radio
stations.
Press
to star t scanning for available DAB stations.
»
After the scanning is complete, the first stored station is
broadcast.
Tune to a station manually
With this feature, you can tune to a specific channel/frequency
manually. In addition to antenna orientation for better radio
reception, the optimal reception can also be obtained with this
feature.
1
Press
to access the station list.
2
Press
/
repeatedly to select a station from 5A to 13F.
3
Press
to confirm the option.
DRC (Dynamic Range Control)
DRC adds or removes a degree of compensation for the differences
in the dynamic range between radio stations.
1
Press
to access the sub-menus.
2
Press
/
repeatedly to select an option. (The asterisk
behind the option indicates the current setting.)
•
[DRC off]
: No compensation applied.
•
[DRC low]
: Medium compensation applied.
•
[DRC high]
: Maximum compensation applied.
3
Press
to confirm the option.
Remove invalid stations
Some stations in the list have no ser vice when you travel to another
area. In front of the station name of an invalid station, a question
mark (?) is displayed.
1
Press
to access the sub-menus.
2
Press
/
repeatedly to select an option.
•
[No]
: Return to the previous menu.
•
[Yes]
: Remove invalid stations from the station list.
3
Press
to confirm the option.
System menus
1
Press
to access system menus.
2
Press
/
repeatedly to select a sub-menu.
•
For details, refer to the section ‘
Use system menus
‘.
8
Listen to an external device
(Fig. 7)
You can also listen to an external audio device, for example, MP3
player, through this product.
1
Press
SOURCE
repeatedly to switch the source to
AUX IN
.
»
AUX
is highlighted
2
Connect an audio input cable with a 3.5 mm connector on
both ends to
•
the
AUDIO-IN
socket on the back panel of this product,
and
•
the headphone socket on the external device.
3
Play audio on the external device (refer to its user manual).
9
Use the sleep timer (Fig. 8)
You can set a time period after which the product switches to
standby mode automatically.
Press
SLEEP
repeatedly to select a time period (in minutes).
»
When the sleep timer is activated, appears.
»
After the set period, the product switches to standby mode.
•
To deactivate the sleep timer, press
SLEEP
repeatedly until
[Sleep off]
appears.
10 Use the countdown timer (Fig. 9)
You can set a time period after which the product buzzes for a
reminder.
1
Press and hold
TIMER
until blinks.
»
The hour digits blink.
2
Press
/
repeatedly to set the hour, and then press
to confirm.
»
The minute digits blink.
3
Press
/
repeatedly to set the minute, and then press
to confirm.
»
The second digits blink.
4
Press
/
repeatedly to set the second, and then press
to confirm.
»
stops blink.
•
To stop the buzz, press
TIMER
or the power and volume
knob.
11 Play audio via Bluetooth (Fig. 10)
With this product, you can stream audio from a Bluetooth player.
An application
Philips DigitalRadio
is available on Apple App Store
and Google Play. To fully enjoy features of this product, download and
install the application to your smar t device.
Note
•
Philips does not guarantee the compatibility with all Bluetooth
devices.
•
Before pairing a device with this system, read its user manual for
Bluetooth compatibility.
•
The product can memorize a maximum of 4 paired devices.
•
Make sure that Bluetooth function is enabled on your device, and
your device is set as visible to all other Bluetooth devices.
•
The operational range between this system and a Bluetooth device
is approximately 10 meters (30 feet).
•
Any obstacle between this system and a Bluetooth device can
reduce the operational range.
•
Keep away from any other electronic device that may cause
interference.
Note
•
If the connected Bluetooth device suppor ts the Advanced Audio
Distribution Profile (A2DP), you can listen to tracks that are stored
on the device through the system.
•
If the device also suppor ts the Audio Video Remote Control Profile
(AVRCP), you can control play on this product.
•
If the connected device does not suppor t the AVRCP, control play
on the connected device.
1
Press
SOURCE
repeatedly until
[Bluetooth Mode]
is displayed.
»
If no Bluetooth device is connected,
[Bluetooth No
Connection]
(No Bluetooth connection) scrolls.
2
On your device, search for Bluetooth devices. In the device list,
select
ORT2300
.
•
If a message prompts for the permission for Bluetooth
connection with
ORT2300
, confirm it.
»
If the connection succeeds,
[BT Connected]
is displayed on
the LCD display of this product.
3
Play a track on the connected device.
•
To pause or resume play, press
.
•
To skip to the previous or next track, press / .
•
To display available information about the current track,
press
repeatedly.
Bluetooth indicator
The LED indicator beside the power and volume knob indicates the status
of Bluetooth connection.
Indicator
Bluetooth connection
Off
Waiting for connection
Blinking
Connecting
Solid
Connected
12 Charge your devices
Connect your device to the
USB
socket on the back of the
product.
»
Once the device is recognized, the charging star ts.
Note
•
Philips does not guarantee the compatibility of this product with
all devices.
•
The
USB
socket is for charging only.
13 Adjust volume
•
To increase the volume, turn the power and volume knob
clockwise.
•
To decrease the volume, turn the power and volume knob
anti-clockwise.
14 Adjust brightness
Press
BRIGHTNESS
repeatedly to adjust the brightness of the LCD
display.
15 Use system menus
Use the system menus to
•
check the version of current software of this product,
•
upgrade the software, and
•
reset the product to factor y default status.
Check the current software version
Press
to display the version of current software.
Upgrade the software
1
Go to www.philips.com/suppor t.
2
Search for suppor t information about your product with
“
ORT2300/10
“ as the keyword.
»
When an upgrade packet is available, the link of “
Firmware
Upgrade Readme File
“ is accessible. The exact wording of this
link name may var y in different languages.
3
Click the link of “
Firmware Upgrade Readme File
“.
4
Read and understand the instructions on software upgrade.
5
Follow the instructions to complete the upgrade.
Reset the product
1
Press
to display the options.
2
Press
/
repeatedly to select an option.
•
[No]
: Return to the previous menu.
•
[Yes]
: Reset the product to factor y default status.
3
Press
to confirm the option.
16 Troubleshooting
Warning
•
Never remove the casing of this product.
To keep the warranty valid, never tr y to repair the product yourself.
If you encounter problems when using this product, check the
following points before requesting ser vice. If the problem remains
unsolved, go to the Philips Web page (www.philips.com/suppor t).
When you contact Philips, make sure that the product is nearby and
the model number and serial number are available.
General
No power
•
Make sure that the AC power cord is properly connected.
•
Make sure that there is power at the AC power outlet.
No sound
•
Adjust the volume.
•
When listening to an external device, make sure that the external
device is not muted.
No response from the product
•
Make sure that the power is available.
•
Turn off the product, and then turn it on again.
Poor radio reception
•
Due to the interference from other electrics or building obstacles,
the signals become weak. Move the product to a place free of
interference.
•
Make sure that the antenna is fully extended. Adjust the position of
the antenna.
Clock/alarm setting is erased.
•
Power has been interrupted, or the AC power adaptor has
been disconnected.
•
Set the clock/alarm again.
About Bluetooth connection
Music playback is unavailable on this product even after successful
Bluetooth connection.
•
The device cannot be used with this product to play music.
The audio quality is poor after connection with a Bluetooth-enabled device.
•
The Bluetooth reception is poor. Move the device closer to this
product or remove any obstacle between.
Cannot connect with this product.
•
The device does not suppor t the profiles required for this product.
•
The Bluetooth function of the device is not enabled. Refer to the
user manual of the device to find out how to enable the function.
•
This product is not in the pairing mode.
•
This product is already connected with another Bluetooth-enabled
device. Disconnect that device and then tr y again.
The paired mobile device connects and disconnects constantly.
•
The Bluetooth reception is poor. Move the device closer to this
product or remove any obstacle between.
•
Some mobile phones may connect and disconnect constantly when
you make or end calls. This does not indicate any malfunction of
this product.
•
For some devices, the Bluetooth connection may be deactivated
automatically as a power-saving feature. This does not indicate any
malfunction of this product.
17 Product information
Note
•
Product information is subject to change without prior notice.
General information
AC power adaptor
Model No.: OH-
1015E0592000U1
Brand name: Philips
Input: 100-240 V~, 50/60Hz,
350 mA;
Output: 5.9 V 2 A
Operation power consumption
10 W
Standby power consumption
< 1 W
Dimensions:
- Main unit (W x H x D)
245 x 123 x 122 mm
Weight:
- Main unit
1.1 kg
Tuner
Tuning Range
FM: 87.50 - 108.00 MHz;
DAB: 174.928-239.200 MHz
Tuning grid
50 kHz
DAB sensitivity (EN50248)
< -95 dbm
Total Harmonic Distor tion
< 2%
Signal to Noise Ratio
> 50 dBA
Number of preset radio stations
20 (FM), 20 (DAB)
Speakers
Speaker Impedance
4 Ohm
Speaker Driver
3" full range
Sensitivity
> 82 dB/m/W
Amplifier
Output Power
3 W RMS
Frequency Response
60 Hz - 16 kHz, ±3 dB
Signal to Noise Ratio
> 65 dBA
Audio Input
0.5 V RMS 20 kOhm
Bluetooth
Communication system
Bluetooth Standard version 2.0
Output
Bluetooth Standard Power Class 2
Maximum communication
range
Line of sight approx. 10m (30 feet)
Frequency band
2.4 GHz band (2.4000 GHz - 2.4835
GHz)
Compatible Bluetooth
profiles
Advanced Audio Distribution Profile
(A2DP)
Audio Video Remote Control Profile
(AVRCP)
Suppor ted codecs
- Receive
- Transmit
SBC (Sub Band Codec)
SBC (Sub Band Codec)
18 Notice
Any changes or modifications made to this device that are not
expressly approved by Philips Consumer Lifestyle may void the user’s
authority to operate the equipment.
Compliance
This product complies with the radio interference requirements of
the European Community.
To check the EC DECLARATION OF CONFORMITY, go to
http://download.p4c.philips.com/files/o/ORT2300c_10/ORT2300c_10_doc_
eng.pdf .
This is CLASS II apparatus with double insulation, and no
protective ear th provided.
Care of the environment
Your product is designed and manufactured with high
quality materials and components, which can be recycled
and reused.
When this crossed-out wheeled bin symbol is attached
to a product it means that the product is covered by the
European Directive 2002/96/EC. Please inform yourself
about the local separate collection system for electrical and
electronic products.
Please act according to your local rules and do not dispose of your
old products with your normal household waste.
Correct disposal of your old product helps to prevent potential
negative consequences for the environment and human health.
Environmental information
All unnecessar y packaging has been omitted. We have tried to make
the packaging easy to separate into three materials: cardboard (box),
polystyrene foam (buffer) and polyethylene (bags, protective foam
sheet.)
Your system consists of materials which can be recycled and reused
if disassembled by a specialized company. Please obser ve the local
regulations regarding the disposal of packaging materials, exhausted
batteries and old equipment.
Trademark notice
The Bluetooth
®
word mark and logos are registered trademarks
owned by Bluetooth SIG, Inc. and any use of such marks by Philips is
under license.
Copyright
2013 © Koninklijke Philips Electronics N.V.
Specifications are subject to change without notice. Trademarks are
the proper ty of Koninklijke Philips Electronics N.V or their respective
owners. Philips reser ves the right to change products at any time
without being obliged to adjust earlier supplies accordingly.
ansk
Dansk
Tillykke med dit køb, og velkommen til Philips! Hvis du vil have fuldt
udbytte af den suppor t, som Philips tilbyder, kan du registrere dit
produkt på www.philips.com/welcome.
1 Sikkerhed
Læs og forstå alle instruktioner, inden du bruger dette produkt. Hvis
der opstår skader, fordi instruktionerne ikke er blevet fulgt, gælder
garantien ikke.
Risiko for elektrisk stød eller brand!
•
Fjern aldrig kabinettet på dette produkt.
•
Udsæt aldrig produktet eller tilbehøret for regn eller vand.
Anbring aldrig væskebeholdere, f.eks. vaser, i nærheden af
produktet. Hvis der spildes væsker på eller i produktet, skal
du øjeblikkeligt afbr yde det fra stikkontakten. Kontakt Philips
Kundeser vice for at få produktet undersøgt før brug.
•
Anbring aldrig produktet eller tilbehøret i nærheden af åben ild
eller andre varmekilder, herunder direkte sollys.
•
Indsæt aldrig genstande i ventilationsristene eller andre
åbninger på produktet.
•
Hvis netstikket eller et apparatstik bruges til at afbr yde
enheden, skal disse kunne betjenes nemt.
•
Tag stikket til produktet ud af stikkontakten under tordenvejr.
•
Når du tager ledningen ud, skal du altid holde i stikket, aldrig i
ledningen.
Risiko for kortslutning eller brand!
•
Brug kun strømforsyninger, der er anfør t i bruger vejledningen
•
Før du tilslutter produktet til en stikkontakt, skal du sikre dig,
at strømspændingen svarer til den værdi, der er anfør t bag på
produktet. Tilslut aldrig produktet til stikkontakten, hvis det ikke
har den samme spænding.
•
Udsæt ikke produktet for regn, vand, sollys eller ekstrem varme.
•
Undgå at tvinge stikket i stikkontakten. Løse stikkontakter kan
forårsage gnistdannelse eller brand.
Risiko for personskade eller beskadigelse af produktet!
•
Produktet må ikke udsættes for dr yp eller sprøjt!
•
Placer aldrig farlige genstande på produktet (f.eks. væskefyldte
genstande eller tændte lys).
•
Placer aldrig produktet eller andre genstande på
strømledningerne eller på andet elektrisk udstyr.
•
Hvis produktet transpor teres ved temperaturer under 5
°C, skal produktet udpakkes, og du skal vente, indtil dets
temperatur svarer til rumtemperaturen, før du slutter det til
stikkontakten.
Risiko for overophedning!
•
Installer aldrig produktet på et indelukket sted. Sørg altid for
en afstand på mindst 10 cm hele vejen rundt om produktet til
ventilation.
•
Sørg for, at gardiner eller andre genstande ikke dækker
ventilationshullerne på produktet.
Bemærk
•
Nominel spænding er tr ykt på bagsiden af produktet. Modelnummeret og
serienummeret er tr ykt i bunden.
2
Hvad er der i kassen (Fig. 1)
Kontroller og identificer indholdet af pakken.
3
Tilslut strømmen (Fig. 2)
1
Vælg et passende stik, og fastgør det på sikker vis til
strømadapteren.
2
Tilslut strømadapteren mellem stikkontakten og produktet.
3
Tr yk på tænd/sluk- og lydstyrkeknappen for at tænde
produktet.
•
For at sætte produktet i standbytilstand skal du tr ykke på
tænd/sluk- og lydstyrkeknappen igen.
4
Indstil dato og klokkeslæt (Fig. 3)
Bemærk
•
For at indstille uret manuelt skal du først sætte produktet i standbytilstand.
1
Tr yk på og hold
nede i standbytilstand, indtil
[Set time]
vises.
»
Timecifrene blinker.
2
Tr yk på
/
for at indstille timetal, og tr yk derefter på
for at bekræfte.
»
Minutcifrene blinker.
3
Tr yk på
/
for at indstille minuttal, og tr yk derefter på
for at bekræfte.
»
Datoen vises, og ugedagscifrene blinker.
4
Tr yk på
/
for at indstille dag, og tr yk derefter på
for at bekræfte.
»
Månedscifrene blinker.
5
Tr yk på
/
for at indstille måned, og tr yk derefter på
for at bekræfte.
»
Årscifrene blinker.
6
Tr yk på
/
for at indstille år, og tr yk derefter på
for at bekræfte.
»
[Time saved]
blinker, hvorefter det indstillede klokkeslæt og
dato vises.
Tip
•
Når der afspilles en DAB-radiostation, der overfører tidssignaler, synkroniserer
produktet automatisk sit ur med DAB-radiostationen.
5
Brug af alarm-timeren
Bemærk
•
Kontroller, at du har indstillet dato og klokkeslæt korrekt.
Indstil en alarm (Fig. 4)
Du kan indstille
to
alarmer.
1
Tr yk på
AL1
(eller
AL2
), og hold den nede i to sekunder.
»
[Alarm 1]
(eller
[Alarm 2]
) vises, mens
AL1
(eller
AL2
)
blinker.
»
Det aktuelle alarmtidspunkt vises, mens timecifrene blinker.
2
Tr yk på
/
for at indstille timetal, og tr yk derefter på
for at bekræfte.
»
Minutcifrene begynder at blinke.
3
Tr yk på
/
for at indstille minuttal, og tr yk derefter på
for at bekræfte.
»
Alarmkildens navn begynder at blinke:
[DAB]
,
[FM]
eller
[Buzzer]
.
4
Tr yk på
/
vælge en alarmkilde, og tr yk derefter på
for at bekræfte.
•
Hvis
[DAB]
eller
[FM]
er valgt som alarmkilde, skal du
tr ykke på
for at vælge en forudindstillet
radiostation eller den station, du senest har lyttet til.
»
Alarmfrekvensen blinker :
[Daily]
(dagligt),
[Weekdays]
(hverdage),
[Weekends]
(weekender) eller
[Once]
(én gang).
5
Tr yk på
/
for at vælge en frekvens, og tr yk derefter på
for at bekræfte.
»
Lydstyrken for alarmen blinker.
6
Tr yk på
/
for at indstille lydstyrken, og tr yk derefter på
for at bekræfte.
»
[Alarm Saved]
blinker.
Brug alarmens snooze-funktion
Tr yk på
SNOOZE
, når en alarm går i gang.
»
Alarmen gentages efter 9 minutter.
Stop alarmen
Når den første (eller anden) alarm lyder, skal du tr ykke på
AL1
(eller
AL2
).
»
Alarmen stopper og gentages på det indstillede tidspunkt.
6
Lyt til FM-radiostationer (Fig. 5)
Bemærk
•
For optimal modtagelse skal du trække antennen helt ud og justere
dens position.
•
Du kan maksimalt lagre 20 forudindstillede radiostationer.
1
Tr yk på
SOURCE
gentagne gange, indtil
[FM Mode]
vises.
»
FM
er fremhævet, og den aktuelle radiofrekvens vises.
2
Hold
nede, indtil
[Auto]
vises.
»
Efter søgningen er udfør t, afspilles den først gemte
radiostation.
3
Tr yk på
PRESET
for at få adgang til listen over gemte
radiostationer.
4
Tr yk gentagne gange på
/
for at finde en gemt
radiostation.
Sådan søger du manuelt efter en radiostation
Tr yk på
/
gentagne gange, indtil frekvensen på den ønskede
radiostation vises.
Sådan søger du automatisk efter en
radiostation
Hold
/
nede, indtil
[Scanning...]
vises.
»
Når en tydelig radiostation bliver fundet, standser søgningen,
og radiostationen afspilles.
Programmer radiostationer manuelt
1
Find en radiostation.
2
Hold
PRESET
nede, indtil
[Preset store]
vises.
3
Tr yk gentagne gange på
/
for at vælge et forudindstillet
sekvensnummer.
4
Tr yk på
PRESET
for at bekræfte.
»
Radiostationen gemmes med det valgte sekvensnummer.
5
Gentag trin 1-4 for at programmere flere radiostationer.
•
For at stille ind på en gemt radiostation skal du tr ykke på
PRESET
for at få adgang til listen over gemte radiostationer og
derefter tr ykke på
/
gentagne gange.
Bemærk
•
Hvis du gemmer en radiostation med en anden stations sekvensnummer, overskrives
den første.
Vis RDS-oplysninger
RDS (Radio Data System) er en tjeneste, der giver FM-stationer
mulighed for at transmittere yderligere oplysninger. Når du finder en
FM-radiostation, der transmitterer RDS-signaler, vises stationens navn.
1
Stil ind på en RDS-station.
2
Tr yk på
flere gange for at rulle gennem følgende
oplysninger (hvis de er tilgængelige):
•
Stationsnavn
•
Radiotekst
•
Programtype, f.eks.
[NEWS]
(nyheder),
[SPORT]
(spor t),
[POP M]
(popmusik)...
•
Stereo/mono
Juster FM-indstillinger
1
Tr yk på
, og hold den inde for at åbne FM-menuen.
2
Tr yk på
/
for at vise
[Scan setting]
menuen.
3
Tr yk på
for at få adgang til undermenuerne.
4
Tr yk på
/
for at vælge en indstilling.
•
[Strong stations]
: Søg kun efter tydelige stationer.
•
[All stations]
: Søg efter alle stationer, uanset om
signalstyrken for en station er stærk eller svag.
5
Tr yk på
for at bekræfte indstillingen.
7
Lyt til DAB-radiostationer (Fig. 6)
Bemærk
•
For optimal modtagelse skal du trække antennen helt ud og justere
dens position.
•
Du kan programmere op til 20 forudindstillede DAB-radiostationer.
•
Spørg hos din lokale forhandler, eller besøg www.WorldDAB.org for
at finde de gældende DAB-radiofrekvenser i dit område.
1
Tr yk på
SOURCE
gentagne gange, indtil
[DAB Mode]
vises.
»
DAB
er fremhævet.
2
Tr yk på
og hold den inde for at åbne DAB-
menuerne.
»
Menuen
[Full scan]
vises. Hvis ikke skal du tr ykke på
/
gentagne gange for at for at vælge
[Full scan]
-menuen.
3
Tr yk på
for at aktivere den automatiske søgning.
»
Dette produkt gemmer automatisk radiostationer med
tilstrækkelig signalstyrke.
»
Når søgningen er udfør t, afspilles den først gemte radiostation
automatisk.
4
Tr yk på
/
gentagne gange for at vælge en radiostation,
og tr yk derefter på
PRESET
for at begynde at lytte.
Tip
•
Du kan gentage scanningen for at opdatere listen over gemte stationer og finde en
station manuelt.
Programmér radiostationer
1
Find en DAB-radiostation.
2
Tr yk på
PRESET
, og hold den nede for at aktivere
programmeringen.
3
Tr yk gentagne gange på
/
for at vælge et forudindstillet
sekvensnummer.
4
Tr yk på
PRESET
for at bekræfte.
»
Radiostationen gemmes med det valgte sekvensnummer.
5
Gentag trin 1-4 for at programmere flere radiostationer.
•
For at stille ind på en gemt radiostation skal du tr ykke på
PRESET
for at få adgang til listen over gemte radiostationer og
derefter tr ykke på
/
gentagne gange.
Bemærk
•
Hvis du gemmer en radiostation med en anden stations sekvensnummer, overskrives
den første.
Vis DAB-oplysninger
Navnet på den aktuelle DAB-station vises. Du kan også se de andre
oplysninger.
For at rulle gennem tilgængelige oplysninger skal du tr ykke på
gentagne gange.
•
DLS (Dynamic label segment)
•
Signalstyrke
•
PTY (programtype)
•
Ensemblenavn
•
Frekvens
•
Signalfejlrate
•
Bithastighed-codec
Brug af DAB-menuerne
1
Tr yk på
og hold den inde for at åbne DAB-
menuerne.
2
Tr yk gentagne gange på
/
for at skifte mellem
menuerne.
Gen-scan radiostationer
Fuld scanning bruges til at udføre søgning efter DAB-radiostationer
inden for et bredt område.
Tr yk på
for at scanne efter tilgængelige DAB-stationer.
»
Når scanningen er fuldfør t, afspilles den først gemte
radiostation.
Find en station manuelt.
Med denne funktion kan du finde en bestemt kanal/frekvens manuelt.
Ud over at dreje på antennen for at få et bedre signal kan denne
funktion også benyttes.
1
Tr yk på
for at få adgang til kanallisten.
2
Tr yk gentagne gange på
/
for at vælge en station fra
5A til 13F.
3
Tr yk på
for at bekræfte indstillingen.
DRC (Dynamic Range Control)
DRC øger eller sænker graden af kompensation for forskelle i det
dynamiske område mellem radiostationer.
1
Tr yk på
for at få adgang til undermenuerne.
2
Tr yk gentagne gange på
/
for at vælge en indstilling.
(Stjernen bag indstillingen angiver den aktuelle indstilling).
•
[DRC off]
: Ingen kompensation.
•
[DRC low]
: Middel kompensation.
•
[DRC high]
: Maks. kompensation.
3
Tr yk på
for at bekræfte indstillingen.
Fjern ugyldige stationer
Nogle stationer på listen har ingen tjeneste, når du rejser til et
andet område. Foran stationsnavnet for en ugyldig station, vises et
spørgsmålstegn (?).
1
Tr yk på
for at få adgang til undermenuerne.
2
Tr yk gentagne gange på
/
for at vælge en indstilling.
•
[No]
: Vend tilbage til den forrige menu.
•
[Yes]
: Fjern ugyldige stationer fra listen over stationer.
3
Tr yk på
for at bekræfte indstillingen.
Systemmenuer
1
Tr yk på
for at få adgang til systemmenuerne.
2
Tr yk gentagne gange på
/
for at vælge en undermenu.
•
Se afsnittet ”
Brug af systemmenuerne
” for yderligere
oplysninger.
8
Sådan lytter du til en ekstern
enhed (Fig. 7)
Du kan også lytte til en ekstern lydenhed, f.eks. en MP3-afspiller, via
dette produkt.
1
Tr yk på
SOURCE
gentagne gange for at skifte kilde til
AUX IN
.
»
AUX
er fremhævet.
2
Tilslut et lydindgangskabel med et 3,5 mm stik i begge ender til
•
AUDIO-IN
-stikket på bagpanelet på dette produkt, og
•
hovedtelefonstikket på den eksterne enhed.
3
Afspil lyd på den eksterne enhed (se enhedens
bruger vejledning).
9
Brug sleep-timeren (Fig. 8)
Du kan indstille en tidsperiode, hvorefter produktet skifter automatisk
til standbytilstand.
Tr yk på
SLEEP
gentagne gange for at vælge en periode (i minutter).
»
Når sleep-timeren er aktiveret, vises .
»
Efter den indstillede periode skifter produktet til
standbytilstand.
•
For at deaktivere sleep-timeren skal du tr ykke gentagne
gange på
SLEEP
, indtil
[Sleep off]
vises.
10 Brug nedtællingstimeren (Fig. 9)
Du kan indstille en tidsperiode, hvorefter produktet summer som en
påmindelse.
1
Hold
TIMER
nede, indtil blinker.
»
Timecifrene blinker.
2
Tr yk gentagne gange på
/
for at indstille timetal, og tr yk
derefter på
for at bekræfte.
»
Minutcifrene blinker.
3
Tr yk gentagne gange på
/
for at indstille minuttal, og
tr yk derefter på
for at bekræfte.
»
Sekundcifrene blinker.
4
Tr yk gentagne gange på
/
for at indstille sekundtal, og
tr yk derefter på
for at bekræfte.
»
stopper med at blinke.
•
For at stoppe brummelyden skal du tr ykke på
TIMER
eller på tænd/sluk- og lydstyrkeknappen.
11 Afspil lyd via Bluetooth (Fig. 10)
Med dette produkt kan du streame lyd fra en Bluetooth-afspiller.
Programmet
Philips DigitalRadio
er tilgængeligt på Apple App Store
og Google Play. For at få det fulde udbytte af dette produkt skal du
downloade og installere programmet på din smar t-enhed.
Bemærk
•
Philips kan ikke garantere kompatibilitet med alle Bluetooth-enheder.
•
Inden du parrer en enhed med dette system, skal du læse
bruger vejledningen for at kontrollere, at den er kompatibel med
Bluetooth.
•
Produktet kan huske højst 4 parrede enheder.
•
Sørg for, at Bluetooth-funktionen er aktiveret på enheden, og at
enheden er indstillet til at være synlig for alle andre Bluetooth-
enheder.
•
Dækningsområdet mellem dette system og en Bluetooth-enhed er
ca. 10 meter.
•
Enhver forhindring mellem dette system og en Bluetooth-enhed kan
reducere dækningsområdet.
•
Hold afstand fra andre elektroniske enheder, der kan forårsage
interferens.
Bemærk
•
Hvis den tilsluttede Bluetooth-enhed understøtter Advanced Audio
Distribution Profile (A2DP), kan du lytte til spor, der er gemt på
enheden via systemet.
•
Hvis enheden også understøtter Audio Video Remote Control
Profile (AVRCP), kan du styre afspilningen på dette produkt.
•
Hvis den tilsluttede enhed ikke understøtter AVRCP, kan du styre
afspilningen på den tilsluttede enhed.
1
Tr yk på
SOURCE
gentagne gange, indtil
[Bluetooth Mode]
vises.
»
Hvis der ikke er tilsluttet en Bluetooth-enhed, vises
[Bluetooth
No Connection]
(ingen Bluetooth-forbindelse).
2
På din enhed skal du søge efter Bluetooth-enheder. På
enhedslisten skal du vælge
ORT2300
.
•
Hvis der vises en meddelelse, der beder om tilladelse til
Bluetooth-forbindelse med
ORT2300
, skal du bekræfte
den.
»
Hvis det lykkes at oprette forbindelsen, vises
[BT Connected]
på dette produkts LCD-display.
3
Afspil et nummer på den tilsluttede enhed.
•
Tr yk på
for at sætte afspilning på pause eller
genoptage afspilning.
•
Tr yk på / for at gå til forrige/næste spor.
•
For at få vist tilgængelig information om det aktuelle spor
skal du tr ykke på
gentagne gange.
Bluetooth-indikator
LED-indikatoren ved siden af tænd/sluk- og lydstyrkeknappen angiver
status for Bluetooth-forbindelsen.
Indikator
Bluetooth-forbindelse
Fra
Venter på forbindelse
Blinker
Tilslutter
Lyser konstant
Tilsluttet
12 Oplad dine enheder
Slut din enhed til
USB
-stikket bag på produktet.
»
Når enheden er genkendt, star ter opladningen.
Bemærk
•
Philips garanterer ikke, at dette produkt er kompatibelt med alle
enheder.
•
USB
-stikket er kun beregnet til opladning.
13 Reguler lydstyrken
•
Drej tænd/sluk- og lydstyrkeknappen med uret for at øge
lydstyrken.
•
Drej tænd/sluk- og lydstyrkeknappen mod uret for at mindske
lydstyrken.
14 Juster lys
Tr yk gentagne gange på
BRIGHTNESS
for at justere lysstyrken på
LCD-displayet.
15 Brug systemmenuerne
Brug systemmenuerne til
•
at kontrollere den aktuelle softwareversion af dette produkt,
•
at opgradere softwaren, og
•
at nulstille produktet til fabriksindstillingerne.
User Manual
ORD2105
3 sec.
Bluetooth
ON
ORT2300
3 sec.
FM
3 sec.
3 sec.
3 sec.
3 sec.
3 sec.
DAB
User Manual
ORD2105
3 sec.
Bluetooth
ON
ORT2300
3 sec.
FM
3 sec.
3 sec.
3 sec.
3 sec.
3 sec.
DAB
To get the detailed instructions for use, visit
www.philips.com/suppor t.
www.philips.com/suppor t
„Téléchargement du manuel“ signifie que vous devez attendre que le fichier soit complètement chargé avant de pouvoir le lire en ligne. Certains manuels sont très volumineux, et le temps de chargement dépend de la vitesse de votre connexion Internet.