Philips QG3190/00 - Manuel d'utilisation
Tondeuse Philips QG3190/00 - Manuel d'utilisation, à lire gratuitement en ligne au format PDF. Nous espérons que cela vous aidera à résoudre toutes les questions que vous pourriez avoir. Si vous avez encore des questions, contactez-nous via le formulaire de contact.
Introduction
Congratulations on your purchase and welcome to
Philips! To fully benefit from the suppor t that Philips offers,
register your product at www.philips.com/welcome.
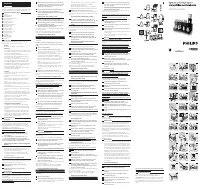
General description (Fig. 1)
A
Handle
B
Setting indicator
C
On/off switch
D
Socket for appliance plug
E
Micro shaver
F
Hair clipping comb
G
Setting selector
H
Nose/ear hair trimmer
I
Precision timmer
J
Precision comb
K
Micro trimmer
L
Cutting element
M
Beard trimming comb
N
Cleaning brush
O
Adapter
P
Appliance plug
Q
Charging light
R
Stand
Important
Read this user manual carefully before you use the
appliance and save it for future reference.
Danger
- Make sure the adapter does not get wet.
Warning
- Check if the voltage indicated on the adapter and on
the appliance corresponds to the local mains voltage
before you connect the appliance.
- The adapter contains a transformer. Do not cut
off the adapter to replace it with another plug, as
this causes a hazardous situation.
- This appliance is not intended for use by persons
(including children) with reduced physical, sensor y
or mental capabilities, or lack of experience and
knowledge, unless they have been given super vision
or instruction concerning use of the appliance by a
person responsible for their safety.
- Children should be super vised to ensure that they
do not play with the appliance.
Caution
-
Use, charge and store the appliance at a temperature
between 15°C and 35°C.
- Only use the adapter supplied to charge the
appliance.
-
If the adapter is damaged, always have it replaced
with one of the original type in order to avoid a
hazard.
- Do not use the appliance when one of the
attachments or combs is damaged or broken as this
may cause injur y.
- Be careful with hot water. Always check if the water
is not too hot, to prevent your hands from getting
burnt.
- This appliance is only intended for clipping human
scalp hair and for trimming and grooming the human
beard, moustache, sideburns, nose hair, ear hair and
eyebrows. Do not use it for another purpose.
- Never tr y to trim your eyelashes.
- If the appliance is subjected to a major change in
temperature, pressure or humidity, let the appliance
acclimatise for 30 minutes before you use it.
Compliance with standards
- The appliance complies with the internationally
approved IEC safety regulations and can be safely
used in the bath or shower and cleaned under the
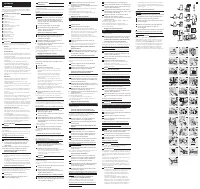
tap (Fig. 2).
- This Philips appliance complies with all standards
regarding electromagnetic fields (EMF). If handled
properly and according to the instructions in this
user manual, the appliance is safe to use based on
scientific evidence available today.
Preparing for use
Charging
Charge the appliance for at least 10 hours before you use
it for the first time and after a long period of disuse.
When the appliance is fully charged, it has a cordless
operating time of up to 35 minutes. Do not charge the
appliance for more than 24 hours.
The appliance does not run from the mains.
You cannot charge the appliance in the stand.
1
Insert the appliance plug into the socket of
the appliance and put the adapter in the wall
socket (Fig. 3).
,
The charging light on the adapter goes on to
indicate that the appliance is charging (Fig. 4).
Note: The charging light does not change colour and does
not go out when the appliance is fully charged.
Optimising the lifetime of the rechargeable
battery
- Remove the adapter from the wall socket when the
batter y is fully charged (which takes 10 hours).
- Do not leave the appliance plugged into the wall
socket for more than 24 hours.
- Discharge the batter y completely twice a year
by letting the motor run until it stops. Then fully
recharge the batter y.
Attaching/detaching attachments
All attachments (cutting element, precision trimmer, micro
trimmer, micro shaver and nose/ear hair trimmer) can be
attached and detached in the same way.
1
To attach the attachment, push it onto the
handle (Fig. 5).
2
To detach the attachment, pull it off the
handle. (Fig. 6)
Hair clipping
Preparing for hair clipping
Make sure that the appliance is fully charged when you
star t clipping.
It is not possible to run the appliance from the mains.
Only use the appliance on clean, dry hair. Do not use it
on freshly washed hair.
1
Make sure that the head of the person whose hair
you intend to cut is at the same level as your chest.
This ensures that all parts of the head are clearly
visible and within easy reach.
2
Comb the hair in the direction of growth (Fig. 7).
3
Put the cutting element on the handle (see
section ‘Attaching/detaching attachments’ in chapter
‘Preparing for use’).
Clipping with hair clipping comb
1
Slide the hair clipping comb into the guiding
grooves on both sides of the handle (‘click’) (Fig. 8).
2
Press the setting selector upwards or downwards
to set the desired setting (Fig. 9).
,
The setting indicator on the back of the appliance
shows the selected setting. (Fig. 10)
The table shows how long the hair will be after clipping at
the different settings.
When you clip for the first time, star t at the highest
setting (9) to familiarise yourself with the appliance.
Settings of hair clipping comb
Setting
1
2
3
4
5
6
7
8
9
Hair length after
clipping(mm)
4
6
8
10
12
14
16
18
20
Tip: Write down the hair length settings you have used to
create a certain hairstyle as a reminder for future clipping
sessions.
3
Switch on the appliance.
4
Move the appliance through the hair slowly.
-
To clip in the most effective way, move the appliance
against the direction of hair growth.
-
Since all hair does not grow in the same direction,
you need to move the appliance in different
directions (upward, downward or across) (Fig. 11).
-
Make sure that the flat par t of the comb is always
fully in contact with the scalp to obtain an even
result.
- Make overlapping passes over the head to ensure
that you cut all the hair that needs to be cut.
-
To achieve a good result with curly, sparse or long
hair, use a comb to guide the hair towards the
appliance.
5
Regularly remove cut hair from the comb.
If a lot of hair has accumulated in the comb, remove the
comb from the appliance and blow and/or shake the hair
out of it.
Contouring without hair clipping comb
You can use the appliance without hair clipping comb to
clip hair ver y close to the skin (0.6mm) or to contour the
neckline and the area round the ears.
Be careful when you clip without comb because the
cutting element removes every hair it touches.
1
Press the setting selector upwards and pull the
comb off the handle. (Fig. 12)
2
Before you start to contour the hairline round the
ears, comb the hair ends over the ears.
3
Tilt the appliance in such a way that only one edge
of the cutting element touches the hair ends when
you shape the contours round the ears (Fig. 13).
Only cut the hair ends. The hairline should be close to
the ear.
4
To contour the neckline and sideburns, turn the
appliance and make downward strokes (Fig. 14).
Move the appliance slowly and smoothly. Follow the
natural hairline.
Cutting shapes with micro trimmer
You can use the micro trimmer to cut shapes in scalp hair.
It cuts hair ver y close to the skin (0.6mm).
Be careful when you use the micro timmer because it
removes every hair it touches.
1
Put the micro trimmer on the handle (see section
‘Attaching/detaching attachments’ in chapter
‘Preparing for use’).
2
Make careful and controlled movements with the
micro trimmer.
-
To achieve a good cutting result, move the trimmer
against the direction of hair growth.
- Always make sure the micro trimmer is fully in
contact with the skin.
Trimming
Preparing for trimming
Make sure that the appliance is fully charged before you
star t trimming.
It is not possible to run the appliance from the mains.
1
Comb the hair to be trimmed (beard, moustache,
sideburns, eyebrows) with a fine comb.
2
Put the cutting element on the handle (see section
‘Attaching/detaching attachments’ in chapter
‘Preparing for use’).
Beard trimming with beard trimming comb
1
Slide the beard trimming comb into the
guiding grooves on both sides of the handle
(‘click’) (Fig. 15).
2
Press the setting selector upwards or downwards
to set the desired setting (Fig. 16).
,
The setting indicator on the back of the appliance
shows the selected setting.
The table shows how long the hair will be after trimming
at the different settings.
When you trim for the first time, star t at the highest
setting (9) to familiarise yourself with the appliance.
Settings of beard trimming comb
Settings
1
2
3
4
5
6
7
8
9
Hair length after
trimming(mm)
2
4
6
8
10
12
14
16
18
3
Switch on the appliance.
4
Move the appliance through the hair slowly (Fig. 17).
-
To trim in the most effective way, move the appliance
against the direction of hair growth.
-
Since all hair does not grow in the same direction,
you need to move the appliance in different
directions (upward or across).
-
Make sure that the flat par t of the comb is always
fully in contact with the skin to obtain an even result.
5
Regularly remove cut hair from the comb.
If a lot of hair has accumulated in the comb, remove the
comb from the appliance and blow and/or shake the hair
out of it.
Trimming at the ‘stubble look’ setting
1
To create a ‘stubble look’, trim with the beard
trimming comb set to hair length setting 1. (Fig. 18)
Beard trimming without beard trimming
comb
Use the beard trimmer without the beard trimming comb
to contour your beard and to remove single hairs.
Cutting without comb results in a ver y shor t stubble
beard (0.6mm).
1
Press the setting selector upwards and pull the
beard trimming comb off the handle (Fig. 19).
2
Make careful and controlled movements with
the beard trimmer. Touch the hair lightly with the
cutting element.
Beard trimming with precision trimmer
and precision comb
Use the precision trimmer with the precision comb to
trim smaller areas and to create designer beards.
1
Put the precision trimmer on the handle (see
section ‘Attaching/detaching attachments’ in chapter
‘Preparing for use’).
2
Slide the precision comb into the guiding grooves
on both sides of the handle (‘click’) (Fig. 20).
3
Press the setting selector upwards or downwards
to set the desired setting. (Fig. 21)
,
The setting indicator on the back of the appliance
shows the selected setting.
The table shows how long the hair will be after trimming
at the different settings.
When you trim for the first time, star t at the highest
setting (4) to familiarise yourself with the appliance.
Settings of precision comb
Setting
1
2
3
4
Hair length after trimming (mm)
2
4
6
8
Beard trimming with precision trimmer but
without precision comb
Use the precision trimmer without the precision comb to
shape your moustache and sideburns, to define contours
and to remove single hairs.
1
Press the setting selector upwards and pull the
precision comb off the handle (Fig. 22).
2
Hold the appliance upright and trim the desired
areas (Fig. 23).
Grooming facial hair (nose hair, ear hair and
eyebrows)
Trimming nose hair
1
Put the nose/ear hair trimmer on the handle (see
section ‘Attaching/detaching attachments’ in chapter
‘Preparing for use’).
2
Make sure your nostrils are clean.
3
Switch on the appliance and insert the tip of the
trimmer into one of your nostrils. (Fig. 24)
Do not insert the tip more than 0.5cm into your nostril.
4
Slowly move the tip in and out while turning it
round at the same time to remove unwanted hair.
To reduce the tickling effect, make sure that you press the
side of the tip firmly pressed against the skin.
Trimming ear hair
1
Put the nose/ear hair trimmer on the handle (see
section ‘Attaching/detaching attachments’ in chapter
‘Preparing for use’).
2
Clean the outer ear channel. Make sure it is free
from wax.
3
Switch on the appliance and move the tip softly
round the ear to remove hairs that stick out
beyond the rim of the ear. (Fig. 25)
4
Carefully insert the tip into the outer ear
channel. (Fig. 26)
Do not insert the tip more than 0.5cm into the ear
channel as this could damage the eardrum.
Trimming eyebrows with precision trimmer
and precision comb
Use the precision trimmer with the precision comb to
trim entire eyebrows to a uniform length.
Never trim your eyelashes. Never come too close to
your eyes.
1
Comb the eyebrows in the direction of hair
growth (Fig. 27).
2
Put the precision trimmer on the handle (see
section ‘Attaching/detaching attachments’ in chapter
‘Preparing for use’).
3
Slide the precision comb into the guiding grooves
on both sides of the handle (‘click’) (Fig. 20).
4
Press the setting selector upwards or downwards
to set the desired setting. (Fig. 21)
,
The setting indicator on the back of the appliance
shows the selected setting.
The table shows how long the hair will be after trimming
at the different settings.
When you trim for the first time, star t at the highest
setting (4) to familiarise yourself with the appliance.
Settings of precision comb
Setting
1
2
3
4
Hair length after trimming (mm)
2
4
6
8
5
Move precision trimmer over the eyebrow from
the outer tip of the eyebrow towards the base of
the nose. (Fig. 28)
Contouring eyebrows/removing single facial
hairs with micro trimmer
Use the micro trimmer to shape and define eyebrows
and to remove single facial hairs
Never trim your eyelashes. Never come too close to
your eyes.
Do not use micro trimmer too close to a mirror.
1
Put the micro trimmer on the handle (see section
‘Attaching/detaching attachments’ in chapter
‘Preparing for use’).
2
When you contour eyebrows, stretch the skin of
the eyelid (Fig. 29).
3
Make careful and controlled movements with the
micro trimmer.
- Always move the micro trimmer against the direction
of hair growth.
- Always make sure the micro trimmer is fully in
contact with the skin.
Shaving
Shaving with the micro shaver
Use the micro shaver to create smooth, well-defined
contours.
Before you use the micro shaver, always check it for
damage or wear. If the foil or cutter is damaged or
worn, do not use the micro shaver, as injury may occur.
If the foil is damaged, replace the top part of the micro
shaver and if the cutter is damaged, replace the whole
attachment before you use the micro shaver again.
1
Pre-trim the contours you want to shave with the
cutting element without comb or the precision
trimmer without comb.
2
Put the micro shaver on the handle (see
section ‘Attaching/detaching attachments’ in chapter
‘Preparing for use’).
3
Gently press the micro shaver onto the skin
and shave along contoured edges to remove any
stubble.
Do not press too hard.
Cleaning
Never use compressed air, scouring pads, abrasive
cleaning agents or aggressive liquids such as petrol or
acetone to clean the appliance.
Note: The appliance does not need any lubrication.
Clean the appliance ever y time you have used it.
1
Make sure the appliance is switched off and
disconnected from the socket.
2
Remove any comb and/or attachment from the
appliance.
3
If you have used the micro shaver, separate its top
part from its body (Fig. 30).
The shaving foil is very delicate. Handle it carefully.
Replace the top part of the micro shaver if the shaving
foil is damaged.
Do not clean the shaving foil with the brush, as this may
cause damage.
4
Blow and/or shake out any hair that has
accumulated in the attachments and/or combs.
5
Clean the attachments, the combs and the
appliance with lukewarm water or with the cleaning
brush.
6
Clean the adapter with the cleaning brush or a dry
cloth.
Keep the adapter dry.
Storage
Store the appliance and attachments in the charging stand
to prevent damage.
Replacement
If the adapter is damaged, always have it replaced with
one of the original type in order to avoid a hazard.
Only replace damaged or worn attachments or combs
with original Philips replacement attachments or combs
Philips replacement attachments, combs and adapters are
available from your Philips dealer and authorised Philips
ser vice centres.
If you have any difficulties obtaining an adapter or
replacement attachments and combs for the appliance,
contact the Philips Customer Care Centre in your
countr y (you find its phone number in the worldwide
guarantee leaflet).
Environment
- Do not throw away the appliance with the normal
household waste at the end of its life, but hand it in
at an official collection point for recycling. By doing
this, you help to preser ve the environment (Fig. 31).
- The built-in rechargeable batter y contains substances
that may pollute the environment. Always remove
the batter y before you discard and hand in the
appliance at an official collection point. Dispose of
the batter y at an official collection point for batteries.
If you have trouble removing the batter y, you can
also take the appliance to a Philips ser vice centre.
The staff of this centre will remove the batter y for
you and will dispose of it in an environmentally safe
way. (Fig. 32)
Disposal of the battery
Only remove the battery when it is completely empty.
1
Disconnect the appliance from the mains and let
the appliance run until the motor stops.
2
Remove any comb and/or attachment from the
appliance.
3
Remove the top part of the appliance with a
screwdriver (Fig. 33).
4
Pull the inner part out of the appliance (Fig. 34).
5
Pry open the inner part and pull out the
battery (Fig. 35).
6
Cut the wires close to the battery with a pair of
household scissors.
Do not connect the appliance to the mains again after
you have removed the battery.
Guarantee & service
If you need ser vice or information or if you
have a problem, please visit the Philips website at
www.philips.com
or contact the Philips Consumer Care
Centre in your countr y (you find its phone number in
the worldwide guarantee leaflet). If there is no Consumer
Care Centre in your countr y, go to your local Philips
dealer.
EnGlISH
QG3193, QG3190
13
35
34
33
32
31
30
29
28
27
26
25
24
23
22
21
20
19
18
17
16
15
14
12
11
10
9
8
7
6
5
4
3
2
N
O
P
B
D
C
R
A
H
I
L
E
J
M
F
G
G
G
K
Q
1
4203.000.5881.2
„Téléchargement du manuel“ signifie que vous devez attendre que le fichier soit complètement chargé avant de pouvoir le lire en ligne. Certains manuels sont très volumineux, et le temps de chargement dépend de la vitesse de votre connexion Internet.