Simplicity S20EZM - Manuel d'utilisation - Page 16


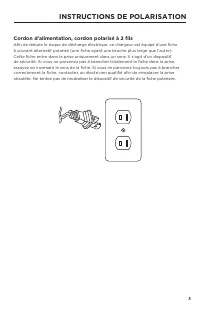
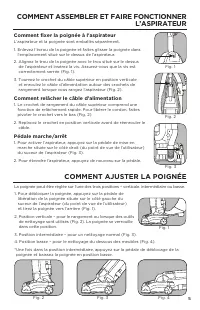
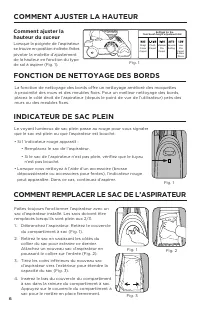
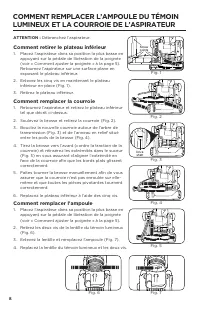


Table des matières:
- Page 10 – CONSIGNES DE SÉCURITÉ IMPORTANTES; LISEZ TOUTES LES INSTRUCTIONS AVANT; CONSERVEZ CES INSTRUCTIONS
- Page 11 – INSTRUCTIONS DE POLARISATION
- Page 13 – COMMENT ASSEMBLER ET FAIRE FONCTIONNER
- Page 14 – COMMENT AJUSTER LA HAUTEUR
- Page 17 – PROTECTION THERMIQUE DU MOTEUR
- Page 18 – DÉPANNAGE
- Page 19 – GARANTIE
8
ATTENTION :
Débranchez l’aspirateur�
Comment retirer le plateau inférieur
1� Placez l’aspirateur dans sa position la plus basse en
appuyant sur la pédale de libération de la poignée
(voir « Comment ajuster la poignée » à la page 5)�
Retournez l’aspirateur sur une surface plane en
exposant le plateau inférieur�
2� Enlevez les cinq vis en maintenant le plateau
inférieur en place (Fig� 1)�
3� Retirez le plateau inférieur�
Comment remplacer la courroie
1� Retournez l’aspirateur et retirez le plateau inférieur
tel que décrit ci-dessus�
2� Soulevez la brosse et retirez la courroie (Fig� 2)�
3� Bouclez la nouvelle courroie autour de l’arbre de
transmission (Fig� 3) et de l’anneau en relief situé
entre les poils de la brosse (Fig� 4)�
4� Tirez la brosse vers l’avant (contre la traction de la
courroie) et réinsérez les extrémités dans le suceur
(Fig� 5) en vous assurant d’aligner l’extrémité en
face de la courroie afin que les bords plats glissent
correctement�
5� Faites tourner la brosse manuellement afin de vous
assurer que la courroie n’est pas enroulée sur elle-
même et que toutes les pièces pivotantes tournent
correctement�
6� Replacez le plateau inférieur à l’aide des cinq vis�
Comment remplacer l’ampoule
1� Placez l’aspirateur dans sa position la plus basse en
appuyant sur la pédale de libération de la poignée
(voir « Comment ajuster la poignée » à la page 5)�
2� Retirez les deux vis de la lentille du témoin lumineux
(Fig� 6)�
3� Enlevez la lentille et remplacez l’ampoule (Fig� 7)�
4� Replacez la lentille du témoin lumineux et les deux vis�
7
If the brush bar stops rotating, it is likely that the
drive belt has snapped (usually because the
brush has been stalled). Replacement belts can
be obtained from Morphy Richards by calling the
spare parts helpline number:
0844 873 0726.
Accessing the floor nozzle
1.
Press the power pedal
(26)
to turn the cleaner off.
2.
Disconnect the cleaner from the mains supply.
3.
Press the upright release pedal
(18)
and place the
cleaner face down, in a flat position on a soft
surface (eg. carpet).
Removing brush bar and belt
4
.
Using a cross-headed screwdriver, unscrew the 5
screws on the base of the cleaner to release the
L-shaped plate from over the rotary brush bar.
5.
Remove the broken belt and lift out the rotary
brush bar.
Refitting brush bar and belt
6.
Hook the belt over the drive shaft (the belt must
be slid sideways past the end of the drive shaft).
7.
Pass the rotary brush bar through the belt,
ensuring the correct end is located against the
belt.
8.
Pull the rotary brush bar forward (against the pull
of the belt) and locate the square ends of the
brush bar into location slots in the floor nozzle.
9.
Rotate the brush bar by hand to ensure the belt is
running in the centre of its location on the brush.
Refitting the floor nozzle base cover
10
.
Refit the L-shaped plate over the rotary brush bar,
and screw the 5 screws back into the base of the
cleaner, using a cross-headed screwdriver, do not
overtighten the screws.
11.
Return the cleaner to the upright position.
Connect to the mains supply. Switch on to test.
Maintenance -
Changing the Belt
Screw
points
Drive
shaft
7
VC73420MUK Rev1_Instruction Book 30/04/2012 12:17 Page 7
7
If the brush bar stops rotating, it is likely that the
drive belt has snapped (usually because the
brush has been stalled). Replacement belts can
be obtained from Morphy Richards by calling the
spare parts helpline number:
0844 873 0726.
Accessing the floor nozzle
1.
Press the power pedal
(26)
to turn the cleaner off.
2.
Disconnect the cleaner from the mains supply.
3.
Press the upright release pedal
(18)
and place the
cleaner face down, in a flat position on a soft
surface (eg. carpet).
Removing brush bar and belt
4
.
Using a cross-headed screwdriver, unscrew the 5
screws on the base of the cleaner to release the
L-shaped plate from over the rotary brush bar.
5.
Remove the broken belt and lift out the rotary
brush bar.
Refitting brush bar and belt
6.
Hook the belt over the drive shaft (the belt must
be slid sideways past the end of the drive shaft).
7.
Pass the rotary brush bar through the belt,
ensuring the correct end is located against the
belt.
8.
Pull the rotary brush bar forward (against the pull
of the belt) and locate the square ends of the
brush bar into location slots in the floor nozzle.
9.
Rotate the brush bar by hand to ensure the belt is
running in the centre of its location on the brush.
Refitting the floor nozzle base cover
10
.
Refit the L-shaped plate over the rotary brush bar,
and screw the 5 screws back into the base of the
cleaner, using a cross-headed screwdriver, do not
overtighten the screws.
11.
Return the cleaner to the upright position.
Connect to the mains supply. Switch on to test.
Maintenance -
Changing the Belt
Screw
points
Drive
shaft
7
VC73420MUK Rev1_Instruction Book 30/04/2012 12:17 Page 7
Fig� 1
Fig� 2
Fig� 3
Fig� 4
Fig� 5
Fig� 7
Fig� 6
COMMENT REMPLACER L’AMPOULE DU TÉMOIN
LUMINEUX ET LA COURROIE DE L’ASPIRATEUR
8
„Téléchargement du manuel“ signifie que vous devez attendre que le fichier soit complètement chargé avant de pouvoir le lire en ligne. Certains manuels sont très volumineux, et le temps de chargement dépend de la vitesse de votre connexion Internet.
Résumé
2 CONSIGNES DE SÉCURITÉ IMPORTANTES Lors de l’utilisation d’un appareil électrique, il est important de prendre des mesures de précaution de base, notamment les suivantes : LISEZ TOUTES LES INSTRUCTIONS AVANT DE COMMENCER À UTILISER CET APPAREIL. USAGE DOMESTIQUE SEULEMENT. IMPORTANT : Le fabricant...
3 INSTRUCTIONS DE POLARISATION 3 Cordon d’alimentation, cordon polarisé à 2 fils Afin de réduire le risque de décharge électrique, ce chargeur est équipé d’une fiche à courant alternatif polarisé (une fiche ayant une broche plus large que l’autre)� Cette fiche entre dans la prise uniquement dans un ...
5 Comment fixer la poignée à l’aspirateur L’aspirateur et la poignée sont emballés séparément� 1� Enlevez l’écrou de la poignée et faites glisser la poignée dans l’emplacement situé sur le dessus de l’aspirateur� 2� Alignez le trou de la poignée avec le trou situé sur le dessus de l’aspirateur et in...