Broan BKSH130BL - Manuel d'utilisation - Page 32
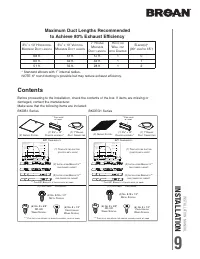
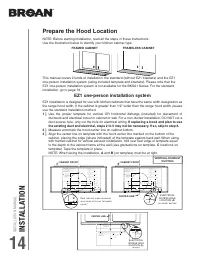

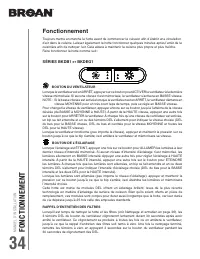
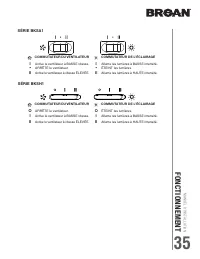
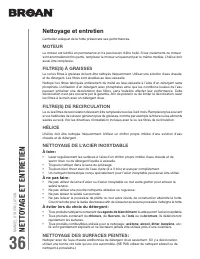
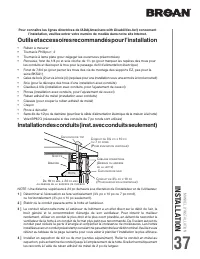
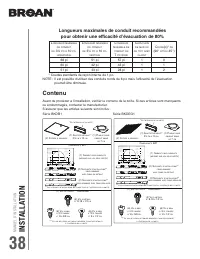
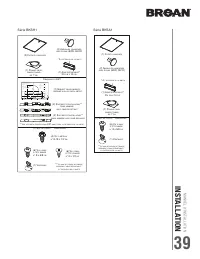
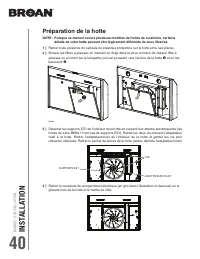
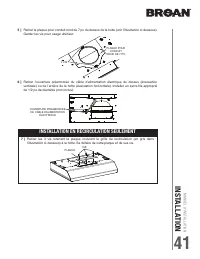
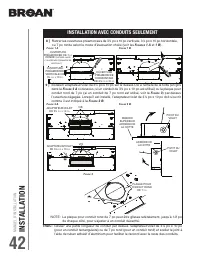
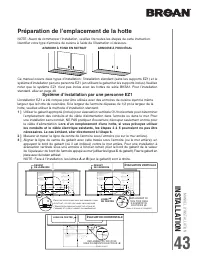
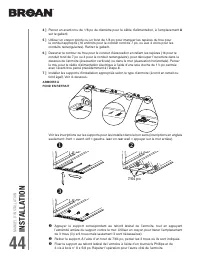
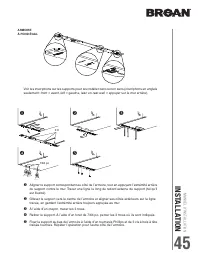
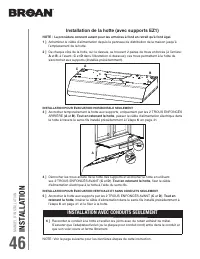
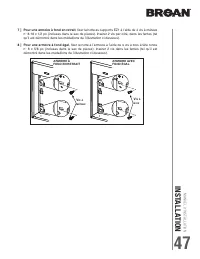
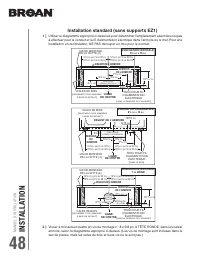
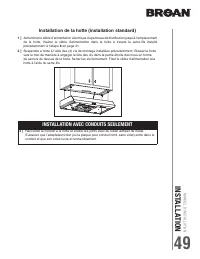
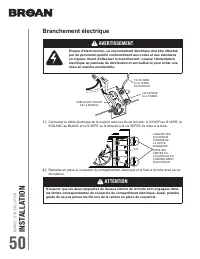
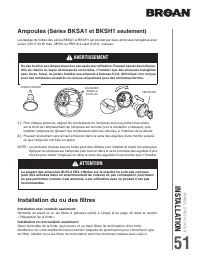

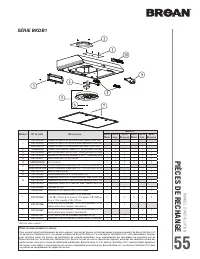
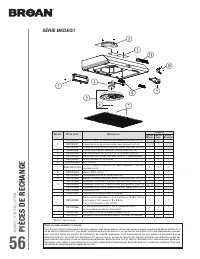
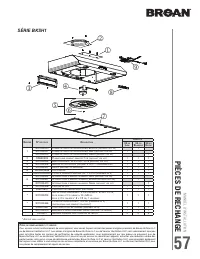
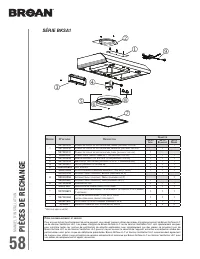


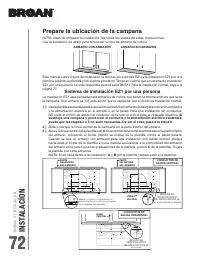
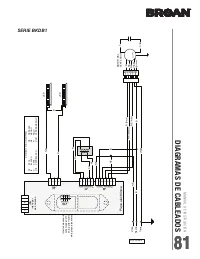
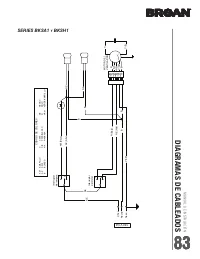
Table des matières:
- Page 2 – TION; Contents; Maximum Duct Lengths Recommended
- Page 3 – Prepare the Hood Location; EZ1 one-person installation system; If replacing a hood and plan to use
- Page 4 – MANUEL D’INST; TABLE DES MA
- Page 5 – SÉCURITÉ; AVERTISSEMENT; VEUILLEZ LIRE ET CONSERVER CES DIRECTIVES; INSTALLATEUR : LAISSER CE MANUEL AU PROPRIÉTAIRE.
- Page 6 – AFIN DE RÉDUIRE LES RISQUES DE FEU DE CUISINIÈRE :; ATTENTION
- Page 7 – FONCTIONNEMENT; Fonctionnement; SÉRIES BKDB1; RAPPEL D’ENTRETIEN DES FILTRES
- Page 8 – COMMUTATEUR DE L’ÉCLAIRAGE
- Page 9 – NETTO; Nettoyage et entretien; MOTEUR; À éviter lors du choix du détergent :; NETTOYAGE DES SURFACES PEINTES :
- Page 10 – Outils et accessoires recommandés pour l’installation; Pour connaître les lignes directrices de l’ADA(
- Page 11 – Contenu; Longueurs maximales de conduit recommandées
- Page 13 – Préparation de la hotte
- Page 14 – INSTALLATION EN RECIRCULATION SEULEMENT
- Page 15 – INSTALLATION AVEC CONDUITS SEULEMENT; TRUC
- Page 16 – Préparation de l’emplacement de la hotte; Système d’installation par une personne EZ1; Lors d’un remplacement d’une hotte, si vous prévoyez utiliser
- Page 19 – Installation de la hotte (avec supports EZ1); Tout en retenant la hotte
- Page 20 – ] Pour une armoire à fond en retrait; ] Pour une armoire à fond égal
- Page 21 – Installation standard (sans supports EZ1)
- Page 22 – Installation de la hotte (installation standard)
- Page 23 – Branchement électrique
- Page 24 – Ampoules; et; Installation du ou des filtres; Installation avec conduits seulement :; Installation en recirculation seulement :
- Page 26 – PIÈCES DE RECHANGE
- Page 28 – SÉRIE BKSH1
- Page 29 – SÉRIE BKSA1
- Page 30 – GARANTIE
- Page 31 – Largos maximales recommandados de conducto; Contenido
- Page 33 – Prepare la ubicación de la campana; Sistema de instalación EZ1 por una persona; Si
MANUAL DE INST
ALACIÓN
INST
ALACÍON
68
68
68
Serie BKSH1
C
L
A
B
Apoyar este borde contra la pared de atrás
Place this edge against back wall
VERTICAL EXHAUST
= 3¼” x 10”
= 3¼” x 14”
RECTANGULAR DUCTING
7” ROUND DUCTING
OR
Use this template for marking; do not attempt to cut out the ducting hole through it.
NOTE: These cutouts are clearance holes; they do not need to be the exact size of ducting.
= 3¼ po x 10 po
= 3¼ po x 14 po
CONDUIT RECTANGULAIRE
CONDUIT ROND DE 7 PO
OU
= 3¼ pulg. x 10 pulg.
= 3¼ pulg. x 14 pulg.
CONDUCTO RECTANGULAR
CONDUCTO REDONDO
DE
7 PULG.
O
Appuyer ce bord au mur arrière
Utiliser ce gabarit pour marquer vos repères; ne pas tenter de découper
le trou pour le conduit à travers le gabarit.
NOTE : Les découpes incluent le jeu nécessaire à l’installation; elles ne doivent pas
être du format exact des conduits.
Use esta plantilla para crear marcados; no trate de cortar el
agujero del conducto a través de la plantilla.
NOTA: To be translated in Spanish.
MARK WHERE INDICATED
FOR
THE APPROPRIATE SIZE DUCT OPENING
MARQUER LES REPÈRES AUX ENDROITS INDIQUÉS SELON
LE
FORMAT DE CONDUIT UTILISÉ
TITLE TO BE TRANSLATED IN SPANISH
Electrical access hole center
A
= single blower hood
B
= double blower hood
Centre du trou pour fil
d’alimentation électrique
A
= hotte ventilateur simple
B
= hotte ventilateur double
To be translated in Spanish
Electrical access hole center
A
= single blower hood
B
= double blower hood
4¼”
10½”
14½”
8”
7½”
C
C
C
Bend template along graduated
scale when installing to framed
cabinet.
Pour une installation sous une
armoire à fond en retrait, utiliser les
lignes pour mesurer l’épaisseur du
décalage causé par le mur de
l’armoire et plier le gabarit en
conséquence.
To be translated in Spanish.
(2)
BOMBILLAS
HALÓGENAS
CON
PANTALLA
50 W, GU10
(1) V
ENTOSA
PARA
BOMBILLAS
(1) C
ONJUNTO
DE
LA
CLAPETA
DE
RETENCIÓN
*
DE
3¼”
X
10”
* S
E
ENCUENTRA
DENTRO
DE
LA
CAMPANA
(1) C
ONECTOR
DE
CONDUCTO
REDONDO
DE
7”
(2) F
ILTROS
DE
GRASA
C
OMPONENTES
EZ1
(2) S
OPORTES
DE
INSTALACIÓN
**
PARA
ARMARIOS
CON
ARMAZÓN
(2) S
OPORTES
DE
INSTALACIÓN
**
PARA
ARMARIOS
SIN
ARMAZÓN
(1) P
LANTILLA
PARA
INSTALACIÓN
DE
CONDUCTOS
(
IMPRESA
POR
AMBOS
LADOS
)
** L
OS
SOPORTES
EZ1
ESTÁN
DENTRO
DE
LA
CAMPANA
(1) B
OLSA
DE
PIEZAS
***
CONTENIDO
:
(6) T
ORNILLOS
DE
CABEZA
REDONDA
PARA
MADERA
N
° 8
X
5/8”
(4) T
ORNILLOS PARA METAL
N
° 8-18
X
1/2”
(6) T
ORNILLOS
EMBUDITOS
PARA
MADERA
N
° 8
X
1/2”
*** L
A
BOLSA
DE
PIEZAS
ESTÁ
DETRÁS
DEL
CONJUNTO
DE
CLAPETA
DE
RETENCIÓN
,
DENTRO
DE
LA
CAMPANA
Serie BKSA1
(2)
BOMBILLAS
HALÓGENAS
CON
PANTALLA
50 W, GU10
(1) F
ILTRO
DE
GRASA
(1) C
ONJUNTO
DE
LA
CLAPETA
DE
RETENCIÓN
*
DE
3¼”
X
10”
(1) B
OLSA
DE
PIEZAS
**
CONTENIDO
:
* S
E
ENCUENTRA
DENTRO
DE
LA
CAMPANA
(1) C
ONECTOR
DE
CONDUCTO
REDONDO
DE
7”
(1) V
ENTOSA
PARA
BOMBILLAS
(5) T
ORNILLOS
DE
CABEZA
REDONDA
PARA
MADERA
N
.° 8
X
5/8”
** L
A
BOLSA
DE
PIEZAS
ESTÁ
DETRÁS
DEL
CONJUNTO
DE
CLAPETA
DE
RETENCIÓN
,
DENTRO
DE
LA
CAMPANA
„Téléchargement du manuel“ signifie que vous devez attendre que le fichier soit complètement chargé avant de pouvoir le lire en ligne. Certains manuels sont très volumineux, et le temps de chargement dépend de la vitesse de votre connexion Internet.
Résumé
INSTALLATION MANUAL INSTALLA TION 9 Contents Before proceeding to the installation, check the contents of the box. If items are missing or damaged, contact the manufacturer. Make sure that the following items are included: BKDB1 Series BKDEG1 Series (1) 3¼” X 10” D AMPER AS...
INST ALLA TION MANUAL INST ALLA TION 14 Prepare the Hood Location NOTE: Before star ting installation, read all the steps of these instructions.Use the illustration below to identify your kitchen cabinet type. EZ1 one-person installation system EZ1 installation is designed for use with kitchen cabin...
MANUEL D’INST ALLATION TABLE DES MA TIÈRES 31 31 Sécurité . . . . . . . . . . . . . . . . . . . . . . . . . . . . . 32-33 Fonctionnement . . . . . . . . . . . . . . . . . . . . . . . 34-35 Nettoyage et entretien . . . . . . . . . . . . . . . . . . . . . 36 MoteurFiltre(s) à graissesFiltre(s) de reci...
Autres modèles de hottes de cuisine Broan
-
 Broan ALT130BL
-
Broan ALT130SS
-
Broan ALT130WW
-
Broan ALT136BL
-
Broan ALT136SS
-
Broan ALT136WW
-
 Broan ALT230BL
-
Broan ALT230BLS
-
Broan ALT230SS
-
Broan ALT230WW