DeLonghi EN750MB - Manuel d'utilisation - Page 16


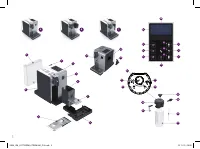


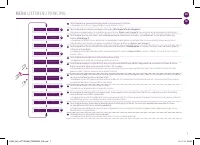
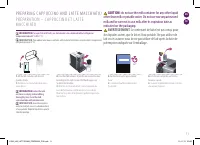
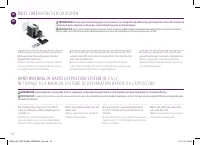
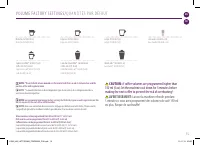
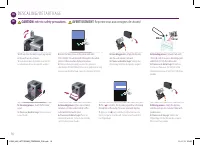
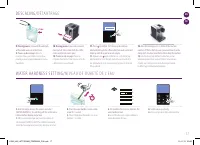
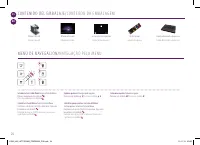
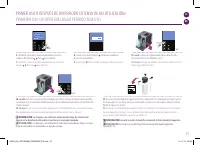
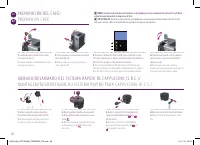
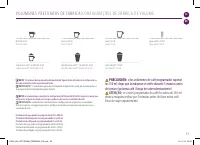
Table des matières:
- Page 4 – V U E D ’ E N S E M B L E; Système de préparation rapide du
- Page 5 – C O N T E N U; PREMIÈRE UTILISATION OU
- Page 7 – M E N U P R I N C I PA L
- Page 8 – do not use the milk container for any other liquid
- Page 9 – Descaling; Volume factory settings; E N T R E T I E N Q U OT I D I E N
- Page 10 – V O LU M E FAC TO RY S E T T I N G S /; if coffee volumes are programmed higher than
- Page 11 – D É TA R T R AG E; refer to safety precautions.
- Page 13 – C O N TAC T T H E
- Page 14 – G A R A N T I E
max
SET LANGUAGE
to continue
LANGUAGE
Actual value : EN
New value : [ ]
to select
05
max
First read the safety precautions to avoid risks of fatal electrical shock and fire
Remove the plastic films from grid,
lever and machine panels.
Remove the water tank, drip tray, and capsule
container. Adjust the cable length and store the
excess in the cable guide under the machine.
Put the machine in upright position,
plug machine into mains.
The water tank can be carried by
its cover.
Rinse the water tank before filling with
potable water up to maximum level.
Insert the hot water spout.
Switch machine ON
Set your preferred language.
Press to continue.
SET LANGUAGE
to continue
Select your language by scrolling the
options using up/down arrow. Press to
confirm.
LANGUAGE
Actual value : EN
New value : [ ]
to select
Coffee preparation
x3
x3
110 ml
40 ml
25 ml
05
06
4
°
15”
Assembling / disassembling of Rapid Cappuccino system (R.C.S)
07
ES
BR
PRIMER USO O DESPUÉS DE UN PERIODO EXTENSO DE NO UTILIZACIÓN/
PRIMEIRO USO OU APÓS UM LONGO PERÍODO SEM USO
INFORMACIÓN:
las máquinas son verificadas completamente luego de su fabricación.
Algunos restos de polvo de café podrían encontrarse en el agua de enjuagado.
INFORMAÇÕES:
as máquinas são totalmente testadas após sua produção. Alguns vestígios
de pó de café podem ser encontrados na água do enxágue.
INFORMACIÓN:
consulte la sección Armado/Desarmado del Sistema Rápido de Cappuccino.
INFORMAÇÕES:
consulte a seção Montagem/Desmontagem do Rapid Cappuccino
System (R.C.S.).
7.
LANGUAGE
:
seleccione su idioma desplazando las opciones
usando las flechas hacia . Pulse para confirmar.
7.
LANGUAGE
:
selecione seu idioma rolando pelas opções com a
seta para
. Pressione para confirmar.
11.
Desarme el Sistema Rápido de Cappuccino (S.R.C.) y limpie todos los componentes en el nivel superior
de su lavavajillas. En caso de no contar con un lavavajillas, consulte la sección Lavado a mano del Sistema
Rápido de Cappuccino (S.R.C.).
11.
Desmonte o Sistema Rápido para Cappuccino (R.C.S.) e limpe todos os componentes no nível superior
de sua máquina de lavar louças. No caso de não ter uma máquina de lavar louça disponível, consulte a
seção Lavagem à Mão do Rapid Cappuccino System (R.C.S.).
10.
Lavado:
repita tres veces a través de la salida de agua caliente. Una vez terminado, retire y guárdelo
nuevamente en el área de almacenamiento situada en la parte derecha de la máquina. Cierre la Puerta del
conector de vapor.
10.
Enxágue:
repita três vezes com o bico de água quente. Ao terminar, remova-o e recoloque-o na área
de armazenamento, localizada na lateral da máquina. Feche a porta do conector de vapor.
9.
Lavado:
coloque un recipiente debajo de la salida del café y
presione el botón Lungo. Repita tres veces.
9.
Enxágue:
coloque um recipiente sob a saída do café e pressione o
botão Lungo. Repita três vezes.
8.
Cuando se presiona el símbolo , la máquina comienza el
proceso de calentamiento.
8.
Depois que o for pressionado, a máquina começará a aquecer.
27
6926_UM_LATTISSIMA_PREMIUM_Z1A.indb 27
13.11.13 09:56
„Téléchargement du manuel“ signifie que vous devez attendre que le fichier soit complètement chargé avant de pouvoir le lire en ligne. Certains manuels sont très volumineux, et le temps de chargement dépend de la vitesse de votre connexion Internet.
Résumé
O V E R V I E W / V U E D ’ E N S E M B L E Display (preparations)/ Écran (préparations) 13 Lungo/ Lungo 14 Espresso/ Espresso 15 Ristretto/ Ristretto 16 Hot water/ Eau chaude 17 Warm milk/ Lait chaud 18 Cappuccino/ Cappuccino 19 Latte Macchiato/ Latte Macchiato Display (navigation)/ Écran (navigat...
EN FR C O N T E N T / C O N T E N U Nespresso is an exclusive system creating the perfect espresso, time after time. All Nespresso machines are equipped with a unique extraction system that guarantees up to 19 bars of pressure. Each parameter has been calculated with great precision to ensure that a...
EN FR Enter the Menu list/ Ouvrir le menu principal Press symbol/ Appuyez brièvement sur le symbole . Browse options/ Parcourir les options Press symbol/ Appuyez sur le symbole . Select option/ Choisir une option Press symbol/ Appuyez sur le symbole . Exit from the Menu l...
Autres modèles de machines à café DeLonghi
-
 DeLonghi COM530M
-
 DeLonghi EC260BK
-
 DeLonghi EC680BK
-
 DeLonghi EC9155GR
-
 DeLonghi EC9155GRPKK
-
 DeLonghi EC9155MB
-
 DeLonghi EC9155MBPK
-
 DeLonghi EC9155W
-
 DeLonghi EC9155WPKK
-
 DeLonghi EC9355BM