MANTIS 3558 - Manuel d'utilisation - Page 12


12
Manuel de l’utilisateur
INFORMATIONS SUR LE CHARGEUR (SUITE)
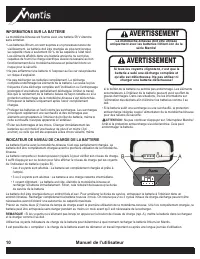
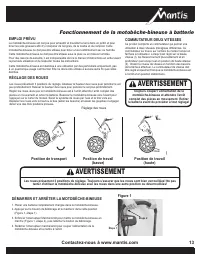
Brancher la fiche du chargeur dans la
prise de courant. Le voyant ROUGE
s’allume en continu.
Voyant ROUGE
ALLUMÉ
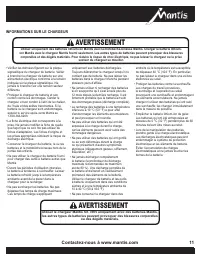
Placer la batterie dans le chargeur en la glissant à
fond vers l’avant.
Le chargeur Mantis fait aussi fonction d’outil de
diagnostic. Ses voyants s’allument suivant des
motifs spécifiques pour indiquer l’état actuel de la
batterie. Voir la table ci-dessous.
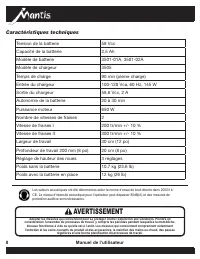
VOYANT INDICATEUR DU CHARGEUR
ROUGE ALLUMÉ en continu, VERT CLIGNOTANT
La batterie se charge
VERT ALLUMÉ en continu, ROUGE ÉTEINT
La batterie est complètement chargée. Retirer la batterie du
chargeur.
ROUGE et VERT tous deux CLIGNOTANTS
Température anormale. La batterie est soit trop chaude, soit trop
froide
Voyant VERT ÉTEINT, voyant ROUGE
CLIGNOTANT
Problème de batterie. La retirer et la changer. Pour toute
assistance, appeler le service après-vente Mantis au 1-800-366-
6268.
• Une fois la charge terminée, glisser la batterie vers l’arrière pour la retirer du chargeur.
REMARQUE : La durée habituelle pour atteindre une pleine charge est d’environ 100 minutes.
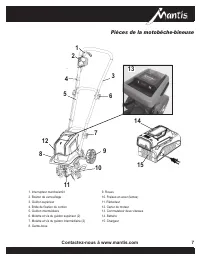
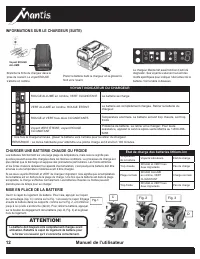
MISE EN PLACE DE LA BATTERIE
Ouvrir le capot du logement de batterie. Pour cela, appuyer sur loquet
de verrouillage (rep. C) comme sur la Fig. 1 et relever le capot. Engager
ensuite la batterie dans les supports, comme sur la Fig. 2, et l’enfoncer
jusqu’à ce qu’elle s’enclenche (déclic). Pour retirer la batterie, appuyer
sur le bouton de dégagement de la batterie (rep. D, Fig. 3) et la glisser
hors du logement.
CHARGER UNE BATTERIE CHAUDE OU FROIDE
Les batteries fonctionnent sur une large plage de température, mais cela ne signifie pas
qu’elles peuvent aussi être chargées dans les mêmes conditions. Le processus de charge est
plus délicat que la décharge et suppose des précautions particulières. Les froids extrêmes
et les fortes chaleurs réduisent la capacité d’accumulation, c’est pourquoi la batterie doit être
amenée à une température modérée avant d’être chargée.
Si les deux voyants ROUGE et VERT du chargeur clignotent, cela signifie que la température
de la batterie est en dehors de la plage de charge. Une fois que la batterie est dans la plage
acceptable, la charge s’effectue normalement. Les batteries chaudes ou froides peuvent
prendre plus de temps pour se charger.
TO
CHARGE
Insert the
plug
of the
charger
into the
wall receptacle.The
top red
light will
illuminate
and stay red
.See figure .
Pla
ce the battery pack into the
charger
by
sliding
the pack
as
shown
in
figure
8 to
lock
it into position
.
The bottom light will Illuminate green
to indicate that the battery is
charging.
The bottom green (charging) light will blink continuously
and the top red
light
remaining ON continuously, indicating
that the
charging
process has
started.
NOTE: Typical time required
to reach a
full charge
is
around 100 minutes.
NOTE:
If the top
light remains
red
while
the
bottom light alternately flashes
red and
green,
this indicates a
temperature abnormality (i.e.
that the battery pack is either too hot or too
cold).
If there is
only
a red
blinking light,
this indicates that
something
is
wrong with
the
battery.
Contact
Schiller customer
service center at
1-800-366-6268
for
assistance.
If the
charging light
indicator
alternately blinks
red and
green
or the
light
indicator does not
come
on at
all,
check that the battery pack is
fully
seated
into the
bay. Remove
the pack and
reinsert.
If the
problem persists,
contact the
Schiller customer
service center at
1-800-366-6268
for
assistance.
INATALLING THE BATTERY
Open the battery
cover. This
is done by
pressing
the
lock release
(
Item
c
)
as
shown
in
Fig.
1 and
swinging up
the
cover. Then
connect the battery
into the
mounts
as
shown
in
Fig. 2
and
push them forward until you
hear the batteries
engage. Push
the
button Fig.3/item
D and then take
out
the
battery
when
finish
using.
Important!
The
battery
must always
be
fully charged
before
use. Close
the battery cover by
swinging
it
down,
and
make sure
that it
latches
in
place correctly.
Co
r
dl
e
ss Till
er
O
per
ation
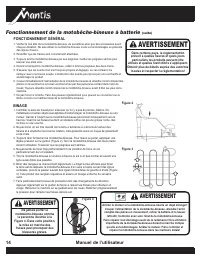
INTENDED
USE
The cordless tiller
is
designed
for
small gardens
and
flower beds,
this
cordless tiller effectively loosens
and
turns
over
new soil.
It
may also
be
used
to
mix
coarse
soil with fertilizer, peat,
and
compost. This product may
not be
used
to
till extremely
dry or
wet soil.The use
of this
product
in rain or
wet
conditions is
prohibited.
For safety
reasons,
it is
essential
to read the entire
instruction manual
before first
use
and to observe
all
the
instructions
contained
within
this
manual.
Fig.1
D
Fig. 2
C
Fig. 3
TO
CHARGE
Insert the
plug
of the
charger
into the
wall receptacle.The
top red
light will
illuminate
and stay red
.See figure .
Pla
ce the battery pack into the
charger
by
sliding
the pack
as
shown
in
figure
8 to
lock
it into position
.
The bottom light will Illuminate green
to indicate that the battery is
charging.
The bottom green (charging) light will blink continuously
and the top red
light
remaining ON continuously, indicating
that the
charging
process has
started.
NOTE: Typical time required
to reach a
full charge
is
around 100 minutes.
NOTE:
If the top
light remains
red
while
the
bottom light alternately flashes
red and
green,
this indicates a
temperature abnormality (i.e.
that the battery pack is either too hot or too
cold).
If there is
only
a red
blinking light,
this indicates that
something
is
wrong with
the
battery.
Contact
Schiller customer
service center at
1-800-366-6268
for
assistance.
If the
charging light
indicator
alternately blinks
red and
green
or the
light
indicator does not
come
on at
all,
check that the battery pack is
fully
seated
into the
bay. Remove
the pack and
reinsert.
If the
problem persists,
contact the
Schiller customer
service center at
1-800-366-6268
for
assistance.
INATALLING THE BATTERY
Open the battery
cover. This
is done by
pressing
the
lock release
(
Item
c
)
as
shown
in
Fig.
1 and
swinging up
the
cover. Then
connect the battery
into the
mounts
as
shown
in
Fig. 2
and
push them forward until you
hear the batteries
engage. Push
the
button Fig.3/item
D and then take
out
the
battery
when
finish
using.
Important!
The
battery
must always
be
fully charged
before
use. Close
the battery cover by
swinging
it
down,
and
make sure
that it
latches
in
place correctly.
Co
r
dl
e
ss Till
er
O
per
ation
INTENDED
USE
The cordless tiller
is
designed
for
small gardens
and
flower beds,
this
cordless tiller effectively loosens
and
turns
over
new soil.
It
may also
be
used
to
mix
coarse
soil with fertilizer, peat,
and
compost. This product may
not be
used
to
till extremely
dry or
wet soil.The use
of this
product
in rain or
wet
conditions is
prohibited.
For safety
reasons,
it is
essential
to read the entire
instruction manual
before first
use
and to observe
all
the
instructions
contained
within
this
manual.
Fig.1
D
Fig. 2
C
Fig. 3
La batterie doit toujours être complètement chargée avant
utilisation. Rabattre le capot du logement de batterie pour
le fermer et s’assurer qu’il s’enclenche correctement.
ATTENTION!
État de charge des batteries lithium-ion
Température
de la batterie
Voyants indicateurs
État de charge
Trop chaude
ROUGE et VERT tous
deux clignotants
Pas de charge
Plage normale
ROUGE ALLUMÉ
en continu, VERT
CLIGNOTANT
Charge normale
Trop froide
ROUGE et VERT tous
deux clignotants
Pas de charge
„Téléchargement du manuel“ signifie que vous devez attendre que le fichier soit complètement chargé avant de pouvoir le lire en ligne. Certains manuels sont très volumineux, et le temps de chargement dépend de la vitesse de votre connexion Internet.