ACCESSORIES; ACCESORIOS - ProTeam 107252 - Manuel d'utilisation - Page 8
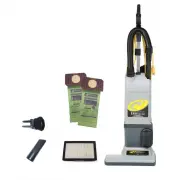

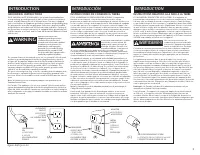
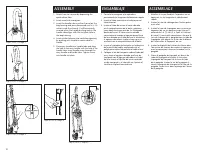
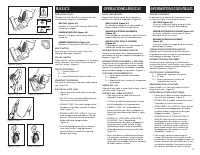
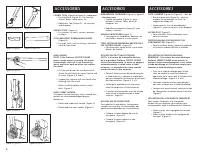

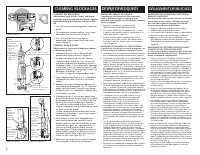
Table des matières:
- Page 2 – TABLE OF CONTENTS ÍNDICE TABLE DES MATIÈRES; Parts Identification; Go to; registrar su aspiradora nueva.
- Page 3 – AVERTISSEMENT
- Page 4 – INTRODUCTION; INTRODUCCIÓN; WARNING
- Page 5 – GROUNDING INSTRUCTIONS; INSTRUCCIONES DE CONEXIÓN A TIERRA; INSTRUCTIONS RELATIVES À LA MISE À LA TERRE
- Page 6 – ASSEMBLY; ENSAMBLAJE
- Page 7 – BASICS; OPERACIONES BÁSICAS; INFORMATIONS ESSENTIELLES
- Page 8 – ACCESSORIES; ACCESORIOS
- Page 9 – FILTERS; FILTROS
- Page 10 – CLEARING BLOCKAGES; DESPEJE DE BLOQUEOS; DÉGAGEMENT DES BLOCAGES
- Page 11 – TROUBLESHOOTING; RESOLUCIÓN DE PROBLEMAS
- Page 12 – LIMITED WARRANTY; GARANTÍA LIMITADA
6
ACCESSORIES
COMBO TOOL
(Figure A & Figure B)
- works as a:
•
Dusting Brush (Figure A) - for furniture,
shelves, books, lamp bases, etc.
• Upholstery Tool (Figure B) - for cushions
and draperies.
CREVICE TOOL
(Figure C)
:
• For crevices, air vents, corners, between
cushions.
CLOG-RESISTANT UNBREAKABLE WAND
(Figure D)
:
• For high areas, such as ceilings, and other
hard to reach areas.
USING WAND
NOTE: If the ProForce 1200XP/1500XP
power nozzle motor is running, the motor
automatically shuts off if you remove the
wand, and turns back on when you replace
the wand.
• Pull the wand from the wand duct and
attach the dust brush or crevice tool to end
of wand. (Figure A, B and E)
• Support the vacuum with one hand while
cleaning with the wand.
• When finished, replace wand in wand
duct. (Figure F)
USING CARRY HANDLE
To support vacuum and carry when needed, two
options are recommended depending on
preference:
• Place hand under carry handle. (Figure G)
• Place hand over carry handle. (Figure H)
ACCESORIOS
HERRAMIENTA COMBINADA
(Figura A y Figura B)
– funciona como:
• Cepillo para polvo (Figura A): para
muebles, estantes, libros, bases de
lámparas, etc.
• Boquilla para tapicería (Figura B): para
cojines y cortinas.
BOQUILLA RINCONERA
(Figura C)
:
• Para aspirar en hendiduras, aberturas de
ventilación, esquinas y entre cojines.
TUBO EXTENSOR IRROMPIBLE RESISTENTE A
LAS OBSTRUCCIONES
(Figura D)
:
•
Para áreas altas, como techos y otras áreas
difíciles de alcanzar.
UTILIZACIÓN DEL TUBO EXTENSOR
NOTA: Si el motor de la boquilla eléctrica
de la aspiradora ProForce 1200XP/1500XP
está en funcionamiento, el motor se apagará
automáticamente si usted retira el tubo
extensor y se encenderá de nuevo cuando
usted reinstale el tubo extensor.
• Retire el tubo extensor del conducto para
el tubo extensor y coloque el cepillo para
polvo o la boquilla rinconera en el extremo
del tubo extensor. (Figura A, B y E)
• Sostenga la aspiradora con una mano
mientras limpia con el tubo extensor.
• Cuando haya terminado, reinstale el tubo
extensor en el conducto para el tubo
extensor. (Figura F)
USO DEL ASA DE TRANSPORTE
Para soportar la aspiradora y transportarla
cuando sea necesario, se recomiendan dos
opciones que dependen de su preferencia:
• Coloque la mano debajo del asa de
transporte. (Figura G)
• Coloque la mano sobre el asa de
transporte. (Figura H)
ACCESSOIRES
OUTIL COMBINÉ
(Figure A et Figure B) –
Sert de :
•
Brosse à épousseter (Figure A) – pour les
meubles, les rayonnages, les livres, les
supports de lampe, etc.
•
Suceur pour les tissus d’ameublement
(Figure B) – pour les coussins et les draperies.
SUCEUR PLAT
(Figure C) :
•
Pour interstices, évents d’aération, coins,
entre les coussins.
TUBE DE RALLONGE INCASSABLE ET NE
S’OBSTRUANT PAS
(Figure D) :
•
Pour les endroits élevés, comme les plafonds,
et les autres endroits difficiles à atteindre.
UTILISATION DU TUBE DE RALLONGE
REMARQUE : Si le moteur du suceur électrique
ProForce 1200XP/1500XP est en marche, le
moteur s’éteint automatiquement si vous retirez
le tube de rallonge, et il se rallume lorsque vous
remettez le tube de rallonge en place.
•
Tirez sur le tube de rallonge pour le faire
sortir du conduit et attachez la brosse à
épousseter ou le suceur plat à l’extrémité du
tube de rallonge. (Figures A, B et E)
•
Soutenez l’aspirateur d’une main pendant
que vous nettoyez avec le tube de rallonge.
•
Lorsque vous aurez terminé, remettez le tube
de rallonge dans le conduit prévu à cet effet.
(Figure F)
UTILISATION DE LA POIGNÉE DE TRANSPORT
Pour soutenir l’aspirateur et le transporter
lorsque cela est nécessaire, deux options sont
recommandées selon la préférence de l’utilisateur :
• Placez la main sous la poignée de transport.
(Figure G)
• Placez la main au-dessus de la poignée de
transport. (Figure H)
Figure A/
Figura A
Figure B/
Figura B
Figure C/
Figura C
Figure D/
Figura D
Figure E/
Figura E
Figure F/
Figura F
Figure G/
Figura G
Figure H/
Figura H
„Téléchargement du manuel“ signifie que vous devez attendre que le fichier soit complètement chargé avant de pouvoir le lire en ligne. Certains manuels sont très volumineux, et le temps de chargement dépend de la vitesse de votre connexion Internet.
Résumé
TABLE OF CONTENTS ÍNDICE TABLE DES MATIÈRES © 2018 ProTeam, Inc. All Rights Reserved. ProTeam, ProForce, Intercept Micro, Cleaning for Health, and Filter Guard are registered trademarks of ProTeam, Inc. © 2018 ProTeam, Inc. Todos los derechos reservados. ProTeam, ProForce, Intercept Micro, Clean...
1 IMPORTANT SAFETY INSTRUCTIONS INSTRUCCIONES DE SEGURIDAD IMPORTANTES CONSIGNES DE SÉCURITÉ IMPORTANTES 1. DO NOT leave any ProTeam vacuum plugged in when not in use. Unplug unit from the outlet before servicing. 2. DO NOT use outdoors or on wet surfaces. 3. DO NOT allow the vacuum to be used a...
2 INTRODUCTION INSPECTION Carefully unpack and inspect your new ProTeam vacuum for shipping damage. Each unit is tested and thoroughly inspected before shipping. For instructions regarding any shipping damage, contact ProTeam immediately (866.888.2168). All returns must have a Return Authorization ...
Autres modèles de aspirateurs ProTeam
-
 ProTeam 105896
-
 ProTeam 107251
-
 ProTeam 107303
-
 ProTeam 107304
-
 ProTeam 107308
-
 ProTeam 107310
-
 ProTeam 107363
-
 ProTeam 107535
-
 ProTeam 107538
-
 ProTeam 107713