Candy CNE 89 T - Manuel d'utilisation - Page 11
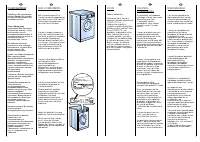
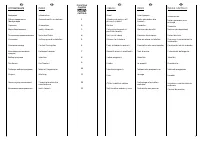
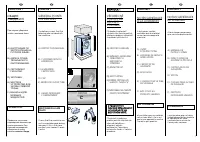
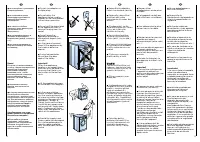
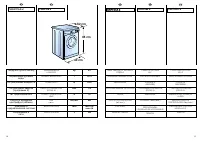
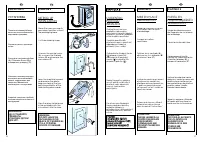
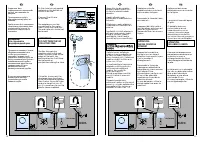
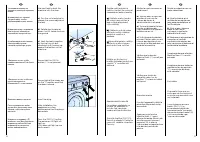
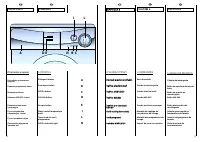
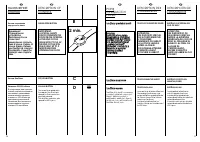
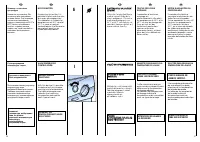

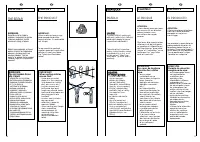
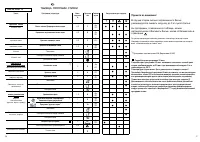
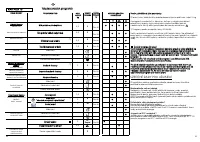
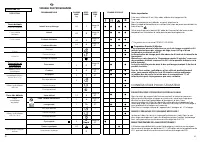
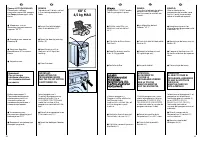
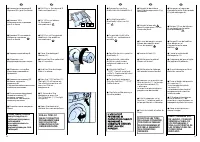
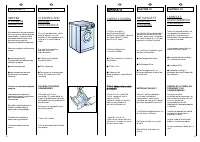
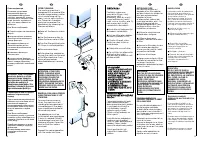
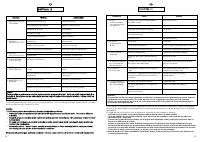

Table des matières:
- Page 2 – OUR COMPLIMENTS; ÚVOD
- Page 3 – INDEX
- Page 6 – CHAPTER 3; SAFETY MEASURES; ÏÀPÀÃPÀÔ 3; ÌÅPÛ; POKYNY PRO; CHAPITRE 3; MESURES DE; CAPÍTULO 3; NORMAS DE
- Page 9 – CHAPTER 5; ÏÀPÀÃPÀÔ 5; ÓÑÒÀÍÎÂÊÀ; ÍÅ ÎÑÒÀÂËßÉÒÅ; AP; UVEDENÍ DO; CHAPITRE 5
- Page 10 – DO NOT TURN THE TAP; Íå îòêpûâàéòå; NE PAS OUVRIR LE
- Page 15 – OK; Íå âpàùàéòå pó÷êó
- Page 18 – CHAPTER 9; THE PRODUCT; When sorting articles; èÄêÄÉêÄî 9; íàè ÅÖãúü; èË ÒÓÚËÓ‚Í ·ÂÎ ̧fl; PRÁDLO; CHAPITRE 9; LE PRODUIT; Au cours de la phase; CAPÍTULO 9; EL PRODUCTO; Durante la selección
- Page 21 – TABLEAU DES PROGRAMMES; CONSEILS UTILES POUR L’UTILISATEUR
20
21
A
B
C
EN
Use front feet to level the
machine with the floor.
a)
Turn the nut clockwise to
release the screw adjuster of
the foot.
b)
Rotate foot to raise or
lower it until it stands firmly on
the ground.
c)
Lock the foot in position
by turning the nut anti-
clockwise until it comes up
against the bottom of the
machine.
Ensure that the Off/On
button (C) is not pressed.
Ensure that all the knobs are
on the “0” position and that
the door is closed.
Insert the plug.
After installation, the
appliance must be
positioned so that the plug is
accessible.
Press the START (C) button.
The power on (N) light will
light up.
If this does not light up see
faults search.
RU
Óñòàíîâèòå ìàøèíó ïî
ópîâí
ю
ñ ïîìîùü
ю
ïåpåäíèõ
íîæåê.
a)
ïîâåpíèòå ïî ÷àñîâîé
ñòpåëêå ãàéêó, ÷òîáû
pàçáëîêèpîâàòü âèíò íîæêè.
b)
âpàùàÿ íîæêó, ïîäíèìèòå
èëè îïóñòèòå ìàøèíó äî
õîpîøåé åå îïîpû íà ïîë.
c)
çàáëîêèpóéòå âèíò íîæêè,
çàòÿíóâ ãàéêó ïpîòèâ
÷àñîâîé ñòpåëêè äî óïîpà.
Óáåäèòåñü â òîì, ÷òîáû
êëàâèøà âêë/âûêë
C
íå áûëà
íàæàòà.
Óáåäèòåñü â òîì, ÷òîáû âñå
pó÷êè íàõîäèëèñü â
ïîëîæåíèè Î, à ë
ю
ê çàêpûò.
Âêë
ю
÷èòå âèëêó â pîçåòêó.
èÓÒΠÔÓ‰ÒÓ‰ËÌÂÌËfl ÔË·Ó
‰ÓÎÊÂÌ ·˚Ú¸ ‡ÒÔÓÎÓÊÂÌ Ú‡ÍËÏ
Ó·‡ÁÓÏ, ˜ÚÓ·˚ ÓÁÂÚ͇ ·˚·
‰ÓÒÚÛÔÌÓÈ.
Íàæìèòå íà êëàâèøó (
C
)
âêë/âûêë, ïpè
∋
òîì çàãîpèòñÿ
èíäèêàòîp pàáîòû
N
.Åñëè
èíäèêàòîp íå çàãîpèòñÿ,
èùèòå íåèñïpàâíîñòü.
Praöka má 2 pohyblivé
noïiöky, kterÿmi lze vyrovnat
vodorodnou polohu praöky.
a
a)) Otáöejte maticí äroubu
po smëru hod. ruöiöek a
pak måïete püizpåsobit
vÿäku noïiöky.
b
b)) Otáöením sniïujte nebo
zdvihejte noïiöku, dokud
perfektnë nepüilne k
podlaze.
c
c)) Upevnëte polohu noïiöky
otoöením matice äroubu
proti smëru hod. ruöiöek.
Ujistëte se, ïe väechny
knoflíky (ovládací prvky) jsou
v pozici ”0” a dvíüka jsou
zavüená.
Zapojte záströku do sítë.
Po instalaci spotüebiöe se
ujistëte, ïe spotüebiö je
umístën tak, aby byla
snadno püístupná zásuvka.
Stisknëte tlaöítko START (C).
Rozsvítí se dioda N. Pokud se
nerozsvítí, najdëte si kapitolu
Poruchy.
CZ
FR
Mettre la machine avec les
pieds avant.
a)
Tourner dans le sens des
aiguilles d’une montre
l’écrou de façon à
dévérouiller la vis du pied.
b)
Tourner le pied et le faire
monter ou descendre
jusqu’à obtenir une parfaite
adhérence au sol.
c)
Enfin bloquer le pied en
revissant l’écrou dans le sens
inverse des aiguilles d’une
montre et le faire adhérer au
fond de la machine.
Vérifier que le bouton
Marche/Arrêt (C) ne soit pas
enfoncé.
Vérifier que toutes les
manettes soient sur la
position “0” et que le hublot
soit fermé.
Brancher la prise.
Une fois l'appareil installé, la
prise électrique doit rester
accessible.
Appuyer sur la touche
Marche/Arrêt (C) pour
allumer la lampe-témoin de
fonctionnement courant
branché (N); si elle ne
s’allume pas se reporter à la
liste des recherches de
panne.
ES
Nivele la máquina con las
patas delantares
a)
Girar la tuerca en el
sentido de las agujas del
reloj para desbloquear el
tornillo del pie.
b)
Girar el pie y hacerlo
bajar o subir hasta
conseguir su perfecta
adherencia al suelo.
c)
Bloquear el pie girando la
tuerca en el sentido
contrario a las agujas del
reloj hasta que se adhiera al
fondo de la lavadora.
Asegúrese de que el botón
Marcha/Paro (C) no esté
pulsado.
Asegúrese de que todos los
mandos estén en posición
“0” y que el ojo de buey
esté cerrado.
Enchúfela.
El aparato tiene que ser
colocado de forma que el
enchufe sea accesible una
vez instalado.
A continuación pulse el
botón START (C) se
encenderá el piloto de
funcionamiento “conexión
de corriente efectuada” (N)
si no se enciende vea
“causas de averías”
„Téléchargement du manuel“ signifie que vous devez attendre que le fichier soit complètement chargé avant de pouvoir le lire en ligne. Certains manuels sont très volumineux, et le temps de chargement dépend de la vitesse de votre connexion Internet.
Résumé
2 3 EN OUR COMPLIMENTS With the purchase of this Candy household appliance, you have shown that you will not accept compromises: you want only the best. Candy is happy to present their new washing machine, the result of years of research and market experience through direct contact with Consumers. Y...
ÏAPAÃPAÔ CHAPTER KKA APPIITTO OLLA A CHAPITRE CAPÍTULO 1 2 3 4 5 6 7 8 9 10 11 12 13 4 5 EN INDEX Introduction General points on delivery Guarantee Safety Measures Technical Data Setting up and Installation Control Description Detergent drawer Selection The Product Table of Programmes Washing Cleani...
10 11 CHAPTER 3 SAFETY MEASURES IMPORTANT: FOR ALL CLEANING AND MAINTENANCE WORK ● Remove the plug ● Turn off the water inlet tap. ● All Candy appliances are earthed. Ensure that the main electricity circuit is earthed. Contact a qualified electrician if this is not the case. This appliance complies...
Autres modèles de machines à laver Candy
-
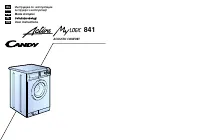 Candy Activa MyLogic 841
-
 Candy Alise CSW 105
-
 Candy CBW27D1E-S
-
 Candy CDB 475 DN-07
-
 Candy CN 63 T
-
 Candy CS1282DE-S
-
 Candy CS41172DE/2-S
-
 Candy CST26LE/1-S
-
 Candy CTS 55 T
-
 Candy CTS 65 T