INFORMATIONS; SUR LE; PRODUIT; FILTER REPLACEMENT - Sharper Image AC1-0067-06 - Manuel d'utilisation - Page 13
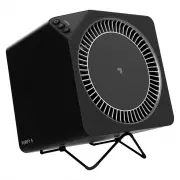
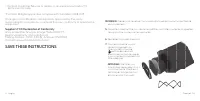
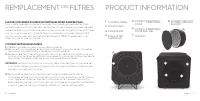

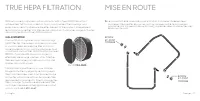
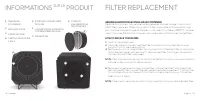
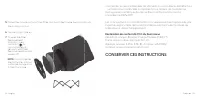
Table des matières:
- Page 2 – READ AND SAVE THESE INSTRUCTIONS; IMPORTANT SAFETY INSTRUCTIONS
- Page 3 – GARANTIE
- Page 4 – DÉPANNAGE
- Page 5 – NETTOYAGE
- Page 6 – SAVE THESE INSTRUCTIONS
- Page 7 – REMPLACEMENT; DES; FILTRES; PRODUCT INFORMATION
- Page 8 – GETTING STARTED; VÉRITABLE FILTRATION HEPA
- Page 9 – UTILISATION
- Page 10 – CONTROL PANEL; TABLEAU DE COMMANDE
- Page 11 – HOW TO USE
- Page 12 – TRUE HEPA FILTRATION; MISE EN ROUTE
- Page 13 – INFORMATIONS; SUR LE; PRODUIT; FILTER REPLACEMENT
- Page 14 – CONSERVER CES INSTRUCTIONS
- Page 16 – TROUBLESHOOTING
- Page 17 – WARRANTY
- Page 19 – LIRE ET CONSERVER CES INSTRUCTIONS; CONSIGNES DE SÉCURITÉ IMPORTANTES; CONTENIDO
46 Français
INFORMATIONS
SUR LE
PRODUIT
TABLEAU DE
COMMANDE
GRILLE DE SORTIE
CADRE DU FILTRE
CARTOUCHE DE FILTRE
3-EN-1
PORTE DU COMPARTIMENT
DE FILTRE
LANGUETTE DE LA PORTE DU
COMPARTIMENT DE FILTRE
ENTRÉE D’AIR
CORDON
D’ALIMENTATION
(PAS MONTRÉ)
1
2
3
4
5
6
7
8
2
3
5
6
7
1
LA PORTE DU
T DE FILTRE
D ALIMENTATION
(PAS MONTRÉ)
4
15
English
GENUINE SHARPER IMAGE FILTERS ARE RECOMMENDED
Peak performance is only realized when genuine Sharper Image Carbon and
HEPA filters are used. Others may claim to be compatible with Sharper Image
units, but the Sharper Image Air Purifier is calibrated to achieve a 99.97% capture
rate of particles 0.3 microns or larger, only when used with Sharper Image Filters.
HOW TO REPLACE YOUR FILTERS
1.
Turn off and unplug unit.
2.
Turn over the unit and remove the Filter Frame by twisting the Filter Frame
Support Tabs to the open position.
3.
Remove and discard used Filters. Simply take hold of the Pre-Filter at any place
along the perimeter and remove. To remove the Filter Cartridge, pull upward
on side tabs until filter is removed.
NOTE:
Clean any remaining dust or hair inside the unit by using a vacuum hose. Do
Not use water or liquids to clean the unit.
4.
Replace with genuine Sharper Image Filters. Place the Filter Cartridge in the
unit and gently press around the perimeter to ensure placement. Carbon side
of cartridge will go into the unit first so tabs on Hepa are facing up. Place Pre-
Filter on top of Hepa.
NOTE:
Take care to remove any plastic bag covering from your replacement filter.
FILTER REPLACEMENT
„Téléchargement du manuel“ signifie que vous devez attendre que le fichier soit complètement chargé avant de pouvoir le lire en ligne. Certains manuels sont très volumineux, et le temps de chargement dépend de la vitesse de votre connexion Internet.
Résumé
4 English READ AND SAVE THESE INSTRUCTIONS IMPORTANT SAFETY INSTRUCTIONS This owner’s guide and any additional inserts are considered part of the product. They contain important information about safety, use and disposal. Before using the product, please familiarize yourself with all operating and s...
56 Français Vornado Air, LLC garantit au consommateur initial ou à l’acheteur initial que ce Sharper Image® Purificateur D’air (le « produit ») ne comporte aucun vice de matériau ou de fabrication pour une période de deux (2) ans à compter de la date d’achat. Si un tel vice était décelé durant la pé...
6 English (833.800.8669) or ([email protected]) for further instructions about replacement and repair. - Risk of fire. Your appliance may be equipped with a detachable power supply or a cord/plug with a safety device such as a fuse. Use only the power cord and plug provided. - Before plugging po...
Autres modèles de purificateurs d'air Sharper Image
-
 Sharper Image AC1-0066-06
-
 Sharper Image AC1-0068-63