Grinder; DIRECTIVES POUR FARCIR; UTILISATION DE LA FONCTION INVERSE (REVERSE) - Weston 82-0301-W - Manuel d'utilisation - Page 5


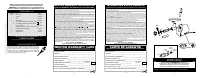
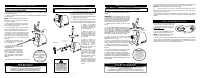

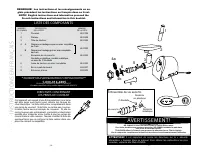
Table des matières:
- Page 2 – COMPONENT LIST; NOTE! French instructions and information follow the; ENGLISH INSTRUCTIONS; OUTLET INSTRUCTIONS; if applicable; WESTON WARRANTY INFORMATION; SAVE THIS WARRANTY INFORMATION FOR YOUR RECORDS!; WESTON WARRANTY CARD; INFORMATION SUR LA GARANTIE; CARTE DE GARANTIE; Auger Assembly
- Page 3 – IMPORTANT SAFETY RULES; SAVE THESE INSTRUCTIONS!; ACCESSOIRES SUPPLÉMENTAIRES DISPONIBLES; INFORMATIONS SUR LES SAUCISSES; W e s t o n P r o d u c t s . c o m
- Page 4 – SÉCURITÉ ALIMENTAIRE; PROTECTION CONTRE LES SURCHARGES THERMIQUES; CONSEILS UTILES
- Page 5 – Grinder; DIRECTIVES POUR FARCIR; UTILISATION DE LA FONCTION INVERSE (REVERSE)
- Page 6 – STUFFING INSTRUCTIONS; USING THE REVERSE FUNCTION; DIRECTIVES DE HACHAGE; ASSEMBLAGE DU POUSSOIR
- Page 7 – FOOD SAFETY
- Page 8 – SAUSAGE INFORMATION; MISES EN GARDE; IMPORTANTES RÈGLES DE SÉCURITÉ; CONSERVER CES DIRECTIVES!; ADDITIONAL ACCESSORIES AVAILABLE
- Page 9 – LISTE DES COMPOSANTS; REMARQUE! Les instructions et les renseignements en an-; INSTRUCTIONS EN FRANÇAIS; DIRECTIVES CONCERNANT; Ensemble de vis sans fin
GRINDING INSTRUCTIONS
STUFFER ASSEMBLY
1. Remove the Ring Nut, Grinding Plate, Knife and
Auger from the Grinder Head before installing the
Grinder Head to the Main Body.
2. Align the notches in the Grinder Head with the
tabs on the Main Body.
3. Press the Grinder Head against the Motor and
rotate it counterclockwise until it locks into place
(Figure F).
4. Insert the Auger into the
Grinder Head, Auger Driver
end first (Figure G).
5. Place the Grinder Knife
onto the square portion of
the Auger Pin. The cutting
edges (flat side) of the Knife
should be facing out.
6. Place the Grinding Plate
of your choice onto the
Auger Pin. Make sure the
notch of the Grinder Plate
fits into the positioning pin of
the Grinder Head.
7. Insert
the
Stuffing
Funnel through the Ring Nut
and then onto the Grinder
Head.
8. Turn the Ring Nut
clockwise onto the threaded
end of the Grinder Head
until it touches the Stuffing
Funnel. DO NOT over-
tighten the Ring Nut.
9. Place the Tray on the
upright part of the Grinder
Head. NEVER use the
Grinder without the Tray
installed!
Figure F
Figure G
Figure E
NOTE:
To prevent
overheating, do not
operate the
Grinder
for
more than 15 minutes
at a time.
Allow the
Grinder
to cool
periodically.
Auger
Driver
WARNING!
Before cleaning, assembling or disassembling the
appliance, make sure the appliance is OFF and the PLUG IS REMOVED
FROM THE OUTLET/POWER SOURCE!
NEVER operate Grinder without the Tray secured in place.
To avoid serious or fatal injury, NEVER reach into any Grinder inlet.
ALWAYS use the Stomper to push food into the Grinder Head.
Read & fully understand all instructions & warnings prior to use.
WARNING!
WARNING!
Before cleaning, assembling or disassembling the
appliance, make sure the appliance is OFF and the PLUG IS REMOVED
FROM THE OUTLET/POWER SOURCE!
DIRECTIVES POUR FARCIR
Figure H
NE JAMAIS se servir du Hachoir sans le Plateau fixé en place.
Pour éviter des blessures graves ou mortelles, NE JAMAIS introduire la main dans
tout orifice d’entrée du Hachoir.
TOUJOURS utiliser le Poussoir pour pousser les aliments dans la Tête du Hachoir.
Lire et comprendre complètement toutes les instructions et avertissements avant l’utilisation.
AVERTISSEMENT!
AVERTISSEMENT!
TOUJOURS DÉBRANCHER la trancheuse à viande
de sa source d’alimentation avant d’en faire l’entretien, de la nettoyer, de
changer des accessoires ou encore lorsqu’elle n’est pas utilisée.
-8-
-9-
-24-
-25-
REMARQUE :
Pour éviter les
risques de surchauffe,
ne pas utiliser le
Hachoir pendant plus
de 15 minutes à la fois.
Laisser le Hachoir se
refroidir
périodiquement.
1. Après le hachage de la viande en suivant les “Directives de hachage”, mélanger la
viande hachée avec l’assaisonnement à saucisse.
2. Suivre les “Directives d’assemblage du poussoir” pour assembler complètement le
Hachoir comme un Outil à farcir y compris le Plateau.
REMARQUE:
Bien qu’une personne puisse farcir
des saucisses avec ce Hachoir, ii est recommandé
que deux personnes exécutent cette opération.
3. Placez la viande hachée assaisonnée dans le
Plateau. Ne pas trop remplir le Plateau, placer juste
suffisamment de viande pour laisser la surface de
la Trémie ouverte.
4. Glisser un boyau a saucisse sur l’Entonnoir à
farce. Voir la partie “Information sur les saucisses
/ Boyaux” de ce manuel pour de plus amples
renseignements.
5. Glisser 10 a 15 cm (4 a 6 po) de boyau d’un
bout de l’Entonnoir à farce et faites un nœud au
bout du boyau. Si vous utiliser un boyau fibreux de
gros diamètre, tenez l’extrémité fermée du boyau
bien serrée contre l’extrémité de l’Entonnoir à farce
(Figure H).
6. S’assurer que le
Hachoir est sur la position
“O” OFF (ARRÊT).
Brancher le Hachoir a
l’alimentation électrique.
7. Assurez-vous que Hachoir est en position de «
FWD », en appuyant sur
t
rouge le bouton EN
AVANT.
8. Appuyer sur le Bouton du Hachoir “ON”
(MARCHE). Commencer à mettre soigneusement
la viande hachée dans la Trémie. UTILISER
SEULEMENT LE POUSSOIR POUR POUSSER
LA VIANDE DANS LA TÊTE, NE PAS UTILISER
LES DOIGTS OU TOUT AUTRE OBJET.
...LES DIRECTIVES CONTINUENT A LA PAGE SUIVANTE
8. Tenir le boyau en place d’une main tout en faisant passer le mélange à travers le
Hachoir. Au fur et à mesure que la viande remplie le boyau, le posez délicatement sur
une surface sèche et propre.
REMARQUE :
Utilisez une surface mouillée si vous
utilisez des boyaux naturels.
9. Ne pas remplir les derniers 8 à 10 cm (3 à 4 po) de boyau. Une fois que toute la
longueur de boyau e est farcie, tourner l’extrémité ouverte pour la fermer, puis nouer
bien serre les extrémités du boyau pour fermer. Tourner pour faire des chainons.
10. Pour farcir des saucisses, remplir le boyau lentement pour éviter des poches d’air.
Si des poches d’air apparaissent dans la saucisse, utiliser une aiguille pour percer les
bulles. Les petits trous se refermeront naturellement.
La fonction inverse (REV) doit seulement
être utilisée pendant des temps très
courts pour aider à dégager un blocage.
1. Laisser le Moteur du Hachoir
S’ARRÊTER COMPLÈTEMENT avant
d’engager la fonction inverse “REV”.
2. Poussez le bouton rouge
w
inverse
appuyez sur alors le bouton noir REV
(Figure I).
REMARQUE :
NE JAMAIS se servir du Hachoir en fonction inverse pendant plus de
5 secondes.
3. Si le Hachoir reste bloqué après avoir utilisé la fonction inverse, mettre le Hachoir sur
la position “O” ARRÊT, débrancher le Hachoir de sa source d’alimentation. Démonter
le Tête du Hachoir et la nettoyer suivant les “Directives de nettoyage.” Remonter le
Hachoir et suivez les “Directives pour hacher/ Directives pour farcir.”
UTILISATION DE LA FONCTION INVERSE (REVERSE)
Bouton Inverse
Figure I
READ AND FULLY
UNDERSTAND ALL
INSTRUCTIONS AND
WARNINGS PRIOR
TO USING THIS UNIT.
Never leave this appliance
unattended!
WARNING!
1. Follow the
“Grinder Assembly Instructions”
to fully assemble the Grinder including the
Tray.
NOTE:
It is best to grind the meat using the coarse, 6 mm Grinding Plate first. If a finer
grind of meat is desired, run the coarse ground meat through the Grinder a second time
using the medium, 4 mm Grinding Plate.
2. Trim the meat of all cords, tendons, bones,
shot, etc.
3. For best results, be sure that all meat has
been chilled to between 32-34
o
F (0-1
o
C) before
grinding. DO NOT ALLOW MEAT TO SIT OUT
AT ROOM TEMPERATURE LONGER THAN
ABSOLUTELY NEEDED. Closely follow the
“Food Safety” instructions as outlined by the
USDA.
4. Cut meat into sizes small enough to fit into the
Feed Chute. Approximately 1” (2.5 cm) cubes.
5. Place cubed meat to be ground into the Tray.
Do not overfill the Tray, place just enough meat to
leave the Feed Chute area open.
6. Place a dish or bowl to collect the ground
meat at the end of the Grinder Head (Figure E).
7. Make sure the Grinder is in the OFF “O”
position. Attach the Grinder to the power supply.
8. Make sure the Grinder is in the “FWD” position,
by pressing the red
t
FORWARD button.
9. Press ON “I” the Grinder Button. Carefully
start feeding cubes of meat into the Feed
Chute. ONLY USE THE STOMPER TO PUSH
MEAT INTO THE HEAD, DO NOT USE YOUR
FINGERS OR ANY OTHER OBJECT.
„Téléchargement du manuel“ signifie que vous devez attendre que le fichier soit complètement chargé avant de pouvoir le lire en ligne. Certains manuels sont très volumineux, et le temps de chargement dépend de la vitesse de votre connexion Internet.
Résumé
COMPONENT LIST If any components of this unit are broken or the unit does not operate properly, call Weston Products LLC Toll Free at 1-800-814-4895 Monday thru Friday 8:00am-5:00pm EST. Outside the U.S. call 440-638-3131 NOTE! French instructions and information follow the English instructions and ...
IMPORTANT SAFEGUARDS When using electrical appliances, basic safety precautions should always be followed including the following: 1. READ ALL INSTRUCTIONS BEFORE USING THE APPLIANCE. 2. To protect against risk of electrical shock, do not submerge or use this appliance near water or other liquid. 3....
CLEANING 1. Unscrew the Ring Nut and remove all parts from the Grinder Head. 2. To remove the Grinder Head, press the Head Release Button and turn the Grinder Head clockwise (Figure A). 3. Wash all parts that come in contact with food in hot soapy water. Rinse with clear water. Dry immediately. Th...
Autres modèles de hachoirs à viande Weston
-
 Weston 09-0501-W
-
 Weston 09-0801-W
-
 Weston 09-1201-W
-
 Weston 09-2201-W
-
 Weston 09-3201-W
-
 Weston 10-0801-W
-
 Weston 10-1201-W
-
 Weston 10-2201-W
-
 Weston 10-3201-W
-
 Weston 33-0801-W