Changing the Presser Foot; Cambio del prensatelas; Замена прижимной лапки - Brother LS-3125 - Manuel d'utilisation - Page 12

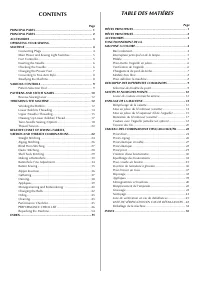

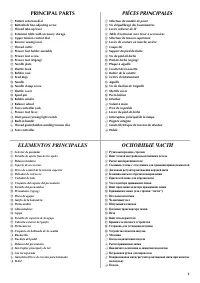
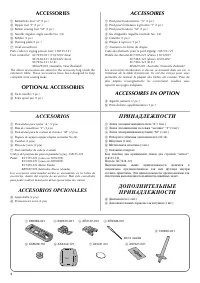
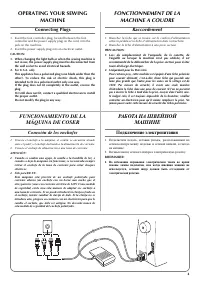
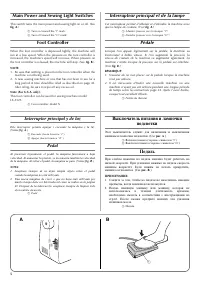
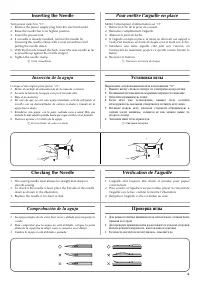
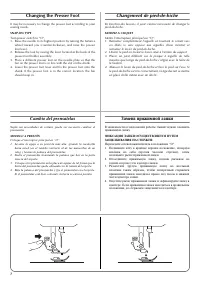
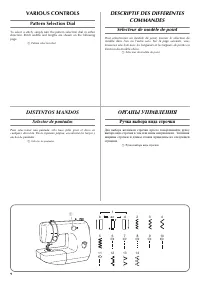
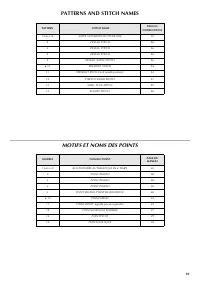
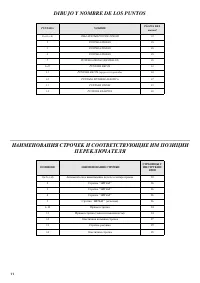
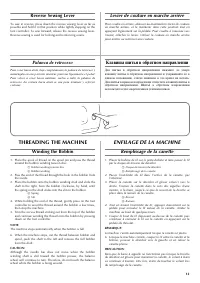
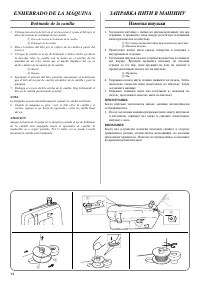
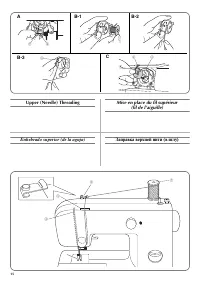
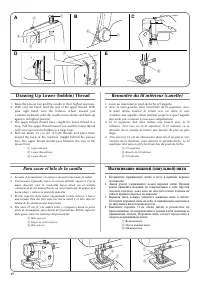
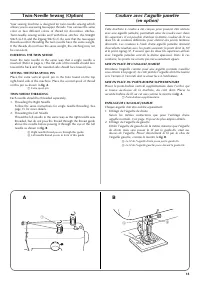
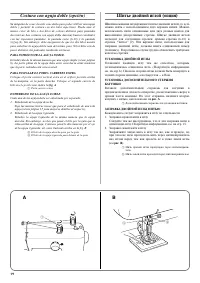
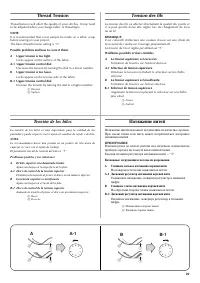
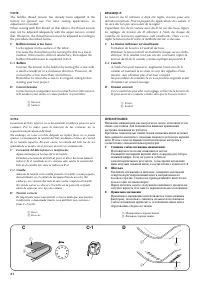
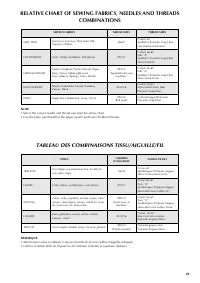
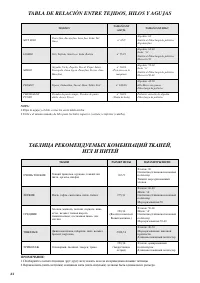
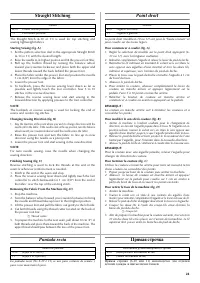
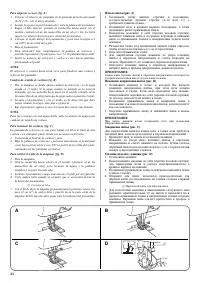
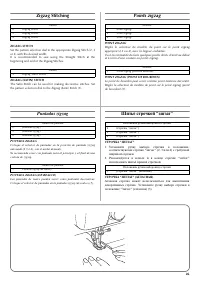
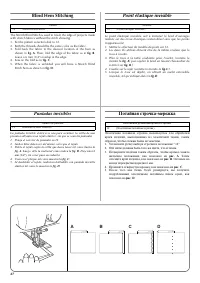
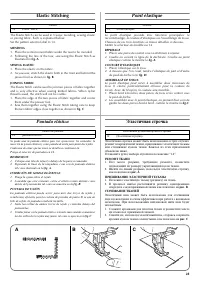

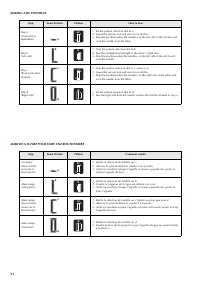

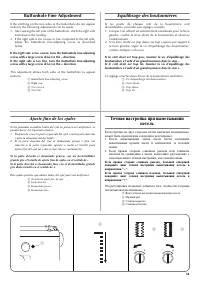
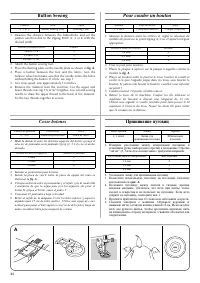
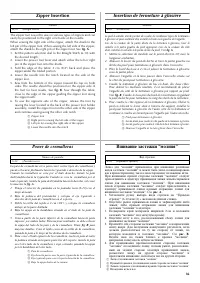
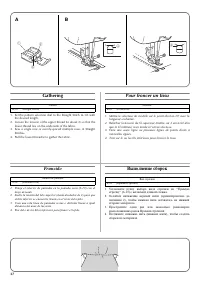
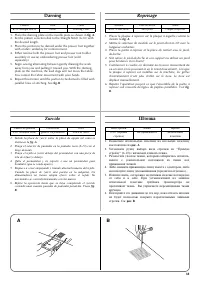
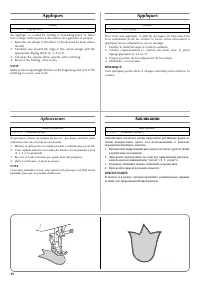
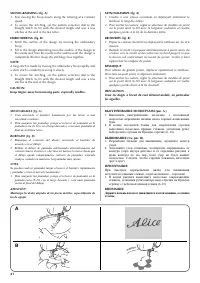
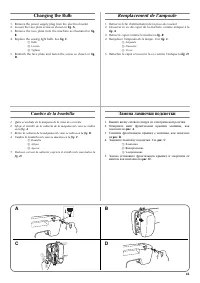
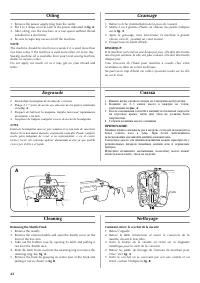
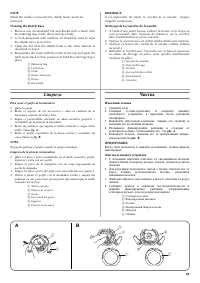


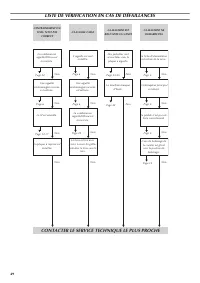
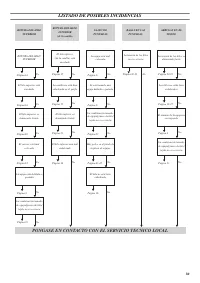
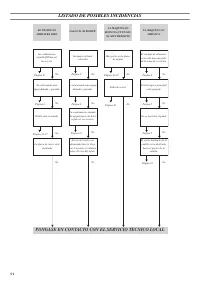
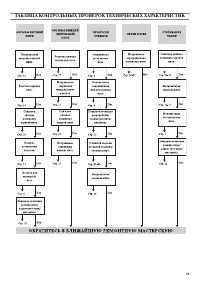

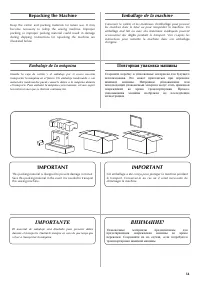
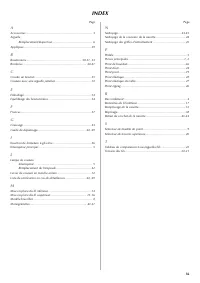
Table des matières:
- Page 4 – CONTENTS; TABLE DES MATIÉRES
- Page 8 – ACCESSORIES; OPTIONAL ACCESSORIES; ACCESSOIRES; ACCESSOIRES EN OPTION; ACCESORIOS OPCIONALES; ДОПОЛНИТ Е ЛЬНЫ Е
- Page 9 – Connecting Plugs; FONCTIONNEMENT DE LA; Raccordement; FUNCIONAMIENTO DE LA; Conexión de los enchufes; РАБОТА НА ШВЕЙНОЙ; Подключение электропитания
- Page 12 – Changing the Presser Foot; Cambio del prensatelas; Замена прижимной лапки
- Page 14 – VARIOUS CONTROLS; Pattern Selection Dial; DESCRIPTIF DES DIFFERENTES; DISTINTOS MANDOS; Selector de puntadas; ОРГАНЫ УПРАВЛЕНИЯ; Ручка выбора вида строчки
- Page 15 – PATTERNS AND STITCH NAMES; MOTIFS ET NOMS DES POINTS
- Page 17 – Reverse Sewing Lever; THREADING THE MACHINE; Winding the Bobbin; Levier de couture en marche arrière; ENFILAGE DE LA MACHINE; Remplissage de la canette; Palanca de retroceso; Клавиша шитья в обратном направлении
- Page 22 – Para sacar el hilo de la canilla
- Page 23 – TWIN NEEDLE THREADING; Couture avec l’aiguille jumelée
- Page 26 – Слишком слабое натяжение нижней нити.
- Page 27 – TABLEAU DES COMBINAISONS TISSU/AIGUILLE/FIL
- Page 29 – Straight Stitching; Point droit; Puntada recta; Прямая строчка
- Page 31 – Zigzag Stitching; ZIGZAG STITCH; Points zigzag; Puntadas zigzag; Шитьё строчкой “зигзаг”; СТРОЧКА “ЗИГЗАГ”
- Page 33 – Elastic Stitching; MENDING; SEWING ELASTIC; JOINING FABRIC; Point élastique; Puntada elástica; Эластичная строчка; РЕМОНТ ТКАНИ; ПРИШИВАНИЕ ЭЛАСТИЧНОЙ ТЕСЬМЫ; СТАЧИВАНИЕ ТКАНЕЙ
- Page 35 – Making a Buttonhole; MAKING A BUTTONHOLE; Création d’une boutonnière; Para coser ojales; Выметывание петель
- Page 38 – ЗАКРЕПЛЕНИЕ СТРОЧКИ И ПРОРЕЗКА ПЕТЛИ
- Page 39 – Buttonhole Fine Adjustment; Equilibrage des boutonnières; Ajuste fino de los ojales; Точная настройка при выметывании
- Page 40 – Button Sewing; Pour coudre un bouton; Coser botones; Пришивание пуговиц
- Page 41 – Zipper Insertion; Insertion de fermeture à glissière; Poner de cremalleras; Вшивание застежки “молния”
- Page 43 – Darning; Reprisage; Zurcido; Штопка
- Page 44 – Appliques; Aplicaciones; Аппликации
- Page 47 – Changing the Bulb; Remplacement de l’ampoule; Cambio de la bombilla; Замена лампочки подсветки
- Page 48 – Removing the Shuttle Hook; Graissage; Engrasado; Смазка
- Page 49 – Cleaning the Shuttle Race; Limpieza; Чистка; Извлечение челнока
- Page 50 – Cleaning the Feed Dogs; Performance Checklist; Liste de vérification en cas de; Listado de posibles incidencias; Очистка гребенок транспортера; Таблица контрольных проверок
- Page 51 – LISTE DE VÉRIFICATION EN CAS DE DÉFAILLANCES; CONTACTER LE CENTRE TECHNIQUE LE PLUS PROCHE
- Page 52 – CONTACTER LE SERVICE TECHNIQUE LE PLUS PROCHE
- Page 57 – Repacking the Machine; Emballage de la machine; IMPORTANT; Embalaje de la máquina; IMPORTANTE; Повторная упаковка машины
7
Changing the Presser Foot
It may be necessary to change the presser foot according to your
sewing needs.
SNAP-ON TYPE
Turn power switch to “O”.
1. Raise the needle to its highest position by turning the balance
wheel toward you (counterclockwise), and raise the presser
foot lever.
2. Release the foot by raising the lever located at the back of the
presser foot holder assembly.
3. Place a different presser foot on the needle plate so that the
bar on the presser foot is in line with the slot on the shank.
4. Lower the presser foot lever and fix the presser foot onto the
shank. If the presser foot is in the correct location, the bar
should snap in.
Changement de pied-de-biche
En fonction des besoins, il peut s’avérer nécessaire de changer le
pied-de-biche.
MODELE A CLIQUET
Mettre l’interrupteur principal sur “O”.
1. Remonter complètement l’aiguille en tournant le volant vers
soi (dans le sens opposé aux aiguilles d’une montre) et
remonter le levier du pied-de-biche.
2. Libérer le pied en levant le levier situé à l’arrière du support.
3. Placer un pied différent sur la plaque à aiguille de telle
manière que la tige du pied-de-biche s’aligne avec la fente de
la fixation.
4. Abaisser le levier du pied-de-biche et fixer le pied sur l’axe. Si
le pied-de-biche est mis correctement, la tige devrait se mettre
en place d’elle même avec un déclic.
Cambio del prensatelas
Según sus necesidades de costura, puede ser necesario cambiar el
prensatelas.
MODELO A PRESIÓN
Coloque el interruptor principal en “O”.
1. Levante la aguja a su posición más alta, girando la ruedecilla
hacia usted (en el sentido contrario al de las manecillas de un
reloj) y levante la palanca del prensatelas.
2. Suelte el prensatelas levantando la palanca que hay en la parte
trasera del soporte.
3. Coloque otro prensatelas en la placa de agujas de tal forma que la
barra del prensatelas quede alineada con la ranura del soporte.
4. Baje la palanca del prensatelas y fije el prensatelas en el soporte.
Si el prensatelas está bien colocado, la barra se entra a presión.
Замена прижимной лапки
В зависимости от вида вашей работы, бывает нужно заменить
прижимную лапку.
ФИКСАЦИЯ ЛАПКИ ОСУЩЕСТВЛЯЕТСЯ ПУТЕМ
ЗАЩЕЛКИВАНИЯ НА СТЕРЖНЕ
Переведите сетевой выключатель в положение “О”
1. Поднимите иглу в крайнее верхнее положение, повернув
маховик на себя (против часовой стрелки), затем
поднимите рычаг прижимной лапки.
2. Отсоедините прижимную лапку, подняв рычажок на
задней стороне узла адаптера лапки.
3. Разместите другую прижимную лапку на игольной
пластине таким образом, чтобы поперечный стерженёк
прижимной лапки находился прямо под пазом в нижней
части адаптера лапки.
4. Опустите рычаг прижимной лапки и зафиксируйте лапку в
адаптере. Если прижимная лапка находиться в правильном
положении, ее стерженек защелкнется в адаптере.
„Téléchargement du manuel“ signifie que vous devez attendre que le fichier soit complètement chargé avant de pouvoir le lire en ligne. Certains manuels sont très volumineux, et le temps de chargement dépend de la vitesse de votre connexion Internet.
Résumé
CONTENTS Page PRINCIPAL PARTS.................................................................... 1PRINCIPAL PARTS.................................................................... 2ACCESSORIES .......................................................................... 3OPERATING YOUR SEWING MACHIN...
3 ACCESSORIES a Buttonhole foot “A” (1 pc.) b Zipper foot “I” (1 pc.) c Button sewing foot “M” (1 pc.) d Needle (regular single needle No. 14) e Bobbin (1 pc.) f Darning plate (1 pc.) g Oval screwdriver Parts code for zigzag presser foot: 138135-121Foot controller: XC7359-021 (110/120V Area) XC7438-...
4 OPERATING YOUR SEWING MACHINE Connecting Plugs 1. Insert the foot controller plug, located between the foot controller and the power supply plug on the cord, into the jack on the machine. 2. Insert the power supply plug into an electrical outlet. CAUTION:1. When changing the light bulb or when the...
Autres modèles de machines à coudre Brother
-
 Brother JS-23
-
 Brother LS 2150
-
 Brother LS-1520
-
 Brother LS-2125
-
 Brother SL-7
-
 Brother X-5