GRINDER ASSEMBLY; AVERTISSEMENT - Weston 33-0801-W - Manuel d'utilisation - Page 5


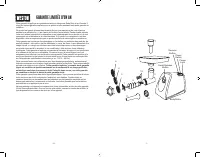

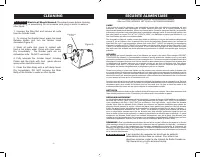
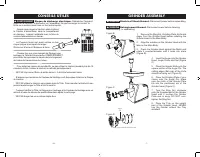
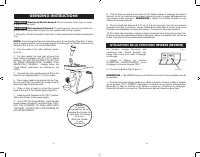
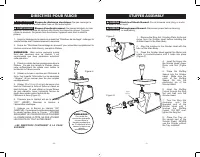
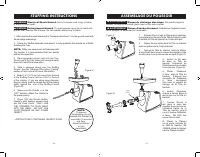
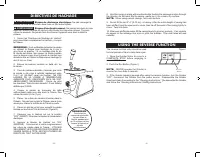
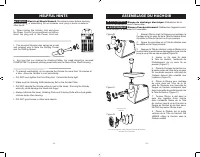
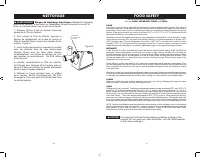

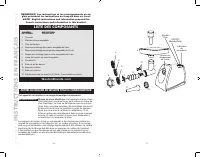
Table des matières:
- Page 2 – GARANTIE LIMITÉE D’UN AN
- Page 3 – IMPORTANT SAFETY RULES; SAVE THESE INSTRUCTIONS!; INFORMATIONS SUR LES SAUCISSES
- Page 4 – CLEANING; SÉCURITÉ ALIMENTAIRE
- Page 5 – GRINDER ASSEMBLY; AVERTISSEMENT
- Page 6 – GRINDING INSTRUCTIONS; UTILISATION DE LA FONCTION INVERSE (REVERSE)
- Page 7 – STUFFER ASSEMBLY
- Page 9 – USING THE REVERSE FUNCTION; DIRECTIVES DE HACHAGE
- Page 11 – FOOD SAFETY
- Page 12 – SAUSAGE INFORMATION; IMPORTANTES RÈGLES DE SÉCURITÉ; CONSERVER CES DIRECTIVES!
- Page 13 – CONSERVER CES INSTRUCTIONS; PRÉCAUTIONS IMPORTANTES
- Page 14 – LISTE DES COMPOSANTS; INSTRUCTIONS EN FRANÇAIS; AUTRES CONSIGNES DE SÉCURITÉ POUR LE CONSOMMATEUR
Figure B
1. Remove the Ring Nut, Grinding Plate, Knife and
Auger from the Grinder Head before installing the
Grinder Head to the Main Body.
2. Align the notches on the Grinder Head with the
tabs on the Main Body.
3. Press the Grinder Head against the Motor and
rotate it counterclockwise until it locks into place
(Figure B).
4. Insert the Auger into the Grinder
Head, Auger Driver end first (Figure
C).
5. Place the Grinder Knife onto the
square portion of the Auger Pin. The
cutting edges (flat side) of the Knife
should be facing out (Figure D).
6. Place the Grinding Plate of your
choice onto the Auger Pin. Make
sure the notch of the Grinder Plate
fits into the positioning pin of the
Grinder Head (Figure C).
7. Turn the Ring Nut clockwise
onto the threaded end of the Grinder
Head until it touches the Grinder
Plate and is snug. DO NOT over-
tighten the Ring Nut.
8. Place the Tray on the upright
part of the Grinder Head. NEVER
use the Grinder without the Tray
installed!
Figure C
Figure D
Auger
Pin
Cutting edges of the Knife facing out.
GRINDER ASSEMBLY
.
Quand vous rangez le Hachoir, pliez et placez
le Cordon d’alimentation dans le compartiment
en dessous. Insérez l’extrémité avec la fiche du
cordon d’alimentation en dernier.
.
Le Poussoir fourni sert aussi comme un bon
moyen propre et compact de ranger
l’Entonnoir à farce et l’Espaceur à farce.
.
Chaque fois que vous changez de Disques pour
hachage, la Tête doit être enlevée COMPLÈTEMENT
pour éviter de repousser la viande dans le Logement
de l’arbre de transmission du moteur.
.
Pour éviter les risques de surchauffe, ne pas utiliser le Hachoir pendant plus de 15
minutes à la fois. Laisser le Hachoir se refroidir périodiquement.
.
NE PAS trop serrer l’Écrou à œil de devant. Il doit être fermement serré.
.
S’assurer que les lames du Couteau de hachage sont disposées à plat sur le Disque
du Hachoir.
.
DE PAS utiliser le Hachoir sans viande dans la Tête. Faire marcher le Hachoir à sec
pourrait endommager la Tête et la Vis sans fin.
.
Toujours lubrifier la Tête, le Disque pour hachage et le Couteau de hachage avec un
aérosol à base de silicone de qualité alimentaire après le nettoyage.
.
NE PAS broyer les os ou autres objets durs.
CONSEILS UTILES
-7-
-26-
w
WARNING
Entanglement Hazard.
Disconnect power before cleaning,
disassembling, or assembling.
w
WARNING
Electrical Shock Hazard.
Disconnect power before assembling.
w
AVERTISSEMENT
Risque de décharge électrique.
Débrancher l’appareil
avant de le nettoyer, le démonter ou l’assembler. Ne pas immerger le cordon, la
fiche ou le moteur dans l’eau ou tout autre liquide.
„Téléchargement du manuel“ signifie que vous devez attendre que le fichier soit complètement chargé avant de pouvoir le lire en ligne. Certains manuels sont très volumineux, et le temps de chargement dépend de la vitesse de votre connexion Internet.
Résumé
11 1 2 Head Release Button 3 7 10 9 8 6 12 4 5 Power Switch Reverse Button Power Light Body/Motor -3- -30- GARANTIE LIMITÉE D’UN AN Cette garantie s’applique aux produits achetés et utilisés aux États-Unis et au Canada. Il s’agit de l’unique garantie explicite pour ce produit et elle remplace toute ...
1. DO NOT use the Grinder without the Tray secured into place. 2. ALWAYS DISCONNECT Grinder from power source before servicing, changing accessories or cleaning the unit. 3. Plug the Grinder into a standard 120 Volt, 60 Hz wall outlet. 4. DO NOT USE the Grinder if the Power Cord, Plug or any other...
Head Release Button CLEANING 1. Unscrew the Ring Nut and remove all parts from the Grinder Head. 2. To remove the Grinder Head, press the Head Release Button and turn the Grinder Head clockwise (Figure A). 3. Wash all parts that come in contact with food in hot soapy water. Rinse with clear water. ...
Autres modèles de hachoirs à viande Weston
-
 Weston 09-0501-W
-
 Weston 09-0801-W
-
 Weston 09-1201-W
-
 Weston 09-2201-W
-
 Weston 09-3201-W
-
 Weston 10-0801-W
-
 Weston 10-1201-W
-
 Weston 10-2201-W
-
 Weston 10-3201-W
-
 Weston 36-1901-W