STUFFER ASSEMBLY - Weston 33-0801-W - Manuel d'utilisation - Page 7


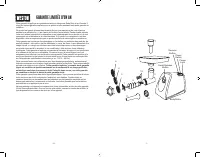

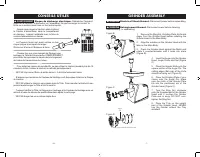
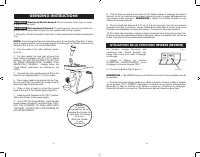
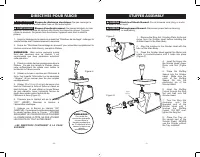
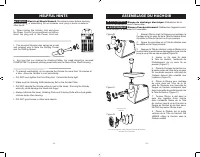

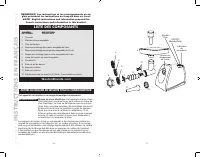
Table des matières:
- Page 2 – GARANTIE LIMITÉE D’UN AN
- Page 3 – IMPORTANT SAFETY RULES; SAVE THESE INSTRUCTIONS!; INFORMATIONS SUR LES SAUCISSES
- Page 4 – CLEANING; SÉCURITÉ ALIMENTAIRE
- Page 5 – GRINDER ASSEMBLY; AVERTISSEMENT
- Page 6 – GRINDING INSTRUCTIONS; UTILISATION DE LA FONCTION INVERSE (REVERSE)
- Page 7 – STUFFER ASSEMBLY
- Page 9 – USING THE REVERSE FUNCTION; DIRECTIVES DE HACHAGE
- Page 11 – FOOD SAFETY
- Page 12 – SAUSAGE INFORMATION; IMPORTANTES RÈGLES DE SÉCURITÉ; CONSERVER CES DIRECTIVES!
- Page 13 – CONSERVER CES INSTRUCTIONS; PRÉCAUTIONS IMPORTANTES
- Page 14 – LISTE DES COMPOSANTS; INSTRUCTIONS EN FRANÇAIS; AUTRES CONSIGNES DE SÉCURITÉ POUR LE CONSOMMATEUR
Figure F
Figure G
Auger
Driver
STUFFER ASSEMBLY
1. Remove the Ring Nut, Grinding Plate, Knife and
Auger from the Grinder Head before installing the
Grinder Head to the Main Body.
2. Align the notches in the Grinder Head with the
tabs on the Main Body.
3. Press the Grinder Head against the Motor and
rotate it counterclockwise until it locks into place
(Figure F).
4. Insert the Auger into
the Grinder Head, Auger
Driver end first (Figure
G).
5. Place the Stuffing
Spacer into the Grinder
Head. Make sure the
notch of the Stuffing
Spacer fits into the
positioning pin of the
Grinder Head.
6. Insert the Stuffing
Funnel through the Ring
Nut and then onto the
Grinder Head.
7. Turn the Ring Nut
clockwise
onto
the
threaded end of the
Grinder Head until it
touches the Stuffing
Funnel. DO NOT over-
tighten the Ring Nut.
8. Place the Tray on
the upright part of the
Grinder Head. NEVER
use the Grinder without
the Tray installed!
DIRECTIVES POUR FARCIR
REMARQUE :
Pour éviter les
risques de surchauffe,
ne pas utiliser le
Hachoir pendant plus
de 15 minutes à la fois.
Laisser le Hachoir se
refroidir
périodiquement.
1. Après le hachage de la viande en suivant les “Directives de hachage”, mélanger la
viande hachée avec l’assaisonnement à saucisse.
2. Suivre les “Directives d’assemblage du poussoir” pour assembler complètement le
Hachoir comme un Outil à farcir y compris le Plateau.
REMARQUE:
Bien qu’une personne puisse
farcir des saucisses avec ce Hachoir, ii est
recommandé que deux personnes exécutent
cette opération.
3. Placez la viande hachée assaisonnée dans le
Plateau. Ne pas trop remplir le Plateau, placer
juste suffisamment de viande pour laisser la
surface de la Trémie ouverte.
4. Glisser un boyau a saucisse sur l’Entonnoir à
farce. Voir la partie “Information sur les saucisses
/ Boyaux” de ce manuel pour de plus amples
renseignements.
5. Glisser 10 a 15 cm (4 a 6 po) de boyau d’un
bout de l’Entonnoir à farce et faites un nœud au
bout du boyau. Si vous utiliser un boyau fibreux
de gros diamètre, tenez l’extrémité fermée du
boyau bien serrée contre l’extrémité de
l’Entonnoir à farce (Figure H).
6. S’assurer que le Hachoir est sur la position
“OFF” (ARRÊT). Brancher le Hachoir a
l’alimentation électrique.
7. Appuyer sur le Bouton du Hachoir “ON”
(MARCHE). Commencer à mettre soigneusement
la viande hachée dans la Trémie. UTILISER
SEULEMENT LE POUSSOIR POUR POUSSER
LA VIANDE DANS LA TÊTE, NE PAS UTILISER
LES DOIGTS OU TOUT AUTRE OBJET.
...LES DIRECTIVES CONTINUENT A LA PAGE
SUIVANTE
Figure H
-9-
-24-
w
WARNING
Entanglement Hazard.
Disconnect power before cleaning,
disassembling, or assembling.
w
WARNING
Electrical Shock Hazard.
Do not immerse cord, plug, or motor
in water or other liquid.
w
AVERTISSEMENT
Risque d’enchevêtrement.
Ne jamais introduire la main
dans tout orifice d’entrée du hachoir afin d’éviter les blessures graves. Toujours
utiliser le poussoir. Ne jamais faire fonctionner l’appareil sans avoir installé le
plateau.
w
AVERTISSEMENT
Risque de décharge électrique.
Ne pas immerger le
cordon, la fiche ou le moteur dans l’eau ou tout autre liquide.
„Téléchargement du manuel“ signifie que vous devez attendre que le fichier soit complètement chargé avant de pouvoir le lire en ligne. Certains manuels sont très volumineux, et le temps de chargement dépend de la vitesse de votre connexion Internet.
Résumé
11 1 2 Head Release Button 3 7 10 9 8 6 12 4 5 Power Switch Reverse Button Power Light Body/Motor -3- -30- GARANTIE LIMITÉE D’UN AN Cette garantie s’applique aux produits achetés et utilisés aux États-Unis et au Canada. Il s’agit de l’unique garantie explicite pour ce produit et elle remplace toute ...
1. DO NOT use the Grinder without the Tray secured into place. 2. ALWAYS DISCONNECT Grinder from power source before servicing, changing accessories or cleaning the unit. 3. Plug the Grinder into a standard 120 Volt, 60 Hz wall outlet. 4. DO NOT USE the Grinder if the Power Cord, Plug or any other...
Head Release Button CLEANING 1. Unscrew the Ring Nut and remove all parts from the Grinder Head. 2. To remove the Grinder Head, press the Head Release Button and turn the Grinder Head clockwise (Figure A). 3. Wash all parts that come in contact with food in hot soapy water. Rinse with clear water. ...