Weston 33-0801-W - Manuel d'utilisation - Page 8


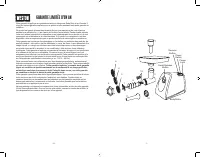

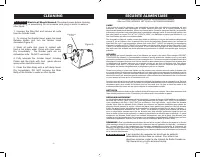
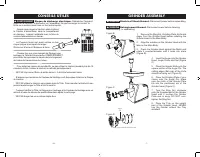
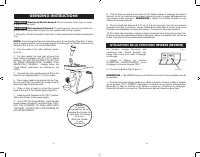
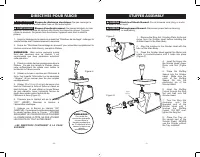
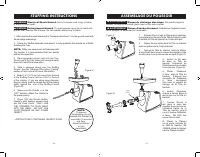
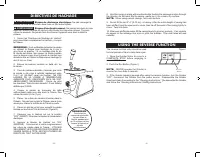
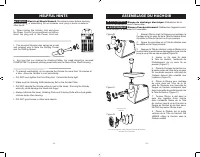
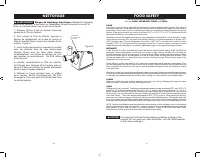

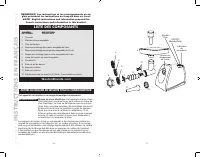
Table des matières:
- Page 2 – GARANTIE LIMITÉE D’UN AN
- Page 3 – IMPORTANT SAFETY RULES; SAVE THESE INSTRUCTIONS!; INFORMATIONS SUR LES SAUCISSES
- Page 4 – CLEANING; SÉCURITÉ ALIMENTAIRE
- Page 5 – GRINDER ASSEMBLY; AVERTISSEMENT
- Page 6 – GRINDING INSTRUCTIONS; UTILISATION DE LA FONCTION INVERSE (REVERSE)
- Page 7 – STUFFER ASSEMBLY
- Page 9 – USING THE REVERSE FUNCTION; DIRECTIVES DE HACHAGE
- Page 11 – FOOD SAFETY
- Page 12 – SAUSAGE INFORMATION; IMPORTANTES RÈGLES DE SÉCURITÉ; CONSERVER CES DIRECTIVES!
- Page 13 – CONSERVER CES INSTRUCTIONS; PRÉCAUTIONS IMPORTANTES
- Page 14 – LISTE DES COMPOSANTS; INSTRUCTIONS EN FRANÇAIS; AUTRES CONSIGNES DE SÉCURITÉ POUR LE CONSOMMATEUR
1. After grinding the meat following the “Grinding Instructions”, mix the ground meat with
the sausage seasonings.
2. Follow the “Stuffer Assembly Instructions” to fully assemble the Grinder as a Stuffer
including the Tray.
NOTE:
While one person can stuff sausage with
this Grinder, it is recommended that two people
perform this operation.
3. Place seasoned ground meat into the Tray.
Do not overfill the Tray, place just enough meat to
leave the Feed Chute area open.
4. Slide a sausage casing over the Stuffing
Funnel. See the “Sausage Information / Casing”
section of this manual for more information.
5. Slide 4”-6” (10-15 cm) of casing from the end
of the Stuffing Funnel and tie a knot in the end
of the casing. If you are using large diameter
fibrous casing, hold the closed end of the casing
tightly against the end of the Stuffing Funnel
(Figure H).
6. Make sure the Grinder is in the
“OFF” position. Attach the Grinder to
the power supply.
7. Press “ON” the Grinder Button.
Carefully start feeding ground meat
into the Feed Chute. ONLY USE
THE STOMPER TO PUSH MEAT
INTO THE HEAD, DO NOT USE
YOUR FINGERS OR ANY OTHER
OBJECT.
...INSTRUCTIONS CONTINUED ON NEXT PAGE
NOTE:
To prevent
overheating, do not
operate the Grinder for
more than 15 minutes
at a time.
Allow the Grinder
to cool
periodically.
Figure H
STUFFING INSTRUCTIONS
1. Enlever l’Écrou à œil, le Disque pour hachage,
le Couteau et la Vis sans fin de Tête du Hachoir avant
d’installer la Tête du Hachoir au Corps principal.
2. Aligner les encoches dans la Tête du Hachoir
avec les pattes sur le Corps principal.
3. Appuyer la Tête du Hachoir contre le Moteur
et la tourner dans le sens inverse des aiguilles d’une
montre jusqu’à ce qu’elle se cale en place (Figure F).
4. Insérer la Vis sans
fin dans la Tête du
Hachoir, l’extrémité de
l’Entraînement de vis sans
fin en premier (Figure G).
5. Placer l’Espaceur
à farce dans la Tête du
Hachoir. S’assurer que
l’encoche de l’Espaceur
à
farce
correspond
bien avec la goupille de
serrage de la Tête du
Hachoir.
6. Insérer l’Entonnoir
à farce à travers Écrou à
œil et puis sur la Tête du
Hachoir.
7. Tourner l’Écrou à
œil dans le sens des
aiguilles d’une montre sur
l’extrémité filetée de la
Tête du Hachoir jusqu’à
ce qu’il touche l’Entonnoir
à farce. NE PAS trop
serrer l’Écrou à œil.
8. Placer le Plateau
sur la partie verticale de
la Tête du Hachoir. NE
JAMAIS utiliser le Hachoir
sans le Plateau installé!
ASSEMBLAGE DU POUSSOIR
Figure F
Figure G
Auger
Driver
-10-
-23-
w
AVERTISSEMENT
Risque d’enchevêtrement.
Débrancher l’appareil avant
de le nettoyer, le démonter ou l’assembler.
w
AVERTISSEMENT
Risque de décharge électrique.
Ne pas immerger le
cordon, la fiche ou le moteur dans l’eau ou tout autre liquide.
w
WARNING
Entanglement Hazard.
To avoid serious injury do not reach into
grinder inlet. Always use stomper. Do not operate without tray in place.
w
WARNING
Electrical Shock Hazard.
Do not immerse cord, plug, or motor
in water or other liquid.
„Téléchargement du manuel“ signifie que vous devez attendre que le fichier soit complètement chargé avant de pouvoir le lire en ligne. Certains manuels sont très volumineux, et le temps de chargement dépend de la vitesse de votre connexion Internet.
Résumé
11 1 2 Head Release Button 3 7 10 9 8 6 12 4 5 Power Switch Reverse Button Power Light Body/Motor -3- -30- GARANTIE LIMITÉE D’UN AN Cette garantie s’applique aux produits achetés et utilisés aux États-Unis et au Canada. Il s’agit de l’unique garantie explicite pour ce produit et elle remplace toute ...
1. DO NOT use the Grinder without the Tray secured into place. 2. ALWAYS DISCONNECT Grinder from power source before servicing, changing accessories or cleaning the unit. 3. Plug the Grinder into a standard 120 Volt, 60 Hz wall outlet. 4. DO NOT USE the Grinder if the Power Cord, Plug or any other...
Head Release Button CLEANING 1. Unscrew the Ring Nut and remove all parts from the Grinder Head. 2. To remove the Grinder Head, press the Head Release Button and turn the Grinder Head clockwise (Figure A). 3. Wash all parts that come in contact with food in hot soapy water. Rinse with clear water. ...